Lesson 9 - Querying your device data from nautobot
The first thing we need to create is the actual query, and to do that, we can test it from the graphiQL link on the bottom right side of your Nautobot GUI. 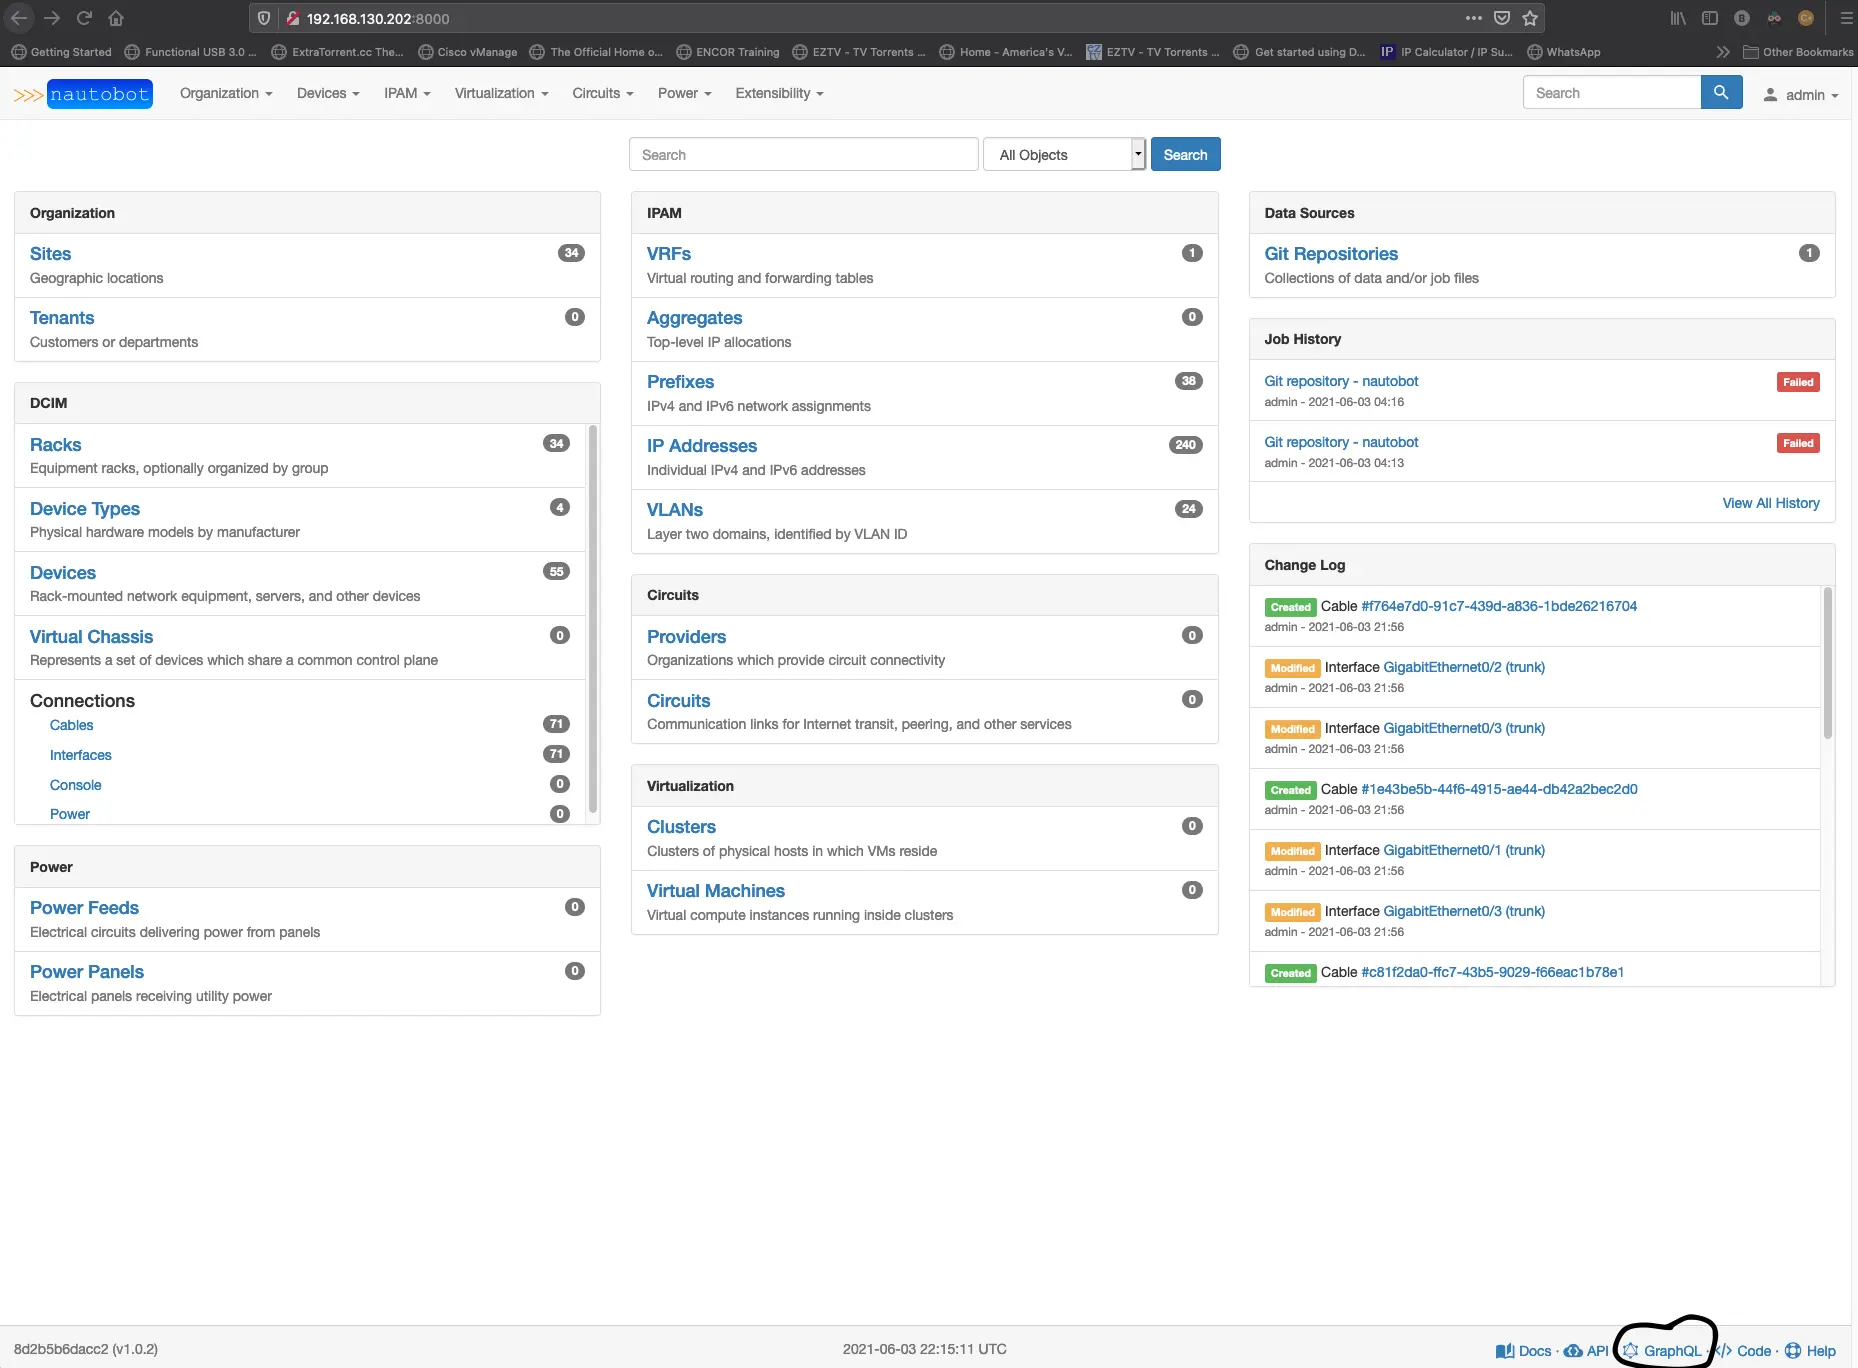
Nautobot should present you with the GraphiQL page after clicking the GraphQL link. 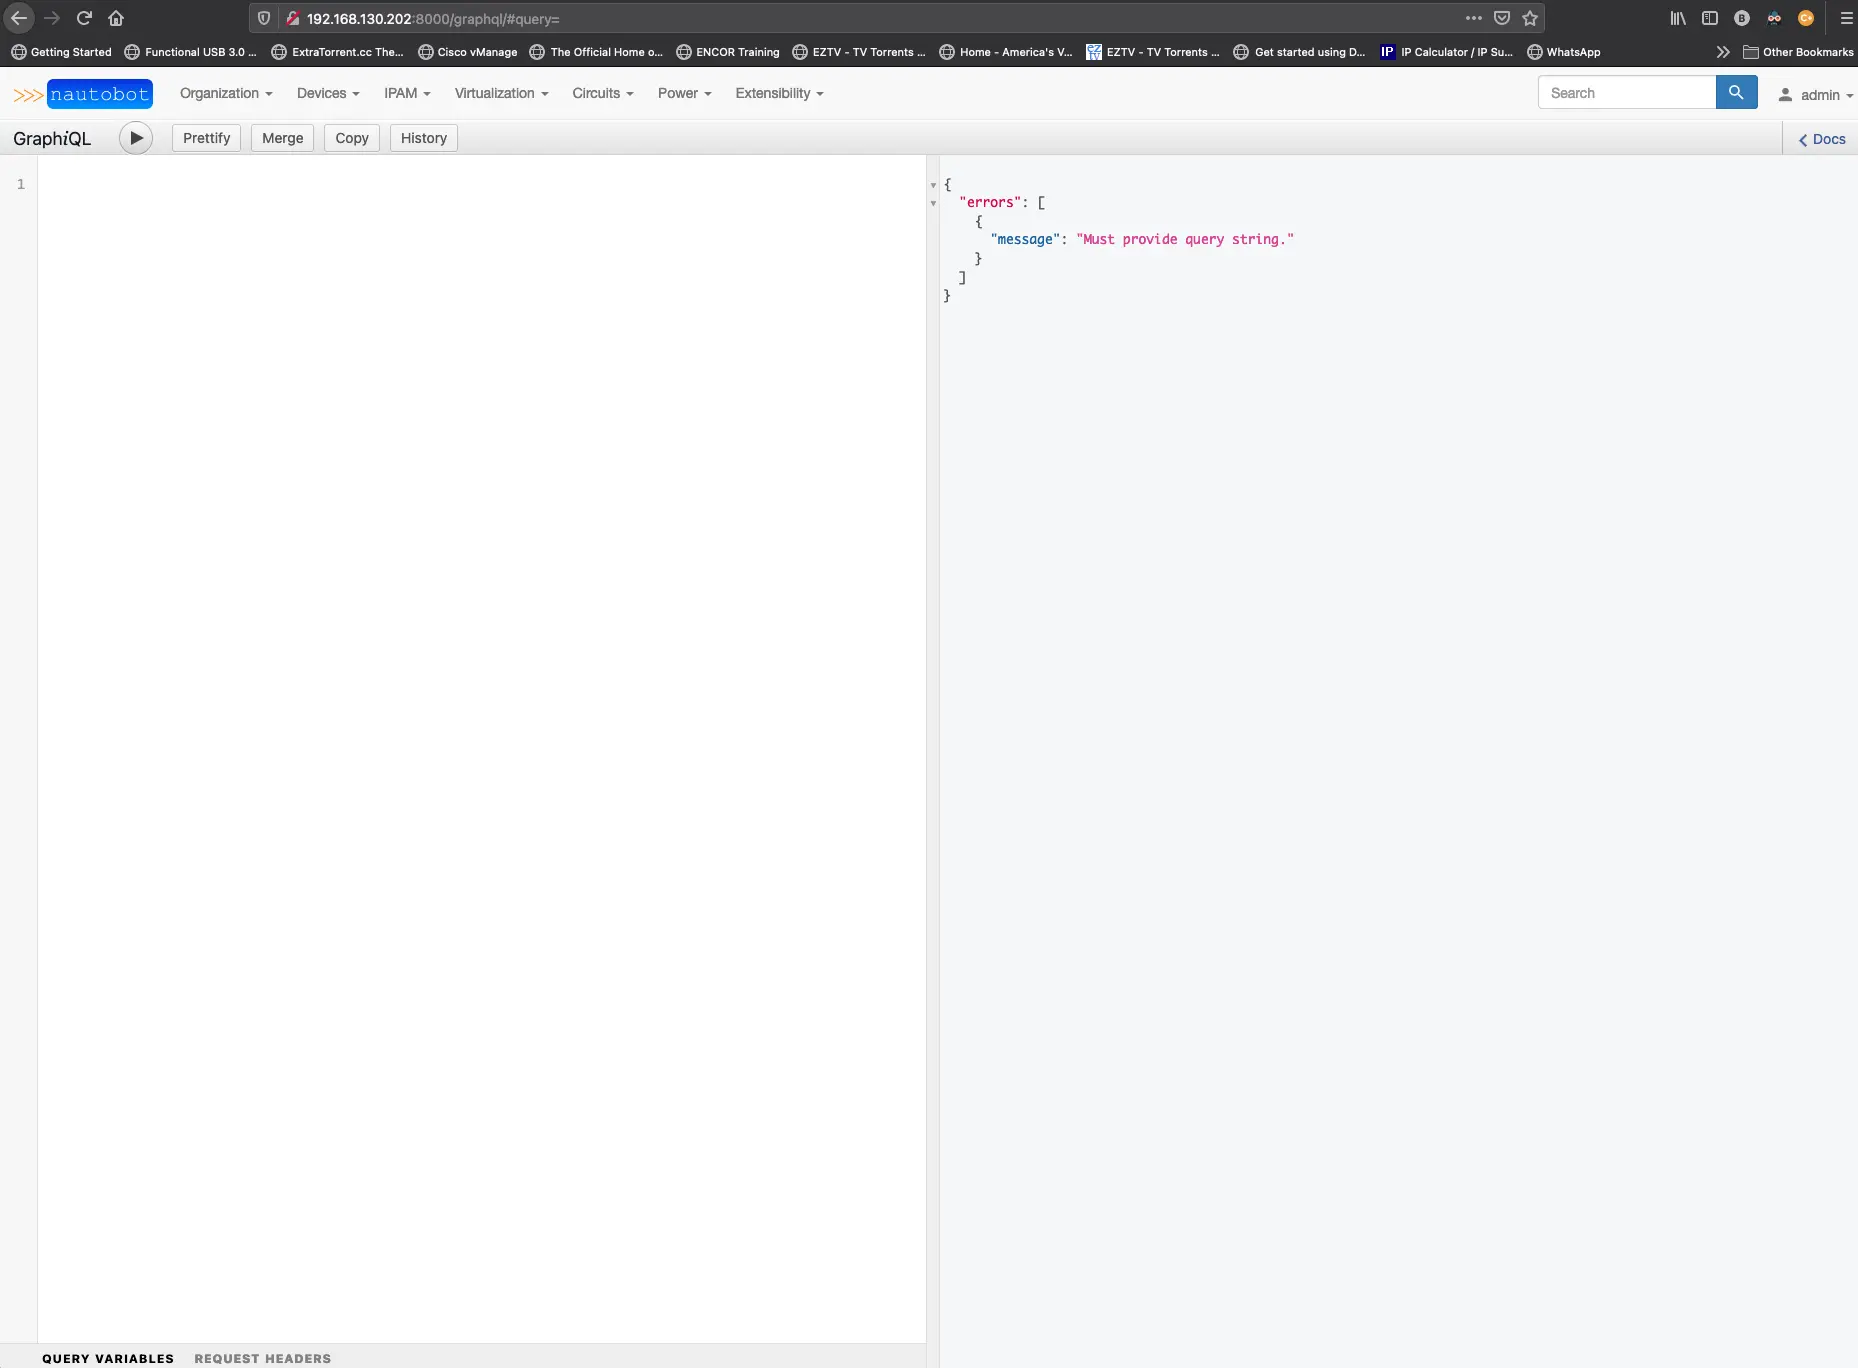
The first thing we will want to do is test out some queries to see what kind of information we can get back. To help me get started, I used this example query and then added or changes things to fit my needs. You can also watch some of these NTC blogs as well to learn a little more about GraphQL.
So let’s try a simple query for the device name. Our query should look like this to start.
1
2
3
4
5
query {
        devices(name: "pod1r1") {
    name
  }
}
The results on the right side of the window should look like this.
1
2
3
4
5
6
7
8
9
{
  "data": {
    "devices": [
      {
        "name": "pod1r1"
      }
    ]
  }
}
Now there is something called aliasing that we can use to transform the names of the categories in the results. So, for example, we want the “name” to read out in the results as inventory_hostname. We add inventory_hostname into our query like this.
1
2
3
4
5
query {
        devices(name: "pod1r1") {
    inventory_hostname:name
  }
}
Now the result should display this way
1
2
3
4
5
6
7
8
9
{
  "data": {
    "devices": [
      {
        "inventory_hostname": "pod1r1"
      }
    ]
  }
}
So with aliasing, we can transform things like hostname into a predefined ansible variable and use it in a later task. So let’s talk about the things we need from Nautobot and recall that what we are attempting to do here is replace the need for host_vars in our Ansible project.
With that in mind, we know we need several key components from each device.
- The device name
- configuration specifics for BGP and OSPF
- Interface configurations for access ports, trunk ports, layer3 ports, VLAN interfaces
- IP addressing
- static routes
- DHCP server configuration
- CDP/LLDP configuration
- AAA configuration
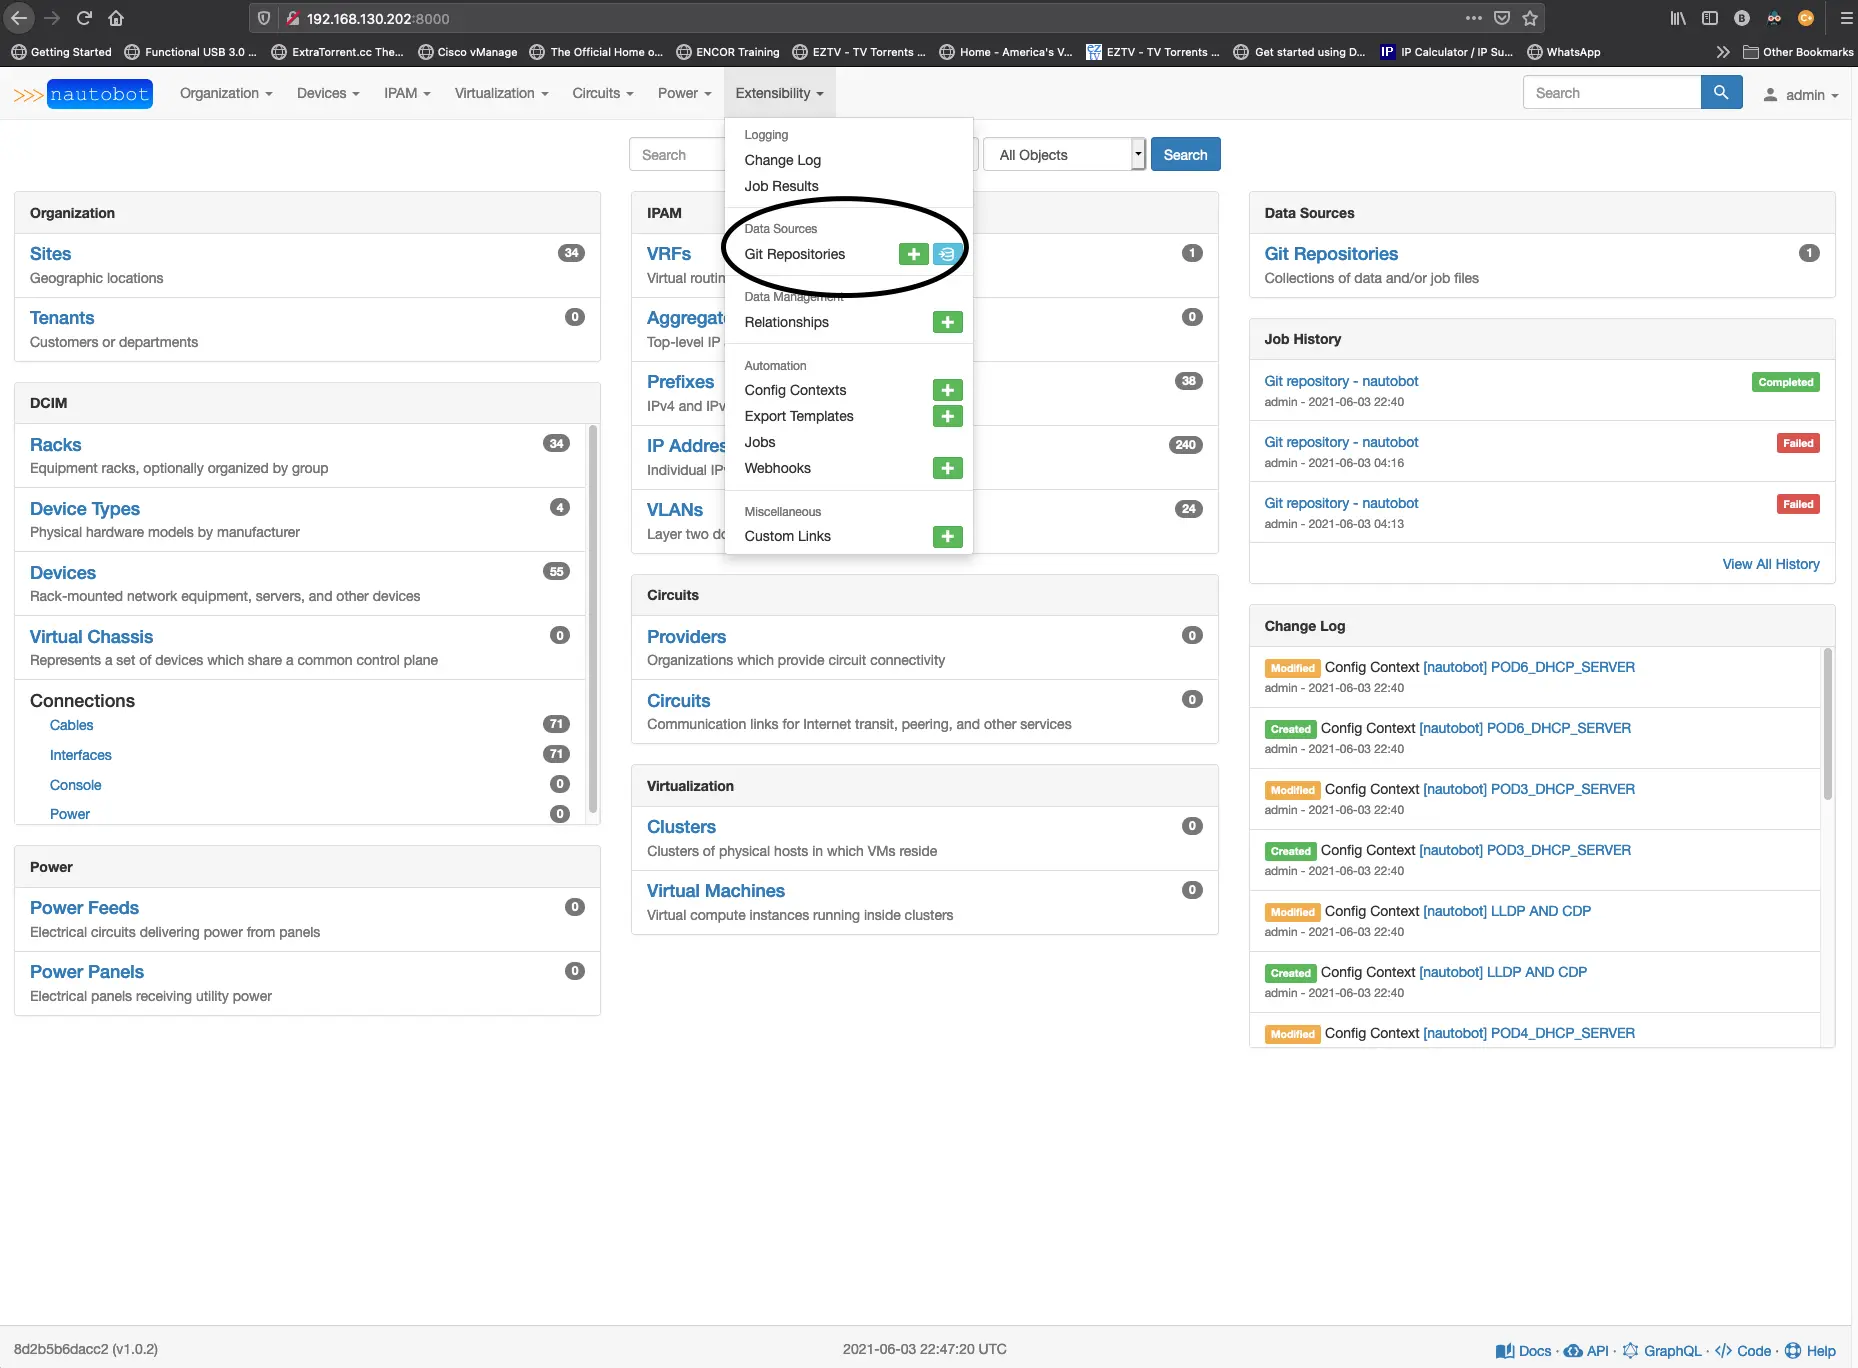
So with that list above, let’s start building out the query to pull this data from Nautobot. The device name we already have, BGP, OSPF, static routes, DHCP server, CDP/LLDP, and AAA configuration, we will need to build into Nautobot using something called config_context. One of the excellent features that Nautobot has provided that differs from Netbox is the ability to sync a GitHub repo with Nautobot. One of the functions for these repos is to manage things like config_context. You create a repo and place a folder named ‘'’config_contexts’’’ and add that repo to your Nautobot from the Extensibility menu on the top right, and from there, click on the add button. 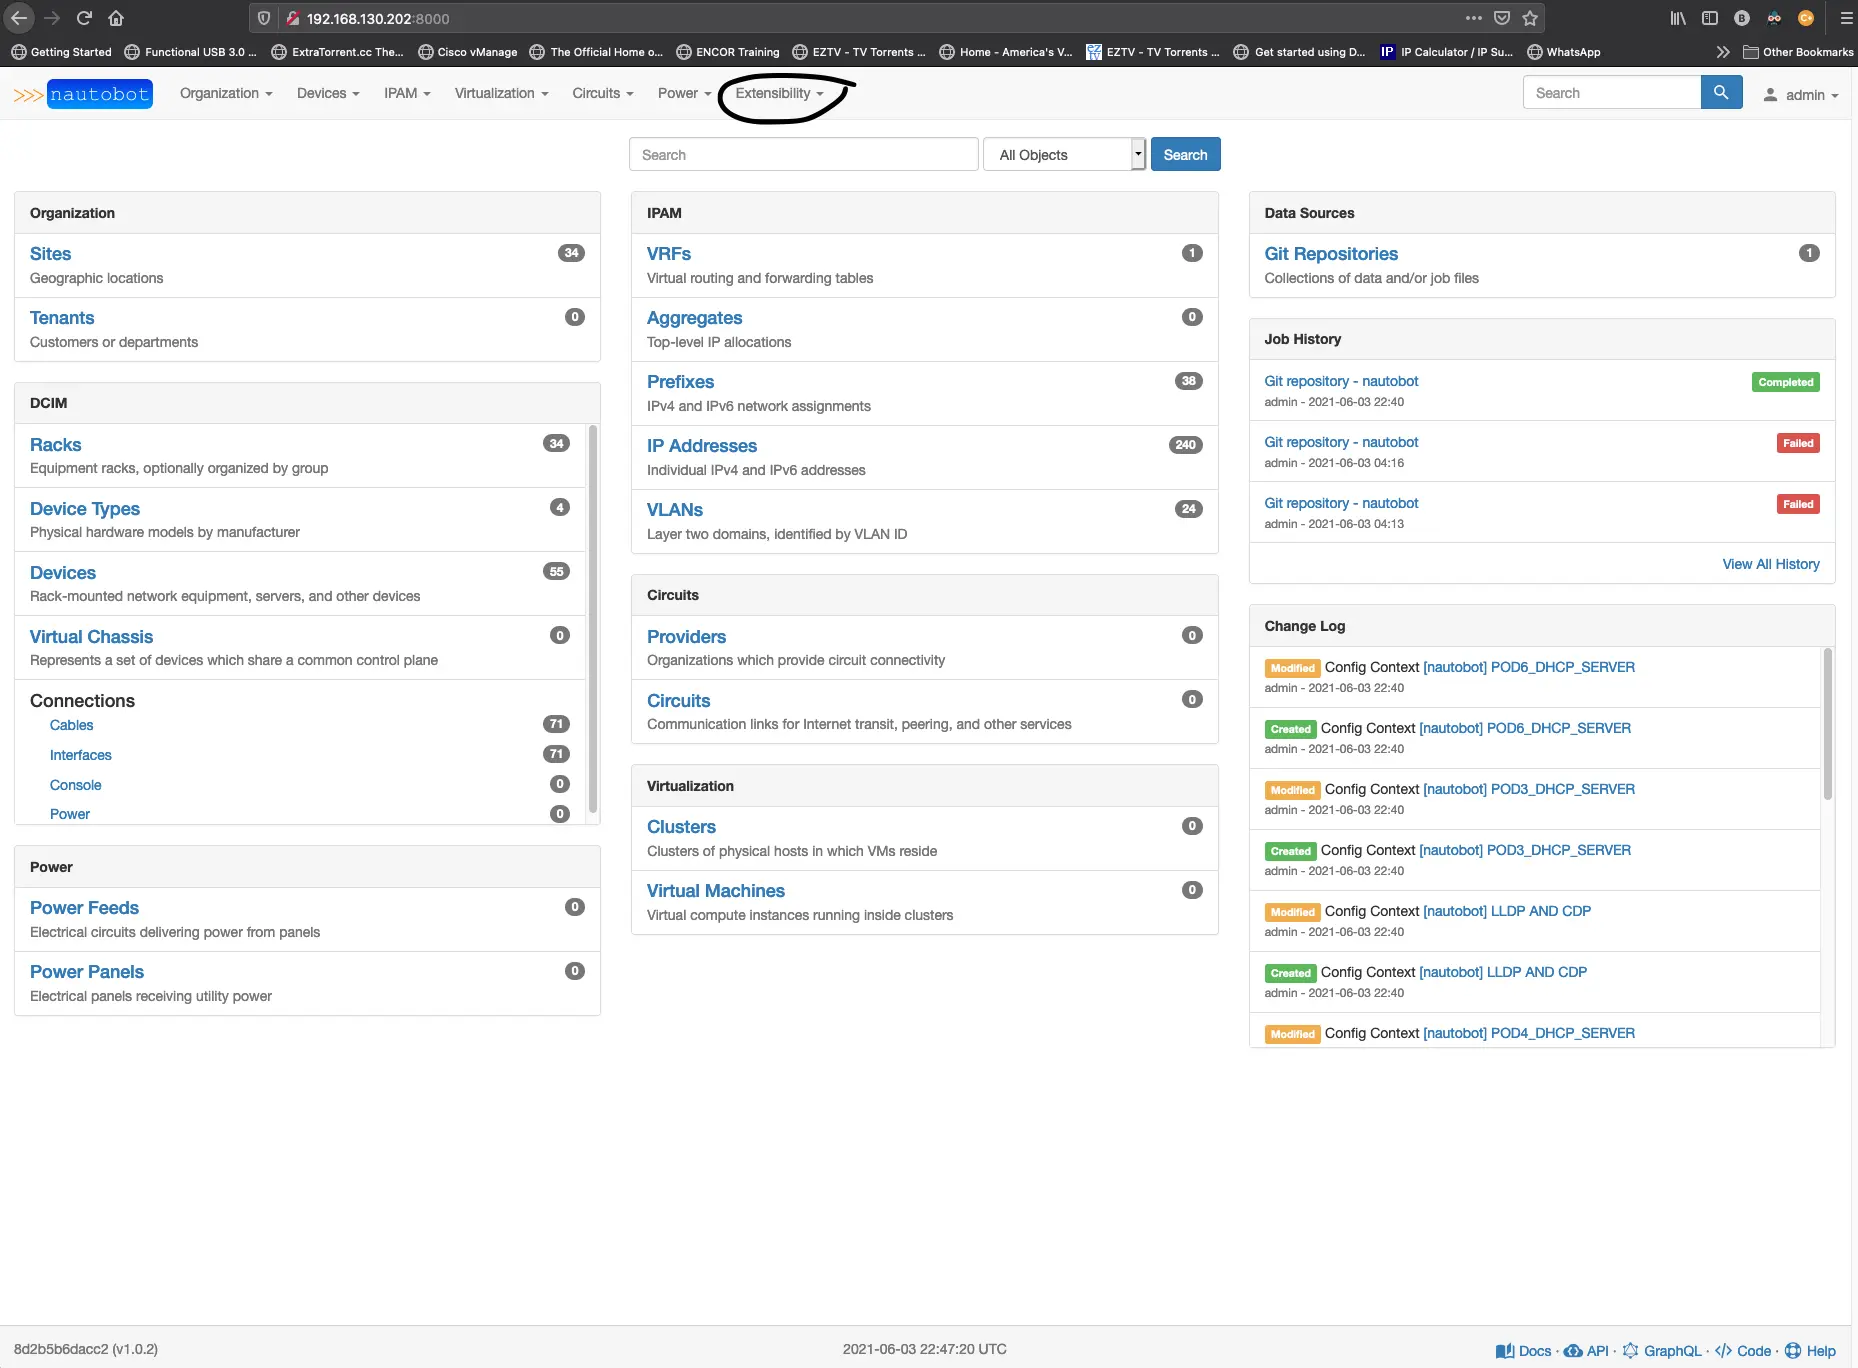
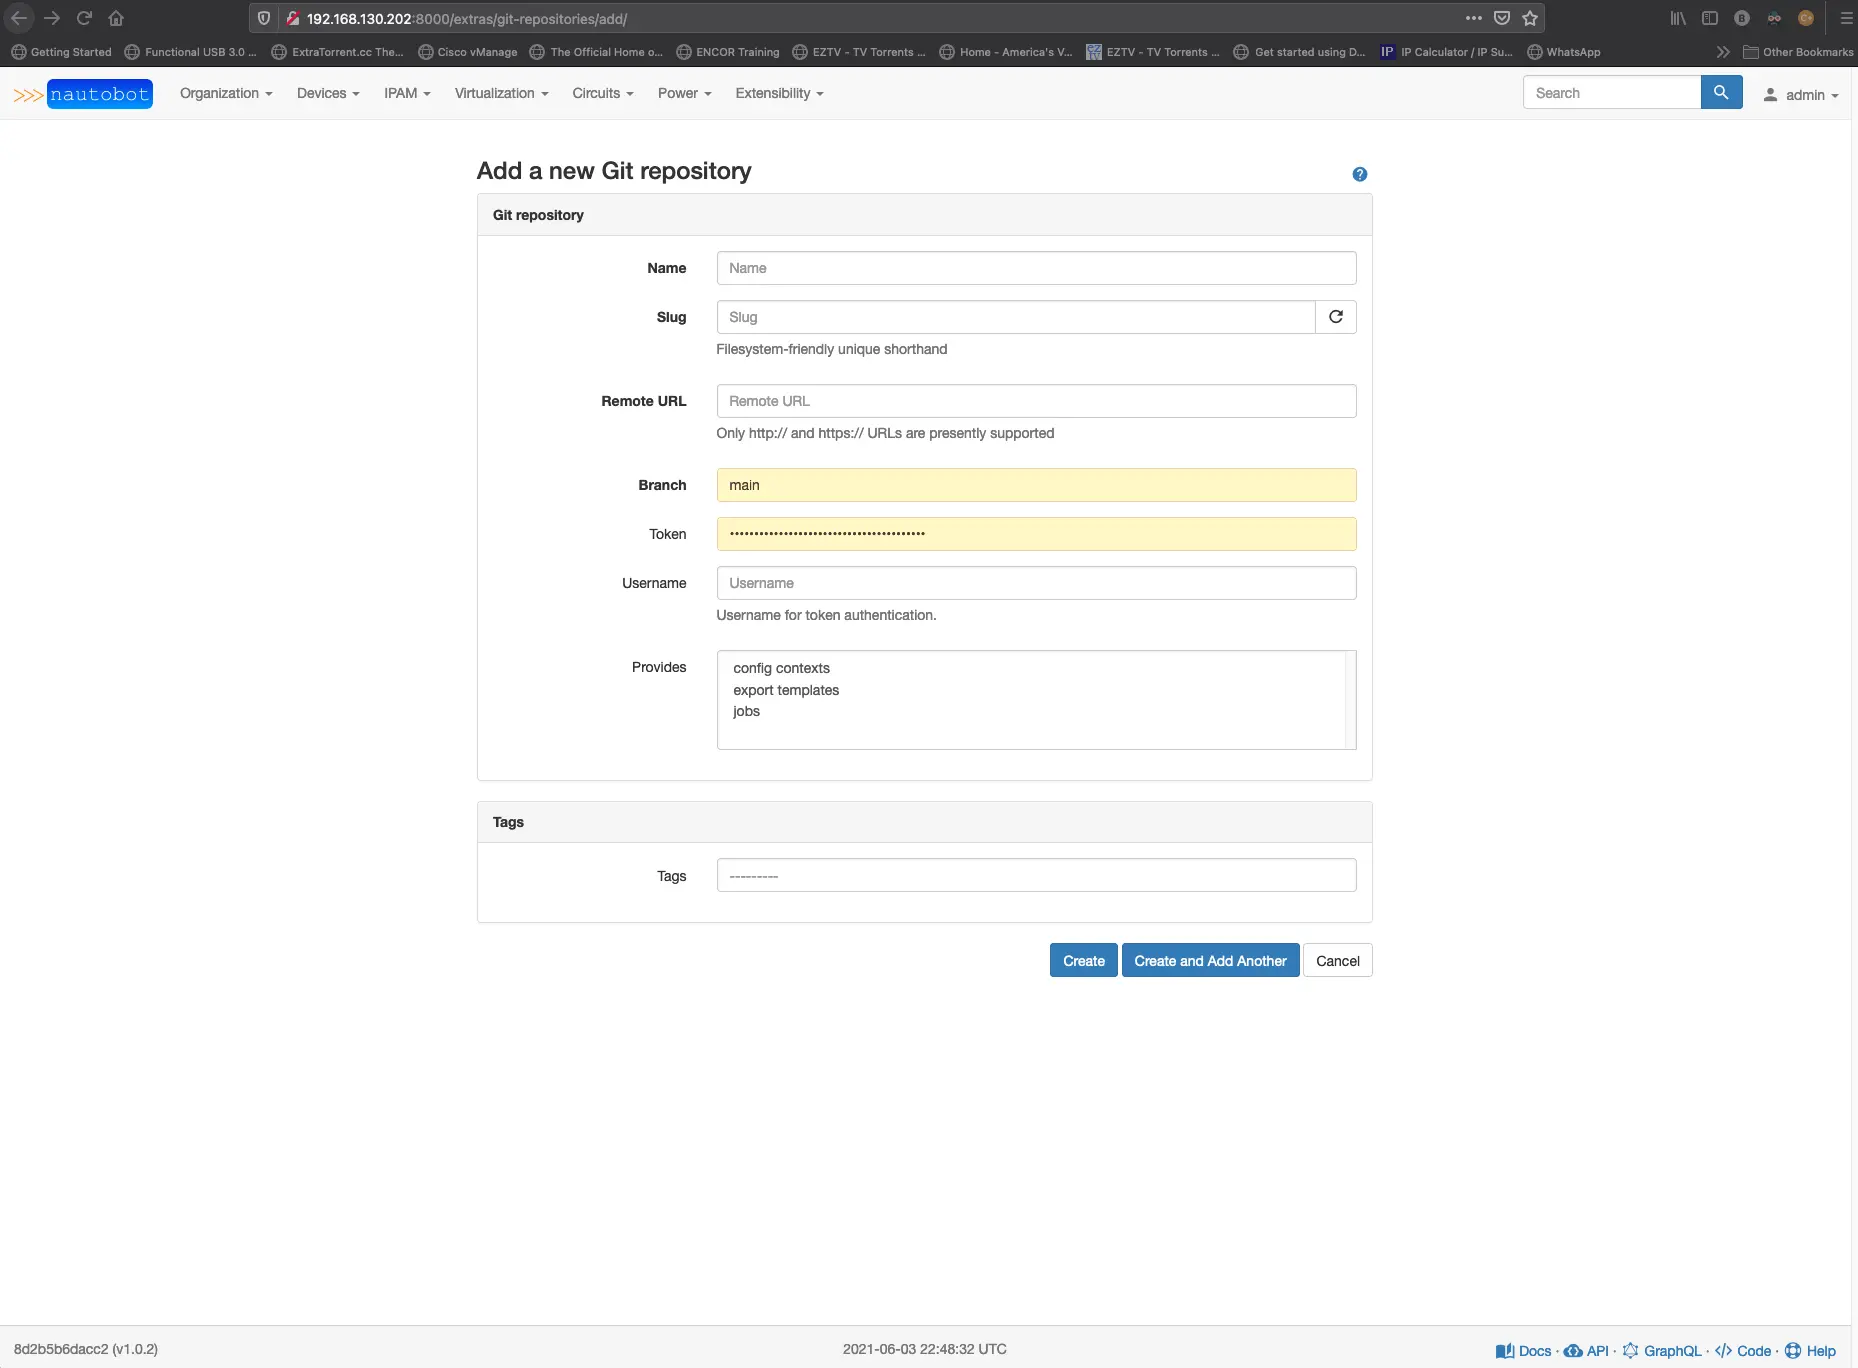
You’ll need to create a git token, and then you’ll want to highlight in the provides section config contexts. If you have done all of that correctly, you should see it successfully sync. Now, let’s start creating some of the files we will want in our config context repo for the OSPF and BGP protocols. Another bonus is that we can manage our config contexts in YAML format instead of the JSON format. Suppose you were to add anything to your Nautobot devices config context from the web app; You need to do that in JSON. Here is where you will find the device config context tab. 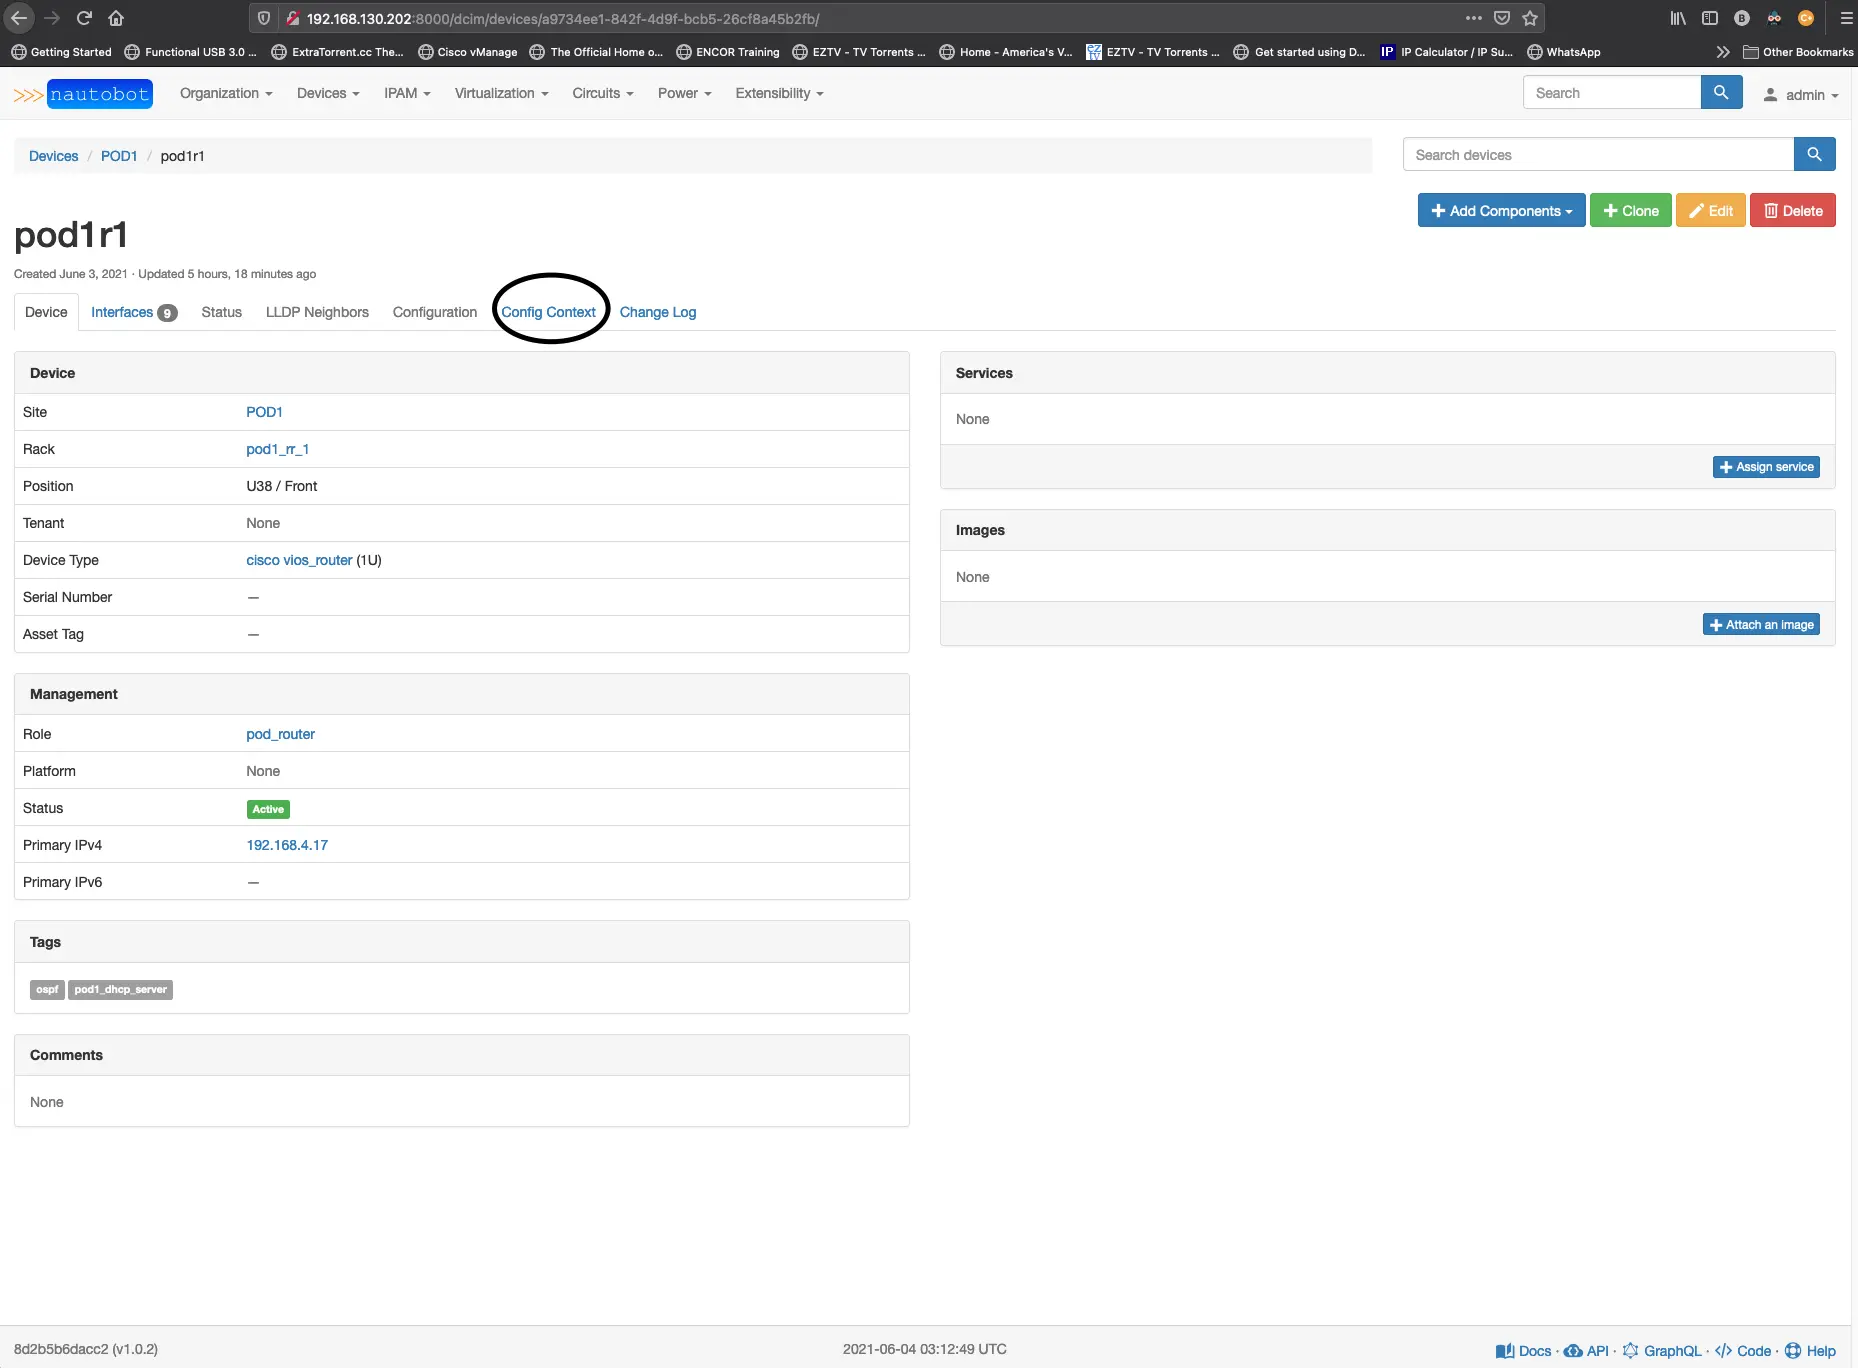
The YAML file for our config_context will need to include some data for Nautobot to recognize it. We use the _metadata:like a tag that tells nautobot to read in variables that we specify for how the config_context should function. The _metadata variables are name, description, and is_active; the weight determines when this should appear and is useful when you might have multiple configurations that might take precedence over another. Last is the role variable; this is used to match devices up based on a specific role it has been assigned, so in our case, the config_context will be applied to any device in the pod_router or pod_l3_switch role. For this to sync to nautobot, your tag must already exist.
We will structure the OSPF variables like you would a standard YAML file; we will want to start all of our files to the left and indent as appropriate. Notice that we are only specifying the OSPF router instance (ID). If we needed to add more to this OSPF configuration, we could do that on the devices config_context tab or by creating another file with something like a router-id or some area configuration by using the same ospf: header and including new variables for the items that would be required. These are stackable and are rendered based on the indentation you are providing.
pod_ospf.yaml
1
2
3
4
5
6
7
8
9
10
_metadata:
  name: POD_OSPF
  weight: 1000
  description: POD ospf configuration
  is_active: true
  roles:
    - slug: pod_router
    - slug: pod_l3_switch
ospf:
  id: 1
Next, we need to include the configuration for the DHCP server we will be running on each router in the pod. We will use a tag to indicate where this configuration should exist.
pod1_dhcp_pool.yaml
1
2
3
4
5
6
7
8
9
10
11
12
13
14
15
16
17
18
19
20
21
22
23
24
25
_metadata:
  name: POD1_DHCP_SERVER
  weight: 1000
  description: POD1 DHCP Server configuration
  is_active: true
  tags:
    - slug: pod1_dhcp_server
dhcp_pool:
  - name: USERS_POOL
    network: "155.1.1.0/26"
    default_router: 155.1.1.1
    lease: 30
    excluded_address: "155.1.1.1 155.1.1.3"

  - name: SERVERS_POOL
    network: "155.1.1.64/26"
    default_router: 155.1.1.65
    lease: 30
    excluded_address: "155.1.1.65 155.1.1.67"

  - name: GUEST_POOL
    network: "155.1.1.128/26"
    default_router: 155.1.1.129
    lease: 30
    excluded_address: "155.1.1.129 155.1.1.131"
Let’s make our static route file. This time we want this to apply to all pods because they are all managed from the same subnet. Instead of a tags field, we will use the site field and list the sites.
mgmt_gateway.yaml
1
2
3
4
5
6
7
8
9
10
11
12
13
14
_metadata:
  name: MGMT_GATEWAY
  weight: 1000
  description: Default route for the MGMT VRF
  is_active: true
  site:
  - POD1
  - POD2
  - POD3
  - POD4
  - POD5
  - POD6
routes:
  mgmt_gateway: 192.168.4.254
Next is the CDP/LLDP configuration; we will use the role variable again to assign this to all devices in each site.
cdp_lldp.yaml
1
2
3
4
5
6
7
8
9
10
11
_metadata:
  name: LLDP AND CDP
  weight: 1000
  description: LLDP AND CDP CONFIGURATION
  is_active: true
  roles:
  - slug: pod_router
  - slug: pod_l3_switch
  - slug: pod_l2_switch
lldp: true
cdp: false
The last one is the AAA configuration and is optional as we did not cover setting up a radius or AAA server in this workshop.
aaa_new_model.yaml
1
2
3
4
5
6
7
8
9
10
11
12
13
14
15
16
_metadata:
  name: AAA_CONFIGURATION
  weight: 1000
  description: AAA configuration for pods
  is_active: true
  roles:
  - slug: pod_router
  - slug: pod_l3_switch
  - slug: pod_l2_switch
aaa-new-model:
  name: RAD_SERVERS
  type: radius
  ip_address: 192.168.4.253
  auth_port: 1812
  acct_port: 1813
  key: cisco
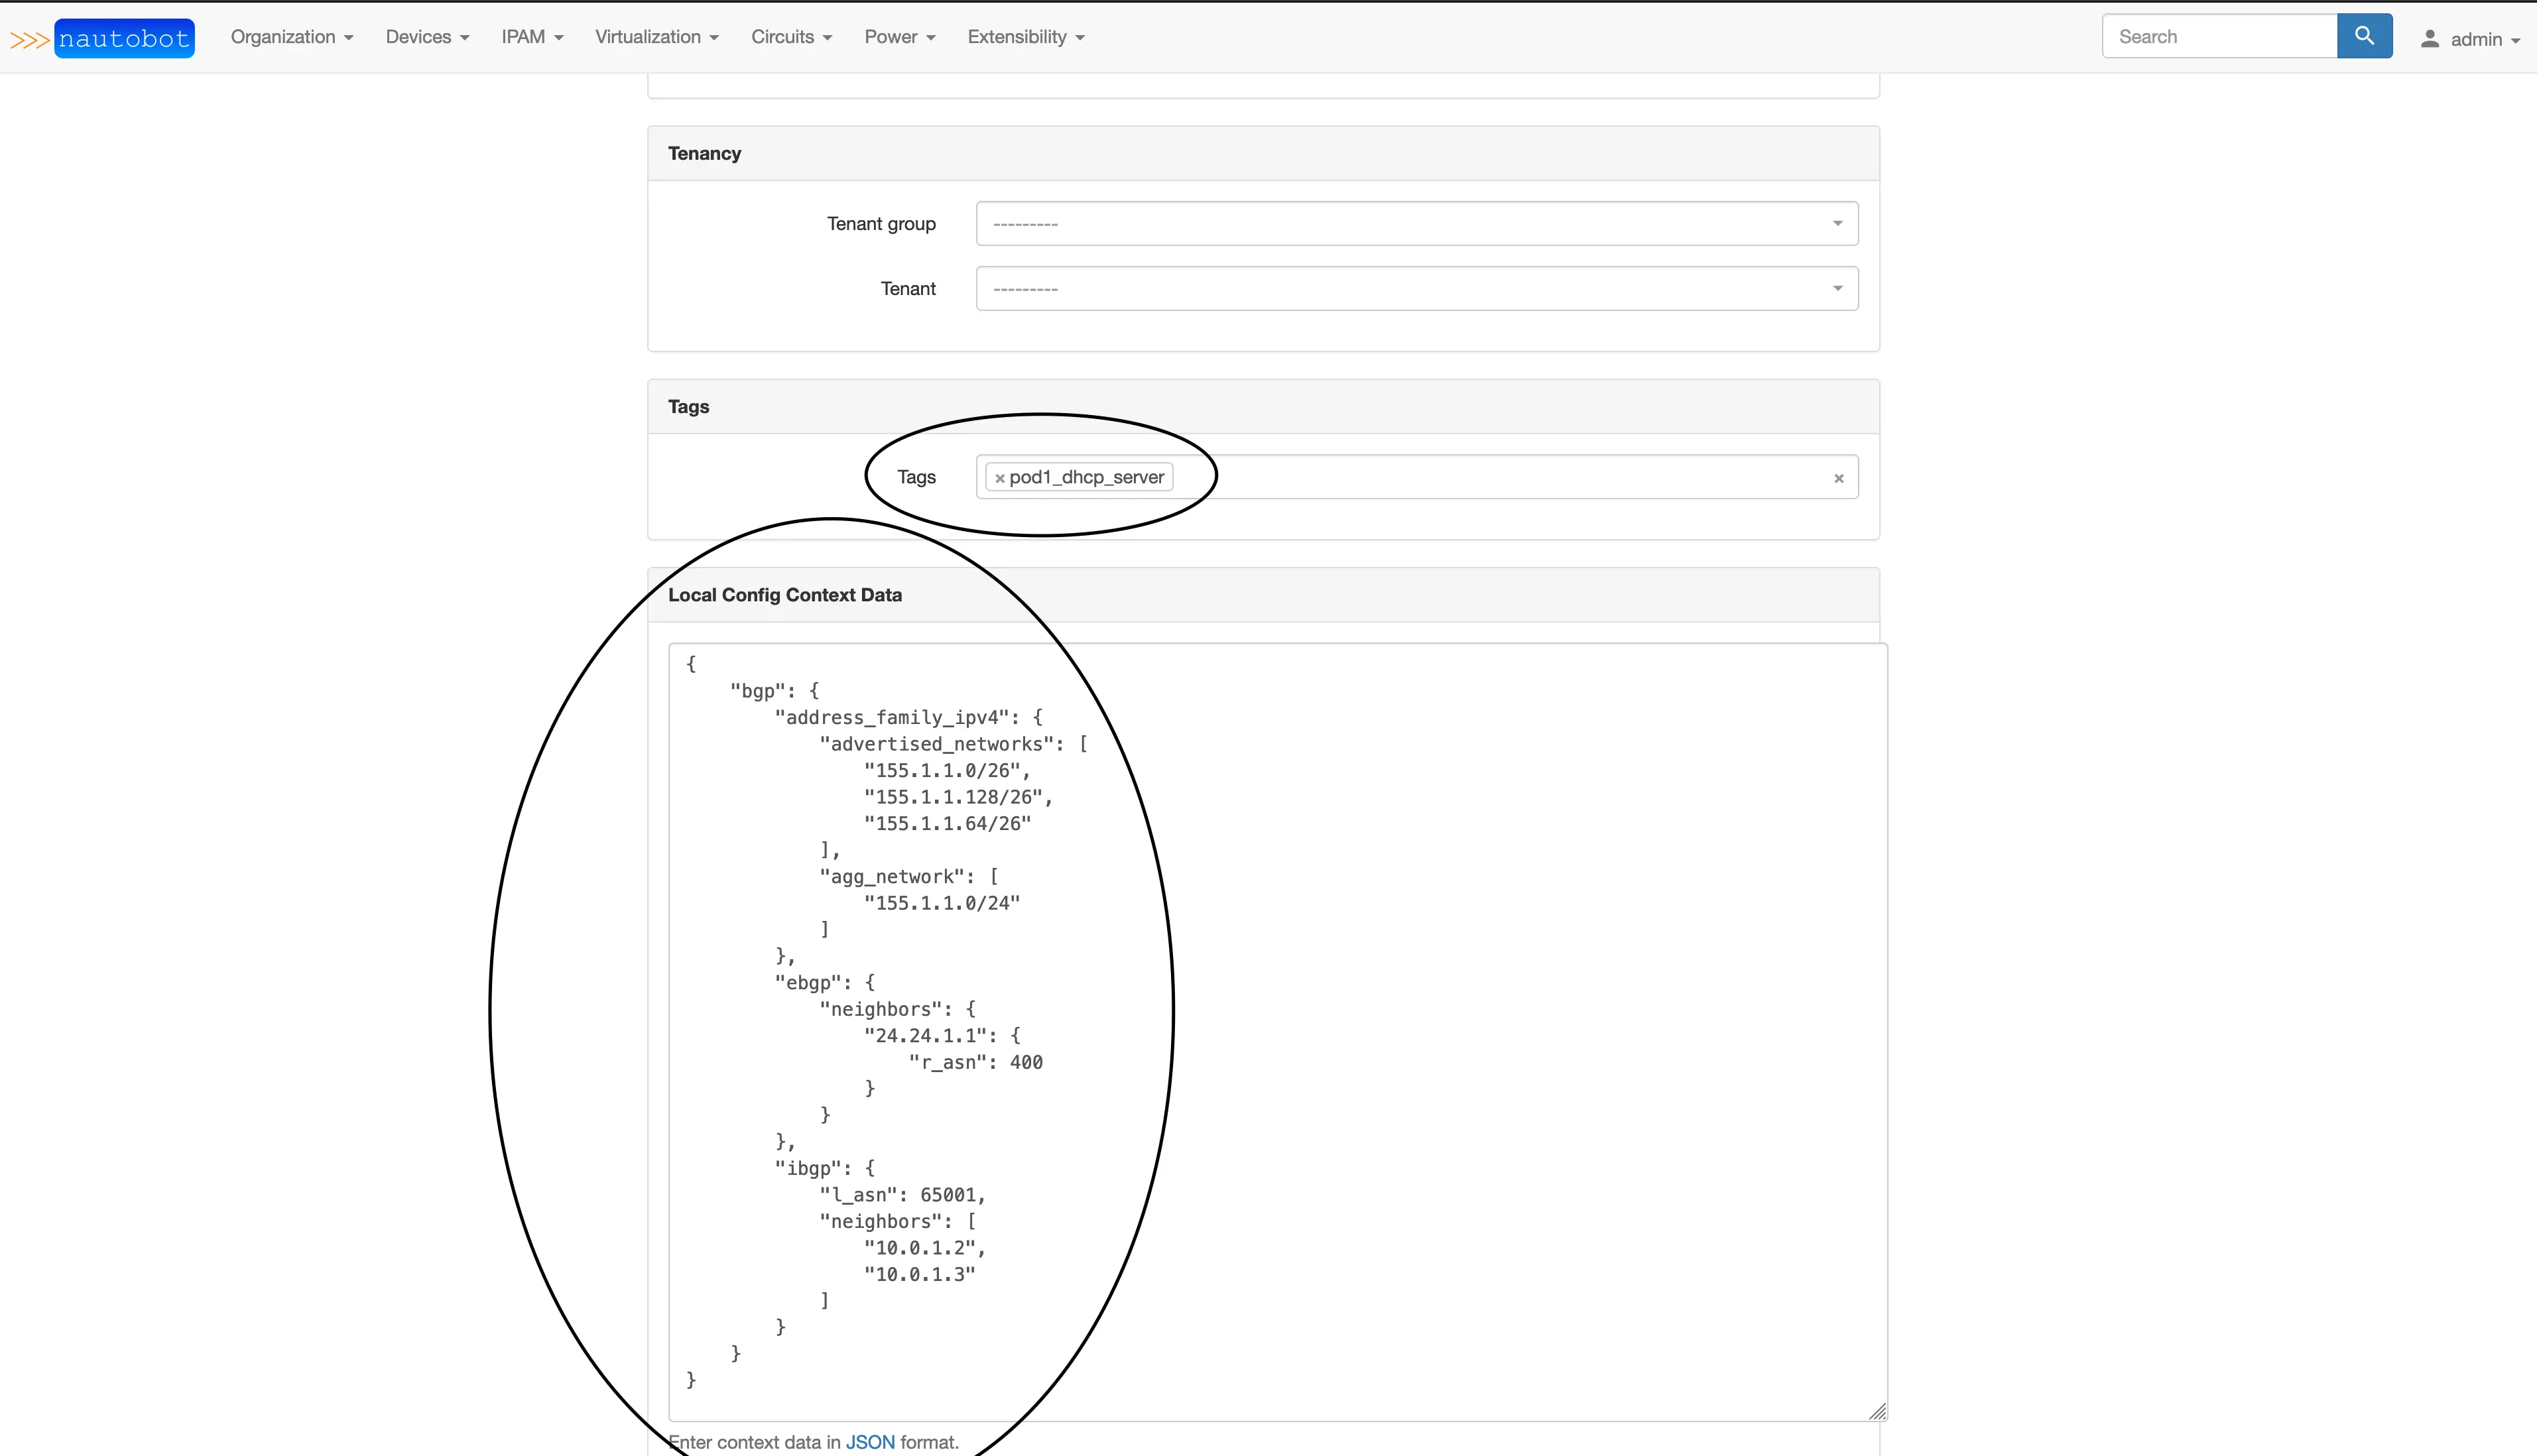
Push these changes to your repo and sync the changes to nautobot. Edit your pod router device and add the tag pod1_dhcp_server and then add the BGP configuration to the local config context box just below the tags box. The data will need to be in JSON format; click update and then click over to the config context tab.
1
2
3
4
5
6
7
8
9
10
11
12
13
14
15
16
17
18
19
20
21
22
23
24
25
26
27
28
{
    "bgp": {
        "address_family_ipv4": {
            "advertised_networks": [
                "155.1.1.0/26",
                "155.1.1.128/26",
                "155.1.1.64/26"
            ],
            "agg_network": [
                "155.1.1.0/24"
            ]
        },
        "ebgp": {
            "neighbors": {
                "24.24.1.1": {
                    "r_asn": 400
                }
            }
        },
        "ibgp": {
            "l_asn": 65001,
            "neighbors": [
                "10.0.1.2",
                "10.0.1.3"
            ]
        }
    }
}
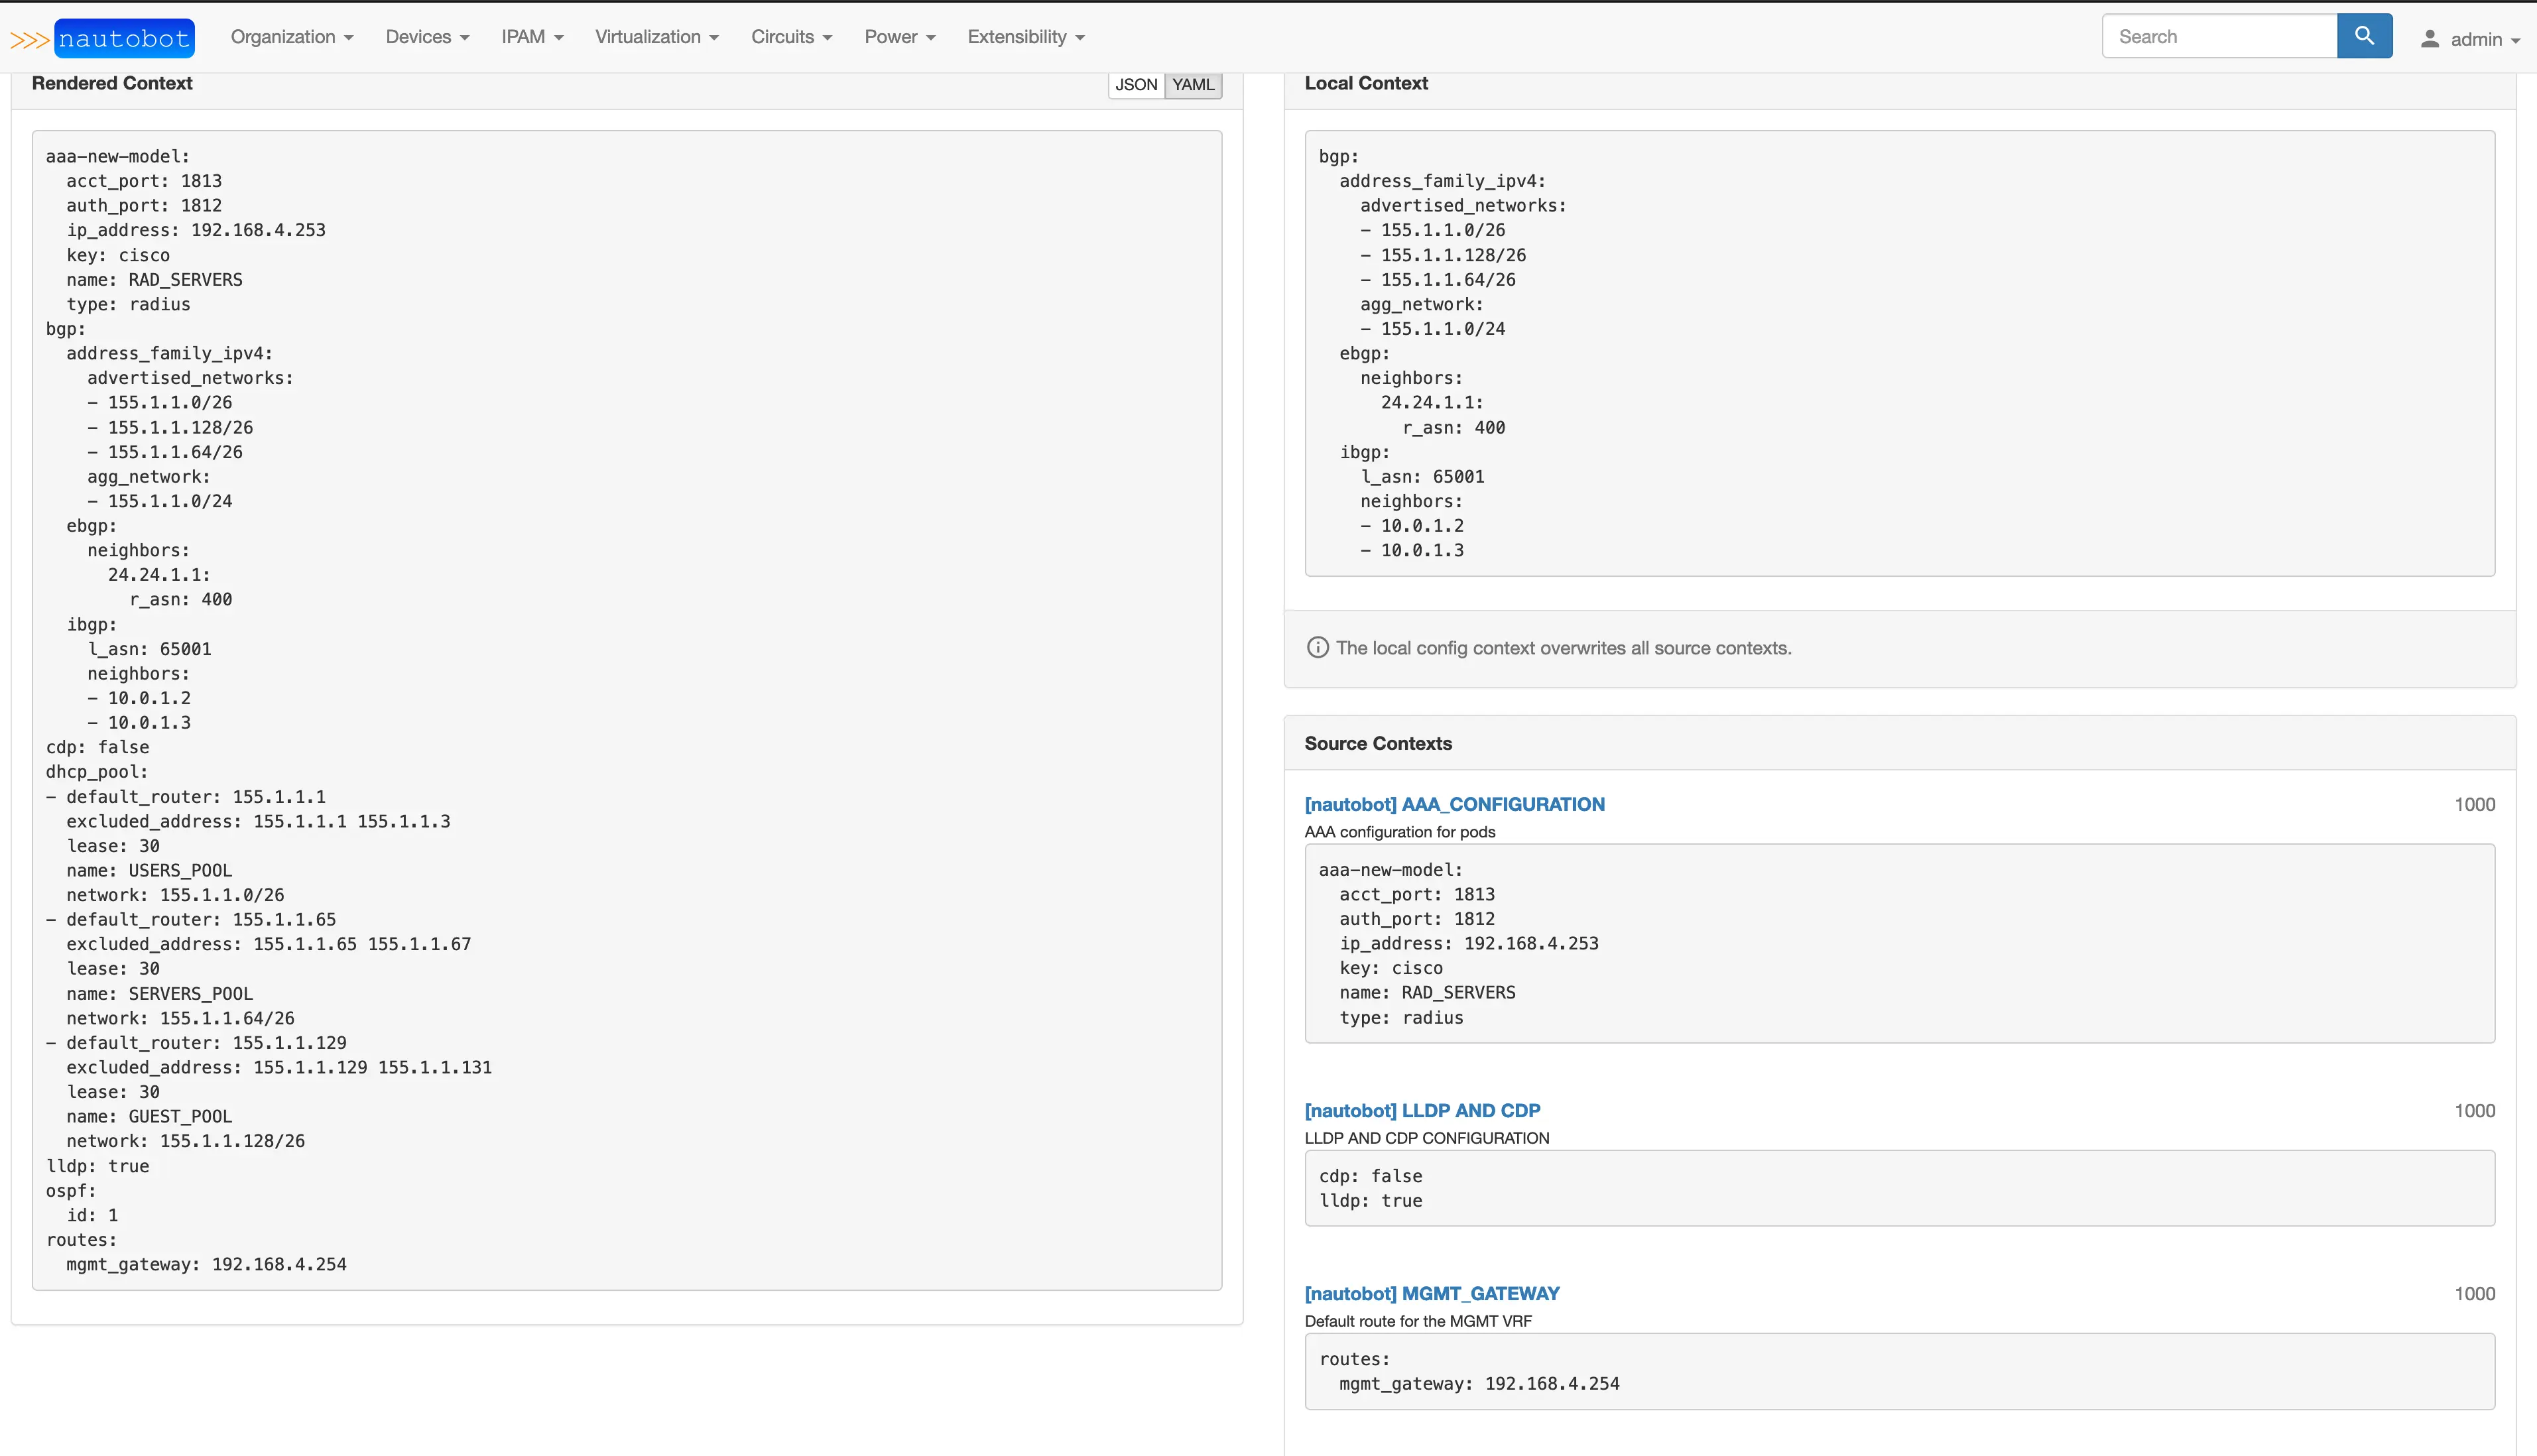
 You should see a rendered configuration, and it can be viewed in JSON or YAML format.
Now that we have all that completed, we should look at our graphql query and see if we can pull all of this config_context stuff into the query. The query should now look like this.
1
2
3
4
5
6
query {
        devices(name: "pod1r1") {
    inventory_hostname:name
    config_context
  }
}
It should render a result like this
1
2
3
4
5
6
7
8
9
10
11
12
13
14
15
16
17
18
19
20
21
22
23
24
25
26
27
28
29
30
31
32
33
34
35
36
37
38
39
40
41
42
43
44
45
46
47
48
49
50
51
52
53
54
55
56
57
58
59
60
61
62
63
64
65
66
67
68
69
70
71
72
73
74
75
{
  "data": {
    "devices": [
      {
        "inventory_hostname": "pod1r1",
        "config_context": {
          "aaa-new-model": {
            "key": "cisco",
            "name": "RAD_SERVERS",
            "type": "radius",
            "acct_port": 1813,
            "auth_port": 1812,
            "ip_address": "192.168.4.253"
          },
          "cdp": false,
          "lldp": true,
          "routes": {
            "mgmt_gateway": "192.168.4.254"
          },
          "dhcp_pool": [
            {
              "name": "USERS_POOL",
              "lease": 30,
              "network": "155.1.1.0/26",
              "default_router": "155.1.1.1",
              "excluded_address": "155.1.1.1 155.1.1.3"
            },
            {
              "name": "SERVERS_POOL",
              "lease": 30,
              "network": "155.1.1.64/26",
              "default_router": "155.1.1.65",
              "excluded_address": "155.1.1.65 155.1.1.67"
            },
            {
              "name": "GUEST_POOL",
              "lease": 30,
              "network": "155.1.1.128/26",
              "default_router": "155.1.1.129",
              "excluded_address": "155.1.1.129 155.1.1.131"
            }
          ],
          "ospf": {
            "id": 1
          },
          "bgp": {
            "ebgp": {
              "neighbors": {
                "24.24.1.1": {
                  "r_asn": 400
                }
              }
            },
            "ibgp": {
              "l_asn": 65001,
              "neighbors": [
                "10.0.1.2",
                "10.0.1.3"
              ]
            },
            "address_family_ipv4": {
              "agg_network": [
                "155.1.1.0/24"
              ],
              "advertised_networks": [
                "155.1.1.0/26",
                "155.1.1.128/26",
                "155.1.1.64/26"
              ]
            }
          }
        }
      }
    ]
  }
Excellent, we now have all of the data similarly rendered with the specific device as it would appear in a file under a host_var folder. Let’s add in all of the fields that we will require to build out the configuration.
``graphql query { devices(name: “pod1r1”) { inventory_hostname:name config_context primary_ip4 { address } device_role { name } platform { name slug manufacturer { name } napalm_driver } site{ slug vlans{ name vid } } interfaces { name description enabled label ip_addresses { address tags { slug } } vrrp_group: cf_vrrp_group vrrp_description: cf_vrrp_description vrrp_priority: cf_vrrp_priority vrrp_primary_ip: cf_vrrp_primary_ip dhcp_helper: cf_dhcp_helper lag { name } tagged_vlans { vid } untagged_vlan { vid } tagged_vlans { vid } tags { slug } connected_interface{ device { name } name } } } }
1
2
3
4
5
6
7
8
9
10
11
12
13
14
15
16
17
18
19
20
21
22
23
24
25
26
27
28
29
30
31
32
33
34
35
36
37
38
39
40
41
42
43
44
45
46
47
48
49
50
51
52
53
54
55
56
57
58
59
60
61
62
63
64
65
66
67
68
69
70
71
72
73
74
75
76
77
78
79
80
81
82
83
84
85
86
87
88
89
90
91
92
93
94
95
96
97
98
99
100
101
102
103
104
105
106
107
108
109
110
111
112
113
114
115
116
117
118
119
120
121
122
123
124
125
126
127
128
129
130
131
132
133
134
135
136
137
138
139
140
141
142
143
144
145
146
147
148
149
150
151
152
153
154
155
156
157
158
159
160
161
162
163
164
165
166
167
168
169
170
171
172
173
174
175
176
177
178
179
180
181
182
183
184
185
186
187
188
189
190
191
192
193
194
195
196
197
198
199
200
201
202
203
204
205
206
207
208
209
210
211
212
213
214
215
216
217
218
219
220
221
222
223
224
225
226
227
228
229
230
231
232
233
234
235
236
237
238
239
240
241
242
243
244
245
246
247
248
249
250
251
252
253
254
255
256
257
258
259
260
261
262
263
264
265
266
267
268
269
270
271
272
273
274
275
276
277
278
279
280
281
282
283
284
285
286
287
288
289
290
291
292
293
294
295
296
297
298
299
300
301
302
303
304
305
306
307
308
309
310
311
312
313
314
Notice that we have added several new fields to the query. Starting at the top after the device name, we need the config_context data, the role of the device, the VLANs assigned to the site, and the interface configuration details. Let's run this query on our graphiQL interface and make sure the results returned are what we expect to see and that it works. If you type out the query yourself, you will also notice that there is autocomplete provided by the interface, which can be helpful to figure out what works in the query and what does not. Also, on the right side, a Docs button can be used to lookup fields you are interested in and access them from a query perspective. Alright, let's look at the results of our query.

```json
{
  "data": {
    "devices": [
      {
        "inventory_hostname": "pod1r1",
        "config_context": {
        "aaa-new-model": {
            "key": "cisco",
            "name": "RAD_SERVERS",
            "type": "radius",
            "acct_port": 1813,
            "auth_port": 1812,
            "ip_address": "192.168.4.253"
        },
        "cdp": false,
        "lldp": true,
        "routes": {
            "mgmt_gateway": "192.168.4.254"
        },
        "dhcp_pool": [
            {
                "name": "USERS_POOL",
                "lease": 30,
                "network": "155.1.1.0/26",
                "default_router": "155.1.1.1",
                "excluded_address": "155.1.1.1 155.1.1.3"
            },
            {
                "name": "SERVERS_POOL",
                "lease": 30,
                "network": "155.1.1.64/26",
                "default_router": "155.1.1.65",
                "excluded_address": "155.1.1.65 155.1.1.67"
            },
            {
                "name": "GUEST_POOL",
                "lease": 30,
                "network": "155.1.1.128/26",
                "default_router": "155.1.1.129",
                "excluded_address": "155.1.1.129 155.1.1.131"
            }
        ],
        "ospf": {
            "id": 1
        },
        "bgp": {
            "ebgp": {
                "neighbors": {
                    "24.24.1.1": {
                        "r_asn": 400
                    }
                }
            },
            "ibgp": {
                "l_asn": 65001,
                "neighbors": [
                    "10.0.1.2",
                    "10.0.1.3"
                ]
            },
            "address_family_ipv4": {
                "agg_network": [
                    "155.1.1.0/24"
                ],
                "advertised_networks": [
                    "155.1.1.0/26",
                    "155.1.1.128/26",
                    "155.1.1.64/26"
                ]
            }
        }
    },
    "device_role": {
        "slug": "pod_router"
    },
    "site": {
        "slug": "pod1",
        "vlans": [
            {
                "name": "USERS",
                "vid": 300
            },
            {
                "name": "SERVERS",
                "vid": 350
            },
            {
                "name": "GUESTS",
                "vid": 400
            },
            {
                "name": "NATIVE_VLAN",
                "vid": 666
            }
        ],
        "tags": []
    },
    "interfaces": [
        {
            "name": "GigabitEthernet0/0",
            "description": "UPLINK TO INTERNET PROVIDER",
            "enabled": true,
            "label": "layer3",
            "ip_addresses": [
                {
                    "address": "24.24.1.2/24",
                    "tags": []
                }
            ],
            "vrrp_group": null,
            "vrrp_description": null,
            "vrrp_priority": null,
            "vrrp_primary_ip": null,
            "dhcp_helper": null,
            "lag": null,
            "tagged_vlans": [],
            "untagged_vlan": null,
            "tags": [],
            "connected_interface": {
                "device": {
                    "name": "cloud_router"
                },
                "name": "GigabitEthernet1"
            }
        },
        {
            "name": "GigabitEthernet0/1",
            "description": "DOWNLINK POD1SW1",
            "enabled": true,
            "label": "layer3",
            "ip_addresses": [
                {
                    "address": "10.10.1.0/31",
                    "tags": [
                        {
                            "slug": "ospf_area_0"
                        },
                        {
                            "slug": "p2p"
                        }
                    ]
                }
            ],
            "vrrp_group": null,
            "vrrp_description": null,
            "vrrp_priority": null,
            "vrrp_primary_ip": null,
            "dhcp_helper": null,
            "lag": null,
            "tagged_vlans": [],
            "untagged_vlan": null,
            "tags": [],
            "connected_interface": {
                "device": {
                    "name": "pod1sw1"
                },
                "name": "GigabitEthernet0/0"
            }
        },
        {
            "name": "GigabitEthernet0/2",
            "description": "DOWNLINK POD1SW2",
            "enabled": true,
            "label": "layer3",
            "ip_addresses": [
                {
                    "address": "10.10.1.2/31",
                    "tags": [
                        {
                            "slug": "ospf_area_0"
                        },
                        {
                            "slug": "p2p"
                        }
                    ]
                }
            ],
            "vrrp_group": null,
            "vrrp_description": null,
            "vrrp_priority": null,
            "vrrp_primary_ip": null,
            "dhcp_helper": null,
            "lag": null,
            "tagged_vlans": [],
            "untagged_vlan": null,
            "tags": [],
            "connected_interface": {
                "device": {
                    "name": "pod1sw2"
                },
                "name": "GigabitEthernet0/0"
            }
        },
        {
            "name": "GigabitEthernet0/3",
            "description": "",
            "enabled": false,
            "label": "",
            "ip_addresses": [],
            "vrrp_group": null,
            "vrrp_description": null,
            "vrrp_priority": null,
            "vrrp_primary_ip": null,
            "dhcp_helper": null,
            "lag": null,
            "tagged_vlans": [],
            "untagged_vlan": null,
            "tags": [],
            "connected_interface": null
        },
        {
            "name": "GigabitEthernet0/4",
            "description": "",
            "enabled": false,
            "label": "",
            "ip_addresses": [],
            "vrrp_group": null,
            "vrrp_description": null,
            "vrrp_priority": null,
            "vrrp_primary_ip": null,
            "dhcp_helper": null,
            "lag": null,
            "tagged_vlans": [],
            "untagged_vlan": null,
            "tags": [],
            "connected_interface": null
        },
        {
            "name": "GigabitEthernet0/5",
            "description": "",
            "enabled": false,
            "label": "",
            "ip_addresses": [],
            "vrrp_group": null,
            "vrrp_description": null,
            "vrrp_priority": null,
            "vrrp_primary_ip": null,
            "dhcp_helper": null,
            "lag": null,
            "tagged_vlans": [],
            "untagged_vlan": null,
            "tags": [],
            "connected_interface": null
        },
        {
            "name": "GigabitEthernet0/6",
            "description": "",
            "enabled": false,
            "label": "",
            "ip_addresses": [],
            "vrrp_group": null,
            "vrrp_description": null,
            "vrrp_priority": null,
            "vrrp_primary_ip": null,
            "dhcp_helper": null,
            "lag": null,
            "tagged_vlans": [],
            "untagged_vlan": null,
            "tags": [],
            "connected_interface": null
        },
        {
            "name": "GigabitEthernet0/7",
            "description": "MGMT-INTERFACE",
            "enabled": true,
            "label": "mgmt",
            "ip_addresses": [
                {
                    "address": "192.168.4.17/24",
                    "tags": []
                }
            ],
            "vrrp_group": null,
            "vrrp_description": null,
            "vrrp_priority": null,
            "vrrp_primary_ip": null,
            "dhcp_helper": null,
            "lag": null,
            "tagged_vlans": [],
            "untagged_vlan": null,
            "tags": [],
            "connected_interface": null
        },
        {
            "name": "Loopback0",
            "description": "iBGP LOOPBACK",
            "enabled": true,
            "label": "",
            "ip_addresses": [
                {
                    "address": "10.0.1.1/32",
                    "tags": [
                        {
                            "slug": "ospf_area_0"
                        }
                    ]
                }
            ],
            "vrrp_group": null,
            "vrrp_description": null,
            "vrrp_priority": null,
            "vrrp_primary_ip": null,
            "dhcp_helper": null,
            "lag": null,
            "tagged_vlans": [],
            "untagged_vlan": null,
            "tags": [],
            "connected_interface": null
        }
    ]
}
Perfect! I believe we have enough to start building out our Jinja templates based on this query, but first, let’s look at using Ansible and the Nautobot module to retrieve this data from a playbook.
We will want to create a new folder under our roles folder called nautobot_query, along with two sub-folders called tasks and vars.
In the tasks folder create a file called main.yaml and build out the task similar to the following:
roles/nautobot_query/tasks/main.yaml
1
2
3
4
5
6
7
8
9
10
11
12
13
14
15
16
17
- name: Get data from Nautobot
  networktocode.nautobot.query_graphql:
    url: ""
    token: ""
    validate_certs: False
    query: ""
  register: "nb_devices"

- name: Create directory if none exist
  file:
    path: querys
    state: directory

- name: Print to file
  copy:
    content: ""
    dest: "querys/.json"
We will use the nautobot query_graphql plugin. The URL, token, and validate_certs settings should be the same as what we used in Section 7. We will reference our query_string as a variable and place that file in the vars folder we created earlier. The results will be registered as a new variable called nb_devices which will create a new file that shows the query results so that we can reference them when building out the Jinja templates.
Create a new file under the vars folder called main.yaml and place the working query from the GraphiQL interface with a couple of modifications. When testing in the GraphiQL interface, we only looked at a single device, and with the ansible tasks we need to be able to accept a variable for the device, we will also need to add query_string: | to the request so that the nautobot_graphql plugin can read it. On the query itself, just replace the device we used to test (pod1r1) with a variable "".
roles/nautobot_query/vars/main.yaml
1
2
3
4
5
6
7
8
9
10
11
12
13
14
15
16
17
18
19
20
21
22
23
24
25
26
27
28
29
30
31
32
33
34
35
36
37
38
39
40
41
42
43
44
45
46
47
48
49
50
51
52
53
54
55
query_string: |
        query {
        devices(name: "") {
        inventory_hostname:name
        config_context
        device_role {
                slug
                }
        site{
        slug
        vlans{
            name
            vid
        }
        }
        interfaces {
                name
                description
                enabled
                label
                ip_addresses {
                    address
                    tags {
                    slug
                    }
                }
                vrrp_group: cf_vrrp_group
                vrrp_description: cf_vrrp_description
                vrrp_priority: cf_vrrp_priority
                vrrp_primary_ip: cf_vrrp_primary_ip
                dhcp_helper: cf_dhcp_helper
                lag {
                    name
                }
                tagged_vlans {
                    vid
                }
                untagged_vlan {
                    vid
                }
                tagged_vlans {
                    vid
                }
                tags {
                    slug
                }
        connected_interface{
            device {
            name
            }
            name
        }
                }
            }
        }
Now let’s create a playbook for this task, pb.nautobot_build_full_config.yaml which will contain the role for the query and then another role for the Jinja templating tasks.
pb.nautobot_build_full_config.yaml
1
2
3
4
5
6
7
8
9
10
---
- name: Query Nautobot for Device data and build full configuration
  hosts: pod1r1
  gather_facts: false
  connection: local

  vars:
    device: ""
  roles:
  - { role: nautobot_query }
For now, let’s test this against a single device, “pod1r1”. The vars will take the inventory_hostname from the ansible inventory and make that variable “device”, which will be used in the query we just built. Run the playbook ansible-playbook pb.nautobot_build_full_config.yaml -i inventory/pod1_inventory.yml, and we should see a new directory created called queries that contains a JSON file called pod1r1.json. You see a file that looks like the following:
1
2
3
4
5
6
7
8
9
10
11
12
13
14
15
16
17
18
19
20
21
22
23
24
25
26
27
28
29
30
31
32
33
34
35
36
37
38
39
40
41
42
43
44
45
46
47
48
49
50
51
52
53
54
55
56
57
58
59
60
61
62
63
64
65
66
67
68
69
70
71
72
73
74
75
76
77
78
79
80
81
82
83
84
85
86
87
88
89
90
91
92
93
94
95
96
97
98
99
100
101
102
103
104
105
106
107
108
109
110
111
112
113
114
115
116
117
118
119
120
121
122
123
124
125
126
127
128
129
130
131
132
133
134
135
136
137
138
139
140
141
142
143
144
145
146
147
148
149
150
151
152
153
154
155
156
157
158
159
160
161
162
163
164
165
166
167
168
169
170
171
172
173
174
175
176
177
178
179
180
181
182
183
184
185
186
187
188
189
190
191
192
193
194
195
196
197
198
199
200
201
202
203
204
205
206
207
208
209
210
211
212
213
214
215
216
217
218
219
220
221
222
223
224
225
226
227
228
229
230
231
232
233
234
235
236
237
238
239
240
241
242
243
244
245
246
247
248
249
250
251
252
253
254
255
256
257
258
259
260
261
262
263
264
265
266
267
268
269
270
271
272
273
274
275
276
277
278
279
280
281
282
283
284
285
286
287
288
289
290
291
292
293
294
295
296
297
298
299
300
301
302
303
304
305
306
307
308
309
310
311
312
313
314
315
316
{
"url": "http://192.168.130.202:8000",
"query": "query {\ndevices(name: \"pod1r1\") {\ninventory_hostname:name\nconfig_context\ndevice_role {\n slug\n }\nsite{\nslug\nvlans{\n name\n vid\n}\n}\ninterfaces {\n name\n description\n enabled\n label\n ip_addresses {\n address\n tags {\n slug\n }\n }\n _custom_field_data\n lag {\n name\n }\n tagged_vlans {\n vid\n }\n untagged_vlan {\n vid\n }\n tagged_vlans {\n vid\n }\n tags {\n slug\n }\nconnected_interface{\n device {\n name\n }\n name\n}\n }\n }\n}",
"graph_variables": null,
"data": {
"devices": [
{
"inventory_hostname": "pod1r1",
"config_context": {
"aaa-new-model": {
"key": "cisco",
"name": "RAD_SERVERS",
"type": "radius",
"acct_port": 1813,
"auth_port": 1812,
"ip_address": "192.168.4.253"
},
"cdp": false,
"lldp": true,
"routes": {
"mgmt_gateway": "192.168.4.254"
},
"dhcp_pool": [
{
"name": "USERS_POOL",
"lease": 30,
"network": "155.1.1.0/26",
"default_router": "155.1.1.1",
"excluded_address": "155.1.1.1 155.1.1.3"
},
{
"name": "SERVERS_POOL",
"lease": 30,
"network": "155.1.1.64/26",
"default_router": "155.1.1.65",
"excluded_address": "155.1.1.65 155.1.1.67"
},
{
"name": "GUEST_POOL",
"lease": 30,
"network": "155.1.1.128/26",
"default_router": "155.1.1.129",
"excluded_address": "155.1.1.129 155.1.1.131"
}
],
"ospf": {
"id": 1
},
"bgp": {
"ebgp": {
"neighbors": {
"24.24.1.1": {
"r_asn": 400
}
}
},
"ibgp": {
"l_asn": 65001,
"neighbors": [
"10.0.1.2",
"10.0.1.3"
]
},
"address_family_ipv4": {
"agg_network": [
"155.1.1.0/24"
],
"advertised_networks": [
"155.1.1.0/26",
"155.1.1.128/26",
"155.1.1.64/26"
]
}
}
},
"device_role": {
"slug": "pod_router"
},
"site": {
"slug": "pod1",
"vlans": [
{
"name": "USERS",
"vid": 300
},
{
"name": "SERVERS",
"vid": 350
},
{
"name": "GUESTS",
"vid": 400
},
{
"name": "NATIVE_VLAN",
"vid": 666
}
]
},
"interfaces": [
{
"name": "GigabitEthernet0/0",
"description": "UPLINK TO INTERNET PROVIDER",
"enabled": true,
"label": "layer3",
"ip_addresses": [
{
"address": "24.24.1.2/24",
"tags": []
}
],
"vrrp_group": null,
"vrrp_description": null,
"vrrp_priority": null,
"vrrp_primary_ip": null,
"dhcp_helper": null,
"lag": null,
"tagged_vlans": [],
"untagged_vlan": null,
"tags": [],
"connected_interface": {
"device": {
"name": "cloud_router"
},
"name": "GigabitEthernet1"
}
},
{
"name": "GigabitEthernet0/1",
"description": "DOWNLINK POD1SW1",
"enabled": true,
"label": "layer3",
"ip_addresses": [
{
"address": "10.10.1.0/31",
"tags": [
{
"slug": "ospf_area_0"
},
{
"slug": "p2p"
}
]
}
],
"vrrp_group": null,
"vrrp_description": null,
"vrrp_priority": null,
"vrrp_primary_ip": null,
"dhcp_helper": null,
"lag": null,
"tagged_vlans": [],
"untagged_vlan": null,
"tags": [],
"connected_interface": {
"device": {
"name": "pod1sw1"
},
"name": "GigabitEthernet0/0"
}
},
{
"name": "GigabitEthernet0/2",
"description": "DOWNLINK POD1SW2",
"enabled": true,
"label": "layer3",
"ip_addresses": [
{
"address": "10.10.1.2/31",
"tags": [
{
"slug": "ospf_area_0"
},
{
"slug": "p2p"
}
]
}
],
"vrrp_group": null,
"vrrp_description": null,
"vrrp_priority": null,
"vrrp_primary_ip": null,
"dhcp_helper": null,
"lag": null,
"tagged_vlans": [],
"untagged_vlan": null,
"tags": [],
"connected_interface": {
"device": {
"name": "pod1sw2"
},
"name": "GigabitEthernet0/0"
}
},
{
"name": "GigabitEthernet0/3",
"description": "",
"enabled": false,
"label": "",
"ip_addresses": [],
"vrrp_group": null,
"vrrp_description": null,
"vrrp_priority": null,
"vrrp_primary_ip": null,
"dhcp_helper": null,
"lag": null,
"tagged_vlans": [],
"untagged_vlan": null,
"tags": [],
"connected_interface": null
},
{
"name": "GigabitEthernet0/4",
"description": "",
"enabled": false,
"label": "",
"ip_addresses": [],
"vrrp_group": null,
"vrrp_description": null,
"vrrp_priority": null,
"vrrp_primary_ip": null,
"dhcp_helper": null,
"lag": null,
"tagged_vlans": [],
"untagged_vlan": null,
"tags": [],
"connected_interface": null
},
{
"name": "GigabitEthernet0/5",
"description": "",
"enabled": false,
"label": "",
"ip_addresses": [],
"vrrp_group": null,
"vrrp_description": null,
"vrrp_priority": null,
"vrrp_primary_ip": null,
"dhcp_helper": null,
"lag": null,
"tagged_vlans": [],
"untagged_vlan": null,
"tags": [],
"connected_interface": null
},
{
"name": "GigabitEthernet0/6",
"description": "",
"enabled": false,
"label": "",
"ip_addresses": [],
"vrrp_group": null,
"vrrp_description": null,
"vrrp_priority": null,
"vrrp_primary_ip": null,
"dhcp_helper": null,
"lag": null,
"tagged_vlans": [],
"untagged_vlan": null,
"tags": [],
"connected_interface": null
},
{
"name": "GigabitEthernet0/7",
"description": "MGMT-INTERFACE",
"enabled": true,
"label": "mgmt",
"ip_addresses": [
{
"address": "192.168.4.17/24",
"tags": []
}
],
"vrrp_group": null,
"vrrp_description": null,
"vrrp_priority": null,
"vrrp_primary_ip": null,
"dhcp_helper": null,
"lag": null,
"tagged_vlans": [],
"untagged_vlan": null,
"tags": [],
"connected_interface": null
},
{
"name": "Loopback0",
"description": "iBGP LOOPBACK",
"enabled": true,
"label": "",
"ip_addresses": [
{
"address": "10.0.1.1/32",
"tags": [
{
"slug": "ospf_area_0"
}
]
}
],
"vrrp_group": null,
"vrrp_description": null,
"vrrp_priority": null,
"vrrp_primary_ip": null,
"dhcp_helper": null,
"lag": null,
"tagged_vlans": [],
"untagged_vlan": null,
"tags": [],
"connected_interface": null
}
]
}
"failed": false,
"changed": false
}
If you use VS CODE, you can use an extension to prettify the JSON output as it may look to be in a single line across the top of the screen. Prettify will transform that into what you see above. Alright, perfect, it resembles what we saw from the GraphiQL query tests we performed. I think we are ready to move on to the Jinja template building.

