Nautobot Workshop Blog Series - Part 5 - Nautobot Ansible Dynamic Inventory

Nautobot Workshop Blog Series
Nautobot Workshop is a hands-on blog series for building a fully automated network lab using Nautobot, Containerlab, and Docker. Starting with a basic Ubuntu setup, each post walks through:
- Deploying Nautobot via
nautobot-docker-compose - Modeling topologies with Containerlab and vrnetlab routers
- Populating Nautobot with real device data using Ansible
- Generating configurations with Jinja2 templates
- Enforcing compliance with the Golden Config plugin
- Leveraging Nautobot’s GraphQL API for dynamic inventory
This series is perfect for network engineers aiming to combine source of truth, automation, and simulation in a streamlined workflow.
🚀 All project files are available in this GitHub repo
Part 5 - Config Contexts, Ansible Dynamic Inventory, and Templates
In this section we will use learn and about config-context, Ansible Dynamic Inventory, and how to template router configurations with Jinja.
Git Repositories in Nautobot
Before we create any Config Context Schemas, and Config Contexts lets get a Repository setup in Nautobot, we will use this Repository to store the Config Contexts, and Schemas, but you can also use it for Nautobot Jobs, Export Templates, and GraphQl Queries. You will need a Github account for this (you can use gitlab also if you want), create a new repository under your Github account and give a name like “nautobot-workshop-datasource”. Create an access token for nautobot and place this access token into your nautobot-docker-compose/environments/creds.env file. This will need to be an environment variable that your Nautobot Docker sandbox can use.
In your github account settings, do to developer settings, and click the personal access tokens. I am using a classic token. When selecting scopes you should only require the top level “repo” permissions. After adding your new token to the creds.env file you will need to restart the containers.
In your Nautobot GUI you will need to create a new secret under SECRETS category. Create a new secret and name it “GITHUB_TOKEN”. The Provider should be Environment Variable, and variable should be exactly what you placed in your creds.env file. 
Create a new Secrets Group named Github and the access type should be HTTPS, with Secret type as Token. Chose the secret you just created above. 
Now click the Extensibility menu and then the Git Repositories blue plus sign under “DATA SOURCES” to add your github repository.
Provide a name and in the remote URL use the HTTP option from the github green code button under Local Clone. Use the branch where you would like to keep this data, and then select all of the “provides” you would like to sync between nautobot and this repository. In my example I have select all options, but the “jinja templates” because we will use most of them in this series. However for now we only need to select the “Config Context Schemas”, “Config Contexts”, “Jobs”, “Export Templates”, and “Graphql Queries”. 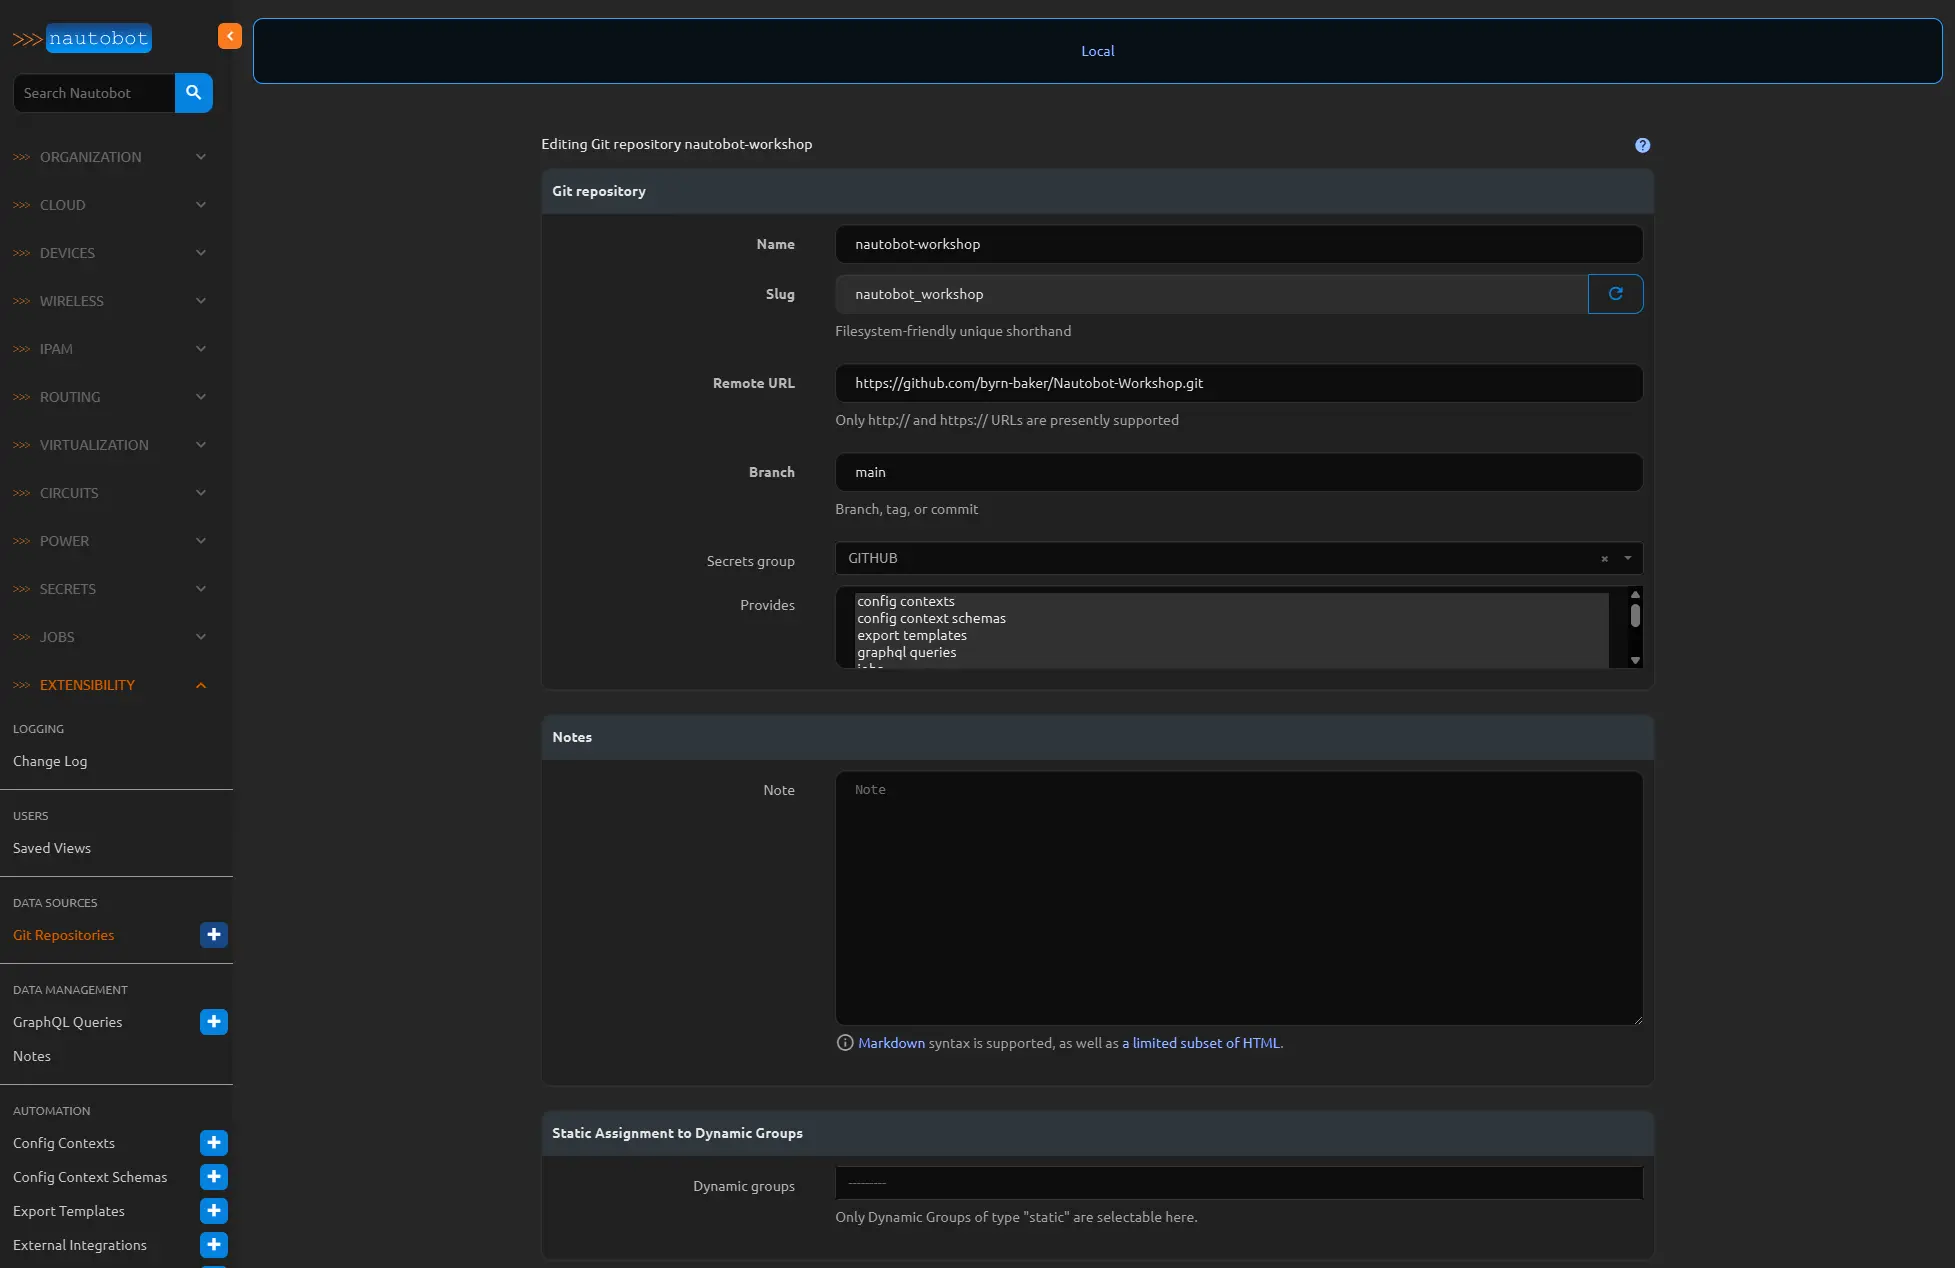
You will want to create folders in your Repos root, jobs, config_context_schema, and config_contexts. In the jobs folder create a blank file called
__initi__.py.
At the bottom click the create & sync button. If all goes well you should see a completed status on this job. 
Confg Contexts
Several configuration details—such as those based on a device’s location or role—need to be dynamic. To achieve this, we should incorporate logic into the templates to ensure that each router receives the appropriate configuration.
Nautobot provides a powerful feature called Config Contexts, which allows us to attach structured data to devices. This data can be applied based on various criteria including location, role, platform, device type, or even specific device names. For example, we can define NTP servers for all devices in a specific site or assign SNMP community strings based on device role.
Config Contexts also support weighting, which enables the definition of default values. When multiple contexts match a device, the one with the highest weight takes precedence—ensuring that there is always a fallback configuration if no specific match is found.
Additionally, Nautobot supports storing Config Context data in a Git repository. This enables version control and aligns the management of configuration data with modern CI/CD workflows, allowing changes to be tracked, reviewed, and deployed systematically—outside of the Nautobot web UI.
We will be using the config contexts to store Route-Maps, Prefix-Lists, Global OSPF, and MPLS information, and MLAG inforation for the CEOS switches.
We can also create a schema for these config contexts to adhere to, this limits the ability to enter garbage into your templates via the config contexts data and ensure that your structured data is correctly structured which also prevents the Jinja Template rendering from failing.
We will need to create the below files and populate them
1
2
3
4
5
6
7
8
9
10
11
12
13
14
15
16
17
18
19
20
21
22
23
24
25
├── config_context_schemas
│   ├── mpls_schema.yaml
│   ├── ospf_schema.yaml
│   ├── prefix_list_schema.yaml
│   └── route_map_schema.yaml
├── config_contexts
│   ├── ce_prefix_list.yml
│   ├── ce_route_maps.yml
│   ├── dc_leaf_rm.yml
│   ├── dc_spine_rm.yml
│   ├── devices
│   │   ├── East-Leaf01.yml
│   │   ├── East-Leaf02.yml
│   │   ├── East-Spine01.yml
│   │   ├── East-Spine02.yml
│   │   ├── West-Leaf01.yml
│   │   ├── West-Leaf02.yml
│   │   ├── West-Spine01.yml
│   │   └── West-Spine02.yml
│   ├── east_fabric.yml
│   ├── mpsl_global.yml
│   ├── ospf_global.yml
│   ├── prefix_list.yml
│   ├── route_maps.yml
│   └── west_fabric.yml
You can reference what is needed in each config context schema here and each config context here
The metadata is important as Nautobot will use this to populate the and store this in its database.
Setting up the Dynamic inventory
Under the inventory folder create a new file name inventory.yml. This will hold our dynamic inventory configurations. You will also want to store your API token as an environmental variable. I am also going to use ansible-vault to store my secrets, which includes the api token and router login.
You will need to install netutils, ansible-pylibssh and paramiko via pip in your virtual env before using the dynamic inventory.
We will create a query to pull all of the variables we need to build the configuration. We will want the UUID and the network driver for sure, other variables I will leave up to you, but you can pull the interfaces among a host of other device data if you wish. The network driver will be used with Ansible to correctly set the connection type, and the device UUID we will use in a graphql query as another task before templating the configurations to a file.
1
2
3
4
5
6
7
8
9
10
11
12
13
14
15
16
---
plugin: networktocode.nautobot.gql_inventory
api_endpoint: http://localhost:8080
validate_certs: false
query:
  devices:
    id:
    platform:
      napalm_driver
      network_driver
    primary_ip4: host
  virtual_machines:
    filters:
      name: EXCLUDE ALL
group_by:
  - platform.napalm_driver
Creating configuration templating role
If we go back to our ansible-lab folder where we created the playbooks to load Nautobot and build the lab topology, create a new folder under the roles called build_lab_config/ We will be creating the below tree
1
2
3
4
5
6
7
8
9
10
11
12
13
14
15
16
17
18
19
20
21
22
23
24
25
26
27
28
29
30
31
32
33
34
35
36
37
38
39
40
41
42
(.ansible) ubuntu@containerlabs:~/Nautobot-Workshop/ansible-lab$ tree
└── roles
    ├── build_lab_config
│   │   ├── tasks
│   │   │   └── main.yml
│   │   ├── templates
│   │   │   ├── arista.eos.eos.j2
│   │   │   ├── cisco.ios.ios.j2
│   │   │   ├── eos
│   │   │   │   ├── bgp.j2
│   │   │   │   ├── interfaces
│   │   │   │   │   ├── _ethernet_physical.j2
│   │   │   │   │   ├── _loopback.j2
│   │   │   │   │   ├── _mgmt.j2
│   │   │   │   │   ├── _port_channel.j2
│   │   │   │   │   ├── _virtual.j2
│   │   │   │   │   └── _vxlan.j2
│   │   │   │   ├── interfaces.j2
│   │   │   │   ├── mlag_config.j2
│   │   │   │   ├── platform_templates
│   │   │   │   │   ├── datacenter_leaf.j2
│   │   │   │   │   └── datacenter_spine.j2
│   │   │   │   ├── prefix_list.j2
│   │   │   │   ├── route_map.j2
│   │   │   │   └── vlans.j2
│   │   │   └── ios
│   │   │       ├── bgp.j2
│   │   │       ├── interfaces
│   │   │       │   ├── _loopback.j2
│   │   │       │   └── _router_physical.j2
│   │   │       ├── interfaces.j2
│   │   │       ├── mpls.j2
│   │   │       ├── ospf.j2
│   │   │       ├── platform_templates
│   │   │       │   ├── customer_edge_router.j2
│   │   │       │   ├── provider_edge_router.j2
│   │   │       │   ├── provider_route_reflector.j2
│   │   │       │   └── provider_router.j2
│   │   │       ├── prefix_list.j2
│   │   │       └── route_map.j2
│   │   └── vars
│   │       └── main.yml
1
2
3
4
5
6
7
8
9
10
11
12
13
14
15
16
17
18
19
20
21
22
23
24
25
26
27
28
29
30
31
32
33
34
35
mkdir -p roles/build_lab_config/{tasks,templates/eos/interfaces,templates/eos/platform_templates,templates/ios/interfaces,templates/ios/platform_templates,vars}
# Create empty files
touch roles/build_lab_config/tasks/main.yml
touch roles/build_lab_config/vars/main.yml
# Arista/EOS base templates
touch roles/build_lab_config/templates/arista.eos.eos.j2
touch roles/build_lab_config/templates/cisco.ios.ios.j2
# EOS templates
touch roles/build_lab_config/templates/eos/bgp.j2
touch roles/build_lab_config/templates/eos/interfaces/_ethernet_physical.j2
touch roles/build_lab_config/templates/eos/interfaces/_loopback.j2
touch roles/build_lab_config/templates/eos/interfaces/_mgmt.j2
touch roles/build_lab_config/templates/eos/interfaces/_port_channel.j2
touch roles/build_lab_config/templates/eos/interfaces/_virtual.j2
touch roles/build_lab_config/templates/eos/interfaces/_vxlan.j2
touch roles/build_lab_config/templates/eos/interfaces.j2
touch roles/build_lab_config/templates/eos/mlag_config.j2
touch roles/build_lab_config/templates/eos/platform_templates/datacenter_leaf.j2
touch roles/build_lab_config/templates/eos/platform_templates/datacenter_spine.j2
touch roles/build_lab_config/templates/eos/prefix_list.j2
touch roles/build_lab_config/templates/eos/route_map.j2
touch roles/build_lab_config/templates/eos/vlans.j2
# IOS templates
touch roles/build_lab_config/templates/ios/bgp.j2
touch roles/build_lab_config/templates/ios/interfaces/_loopback.j2
touch roles/build_lab_config/templates/ios/interfaces/_router_physical.j2
touch roles/build_lab_config/templates/ios/interfaces.j2
touch roles/build_lab_config/templates/ios/mpls.j2
touch roles/build_lab_config/templates/ios/ospf.j2
touch roles/build_lab_config/templates/ios/platform_templates/customer_edge_router.j2
touch roles/build_lab_config/templates/ios/platform_templates/provider_edge_router.j2
touch roles/build_lab_config/templates/ios/platform_templates/provider_route_reflector.j2
touch roles/build_lab_config/templates/ios/platform_templates/provider_router.j2
touch roles/build_lab_config/templates/ios/prefix_list.j2
touch roles/build_lab_config/templates/ios/route_map.j2
Update a the pb.build-lab.yml playbook referencing this new role above:
In the tasks/main.yml under the roles/build_lab_config/tasks/ folder start by adding a task to query nautobot for all of the information we will need to generate a configuration. We will use Jinja templates to create each configuration in a very similar way as we used in the Nautobot Golden configuration app. There is an option in the query_graphql module that will set all of the data from the query in the devices hostvars. This way you can easily access the data with device.hostname. You will also notice we are using delegate_to so that these tasks are run locally on our Ansible host and not the routers.
Make sure the graphql query string is placed in the vars/main.yml file, the networktocode.nautobot.query_graphql above will reference this.
The variables will be stored in hostvars we will need to flatten the data from the GraphQL query. This will ensure that the templates we build here can be easily used with our Nautobot Golden Configuration Application later on.
1
2
3
4
5
- name: Flatten device data into top-level hostvars
  set_fact:
    "": ""
  loop: ""
  when: hostvars[inventory_hostname].device is defined
This nicely nests all of the key values from data.device under hostvars[inventory_hostname], which is where ansible stores any data it pulls from a device while executing tasks on a specific inventory item.
In the /templates/cisco_ios.j2, we will breakout each platform with its own base template. This allows us to make minor adjustments to the devices configuration including or excluding configurations that are not needed for the specific role of the device. This will ensure that the Jinja templates do not become overly complicated and cumbersome. After all a good template should be something any network engineer can read and understand with very little experience with templates. Also long configurations with thousand of lines and nested for loops and if statements can become very confusing and hard to follow. There is always some give and take however, we are exchanging a shorter number of lines for many more files to manage. The upside however is the modules for OSPF, MPLS, BGP, Prefix lists, etc can be standardized to the platform, and re-used with any of the routers and switches in the same platform (IOS, IOS-XE).
Take some time to review all of the templates I created for this lab, I think this will provide you with a big head start for you own environment and a good idea of what to consider when deploying your own SoT.
The way I build configurations is to first deploy the protocols, prefixes, acls, etc so that I know where to place the include statements. When dealing with idempotent configurations on routers, specifically IOS, you want to ensure that the templated configuration matches exactly to a “show run configuration”. With the EOS configuration templates I made use of the example configurations from the AVD project.
Build the configurations
As you work on the configuration templates it might be helpful to see what they look like, so lets create another role to build the configurations. We will use the template module to generate a .conf file for each router. This way we can inspect the structure of the configurations and remove any mistakes or issues that might arise from using “for loops”.
1
2
3
4
5
6
7
8
9
10
11
12
- name: Ensure configs directory exists
  ansible.builtin.file:
    path: ./configs
    state: directory
    mode: '0755'
  delegate_to: localhost

- name: Template the router configurations
  ansible.builtin.template:
    src: ".j2"
    dest: "./configs/.conf"
  delegate_to: localhost
We can use our “build” tag if we just want to create a new template config file without pushing it as an active configuration.
Deploying the configurations -Cisco
For this task we will use the cisco.ios.ios_config module to push the entire configuration to the cisco router.
/roles/deploy_lab_configs/tasks/main.yml
In our lab right now P1 should have a configuration that looks something like this:
1
2
3
4
5
6
7
8
9
10
11
12
13
14
15
16
17
18
19
20
21
22
23
24
25
26
27
28
29
30
31
32
33
34
35
36
37
38
39
40
41
42
43
44
45
46
47
48
49
50
51
52
53
54
55
56
57
58
59
60
61
62
63
64
65
66
67
68
69
70
71
72
73
74
75
76
77
78
79
80
81
82
83
84
85
86
87
88
89
90
91
P1#
P1#
P1#sh run
Building configuration...

Current configuration : 1494 bytes
!
version 17.12
service timestamps debug datetime msec
service timestamps log datetime msec
!
hostname P1
!
boot-start-marker
boot-end-marker
!
!
vrf definition clab-mgmt
 description clab-mgmt
 !
 address-family ipv4
 exit-address-family
 !
 address-family ipv6
 exit-address-family
!
no aaa new-model
!
interface Ethernet0/0
 description clab-mgmt
 vrf forwarding clab-mgmt
 ip address 192.168.220.2 255.255.255.0
!
interface Ethernet0/1
 no ip address
 shutdown
!
interface Ethernet0/2
 no ip address
 shutdown
!
interface Ethernet0/3
 no ip address
 shutdown
!
interface Ethernet1/0
 no ip address
 shutdown
!
interface Ethernet1/1
 no ip address
 shutdown
!
interface Ethernet1/2
 no ip address
 shutdown
!
interface Ethernet1/3
 no ip address
 shutdown
!
ip forward-protocol nd
!
!
ip http server
ip http secure-server
ip route vrf clab-mgmt 0.0.0.0 0.0.0.0 Ethernet0/0 192.168.220.1
ip ssh bulk-mode 131072
!
ipv6 route vrf clab-mgmt ::/0 Ethernet0/0
!
!
!
!
control-plane
!
!
!
line con 0
 logging synchronous
line aux 0
line vty 0 4
 login local
 transport input ssh
!
!
!
!
end

P1#
After we push the configs it should now look like this
1
2
3
4
5
6
7
8
9
10
11
12
13
14
15
16
17
18
19
20
21
22
23
24
25
26
27
28
29
30
31
32
33
34
35
36
37
38
39
40
41
42
43
44
45
46
47
48
49
50
51
52
53
54
55
56
57
58
59
60
61
62
63
64
65
66
67
68
69
70
71
72
73
74
75
76
77
78
79
80
81
82
83
84
85
86
87
88
89
90
91
92
93
94
95
96
97
98
99
100
101
102
103
104
105
106
107
108
109
110
111
112
113
114
115
116
117
118
119
120
121
122
123
124
125
126
127
128
129
130
131
132
133
134
135
136
137
138
139
140
141
142
143
144
145
146
147
148
149
150
151
152
153
154
155
156
157
158
159
160
161
162
163
164
165
166
167
168
169
170
171
172
173
174
175
176
177
178
179
180
181
182
183
184
185
186
187
188
189
190
191
192
193
194
195
196
197
198
199
200
201
202
203
204
205
206
207
208
209
210
211
212
213
214
215
216
217
218
219
220
221
222
223
224
225
226
227
228
229
230
231
232
233
234
235
236
237
238
239
240
241
242
243
244
245
246
247
248
249
250
251
252
253
254
255
256
257
258
259
260
261
262
263
264
265
266
267
268
269
270
271
272
273
274
275
276
277
278
279
280
281
282
283
284
285
286
287
288
289
290
P1#sh run
Building configuration...

Current configuration : 4029 bytes
!
! Last configuration change at 21:14:01 UTC Fri Jun 20 2025 by admin
!
version 17.12
service timestamps debug datetime msec
service timestamps log datetime msec
!
hostname P1
!
boot-start-marker
boot-end-marker
!
!
vrf definition clab-mgmt
 description clab-mgmt
 !
 address-family ipv4
 exit-address-family
 !
 address-family ipv6
 exit-address-family
!
no aaa new-model
!
!
!
!
!
!
!
!
!
!
!
!
!
no ip domain lookup
ip domain name lab
ip cef
login on-success log
ipv6 unicast-routing
ipv6 cef
!
!
!
!
!
!
!
!
mpls label protocol ldp
multilink bundle-name authenticated
!
!
!
!
!
memory free low-watermark processor 55011
!
!
spanning-tree mode rapid-pvst
!
!
username admin privilege 15 secret 9 $9$YMji4T302rqlEk$8/V96ezzz3poG/aQH1pTF2x0ZamMDT2eP4s/PjDQbOk
!
!
!
!
!
!
!
!
!
!
!
!
!
!
!
!
!
!
!
!
!
interface Loopback0
 description Protocol Loopback
 ip address 100.0.254.1 255.255.255.255
 ip ospf 1 area 0
 ipv6 address 2001:DB8:100:254::1/128
 ipv6 ospf 1 area 0
!
interface Ethernet0/0
 description MGMT ONLY INTERFACE
 vrf forwarding clab-mgmt
 ip address 192.168.220.2 255.255.255.0
 no cdp enable
!
interface Ethernet0/1
 description To P2-Ethernet0/1
 ip address 100.0.12.1 255.255.255.0
 ip ospf network point-to-point
 ip ospf 1 area 0
 ipv6 address 2001:DB8:100:12::1/64
 ipv6 enable
 mpls ip
 ipv6 ospf 1 area 0
!
interface Ethernet0/2
 description To P3-Ethernet0/2
 ip address 100.0.13.1 255.255.255.0
 ip ospf network point-to-point
 ip ospf 1 area 0
 ipv6 address 2001:DB8:100:13::1/64
 ipv6 enable
 mpls ip
 ipv6 ospf 1 area 0
!
interface Ethernet0/3
 description To RR1-Ethernet0/1
 ip address 100.0.101.1 255.255.255.0
 ip ospf network point-to-point
 ip ospf 1 area 10
 ipv6 address 2001:DB8:100:101::1/64
 ipv6 enable
 mpls ip
 ipv6 ospf 1 area 10
!
interface Ethernet1/0
 description To PE1-Ethernet0/1
 ip address 100.0.11.1 255.255.255.0
 ip ospf network point-to-point
 ip ospf 1 area 1
 ipv6 address 2001:DB8:100:11::1/64
 ipv6 enable
 mpls ip
 ipv6 ospf 1 area 1
!
interface Ethernet1/1
 no ip address
 shutdown
!
interface Ethernet1/2
 no ip address
 shutdown
!
interface Ethernet1/3
 no ip address
 shutdown
!
router ospf 1
 router-id 100.0.254.1
 passive-interface Loopback0
!
router bgp 65000
 bgp log-neighbor-changes
 neighbor 2001:DB8:100:254::5 remote-as 65000
 neighbor 2001:DB8:100:254::5 description RR1
 neighbor 2001:DB8:100:254::5 update-source Loopback0
 neighbor 100.0.254.5 remote-as 65000
 neighbor 100.0.254.5 description RR1
 neighbor 100.0.254.5 update-source Loopback0
 !
 address-family ipv4
  no neighbor 2001:DB8:100:254::5 activate
  neighbor 100.0.254.5 activate
  neighbor 100.0.254.5 route-map ALLOW_ALL_V4_IN in
  neighbor 100.0.254.5 route-map ALLOW_ALL_V4_OUT out
 exit-address-family
 !
 address-family ipv6
  neighbor 2001:DB8:100:254::5 activate
  neighbor 2001:DB8:100:254::5 route-map ALLOW_ALL_V6_IN in
  neighbor 2001:DB8:100:254::5 route-map ALLOW_ALL_V6_OUT out
 exit-address-family
!
ip forward-protocol nd
!
!
ip http server
ip http secure-server
ip route vrf clab-mgmt 0.0.0.0 0.0.0.0 Ethernet0/0 192.168.220.1
ip ssh bulk-mode 131072
!
!
ip prefix-list ALLOW_ALL_IN_PREFIX seq 5 permit 0.0.0.0/0 le 32
!
ip prefix-list ALLOW_ALL_OUT_PREFIX seq 5 permit 0.0.0.0/0 le 32
ipv6 route vrf clab-mgmt ::/0 Ethernet0/0
ipv6 router ospf 1
 router-id 100.0.254.1
 passive-interface Loopback0
!
!
!
ipv6 prefix-list ALLOW_ALL_V6_IN_PREFIX seq 5 permit ::/0 le 128
!
ipv6 prefix-list ALLOW_ALL_V6_OUT_PREFIX seq 5 permit ::/0 le 128
route-map ALLOW_ALL_V6_IN permit 10
 match ip address prefix-list ALLOW_ALL_V6_IN_PREFIX
!
route-map ALLOW_ALL_V6_OUT permit 10
 match ip address prefix-list ALLOW_ALL_V6_OUT_PREFIX
!
route-map ALLOW_ALL_V4_OUT permit 10
 match ip address prefix-list ALLOW_ALL_OUT_PREFIX
!
route-map ALLOW_ALL_V4_IN permit 10
 match ip address prefix-list ALLOW_ALL_IN_PREFIX
!
mpls ldp router-id Loopback0 force
!
!
!
control-plane
!
!
!
line con 0
 logging synchronous
line aux 0
line vty 0 4
 login local
 transport input ssh
!
!
!
!
end

P1#
P1#ping 100.0.12.2
Type escape sequence to abort.
Sending 5, 100-byte ICMP Echos to 100.0.12.2, timeout is 2 seconds:
!!!!!
Success rate is 100 percent (5/5), round-trip min/avg/max = 1/1/2 ms
P1#sh ip route
Codes: L - local, C - connected, S - static, R - RIP, M - mobile, B - BGP
       D - EIGRP, EX - EIGRP external, O - OSPF, IA - OSPF inter area
       N1 - OSPF NSSA external type 1, N2 - OSPF NSSA external type 2
       E1 - OSPF external type 1, E2 - OSPF external type 2, m - OMP
       n - NAT, Ni - NAT inside, No - NAT outside, Nd - NAT DIA
       i - IS-IS, su - IS-IS summary, L1 - IS-IS level-1, L2 - IS-IS level-2
       ia - IS-IS inter area, * - candidate default, U - per-user static route
       H - NHRP, G - NHRP registered, g - NHRP registration summary
       o - ODR, P - periodic downloaded static route, l - LISP
       a - application route
       + - replicated route, % - next hop override, p - overrides from PfR
       & - replicated local route overrides by connected

Gateway of last resort is not set

      100.0.0.0/8 is variably subnetted, 24 subnets, 2 masks
C        100.0.11.0/24 is directly connected, Ethernet1/0
L        100.0.11.1/32 is directly connected, Ethernet1/0
C        100.0.12.0/24 is directly connected, Ethernet0/1
L        100.0.12.1/32 is directly connected, Ethernet0/1
C        100.0.13.0/24 is directly connected, Ethernet0/2
L        100.0.13.1/32 is directly connected, Ethernet0/2
O IA     100.0.22.0/24 [110/20] via 100.0.12.2, 00:01:31, Ethernet0/1
O        100.0.24.0/24 [110/20] via 100.0.12.2, 00:01:33, Ethernet0/1
O        100.0.31.0/24 [110/20] via 100.0.11.11, 00:01:23, Ethernet1/0
O IA     100.0.33.0/24 [110/20] via 100.0.13.3, 00:01:31, Ethernet0/2
O        100.0.34.0/24 [110/20] via 100.0.13.3, 00:01:33, Ethernet0/2
O IA     100.0.42.0/24 [110/30] via 100.0.13.3, 00:01:23, Ethernet0/2
                       [110/30] via 100.0.12.2, 00:01:28, Ethernet0/1
O IA     100.0.43.0/24 [110/30] via 100.0.13.3, 00:01:31, Ethernet0/2
                       [110/30] via 100.0.12.2, 00:01:23, Ethernet0/1
C        100.0.101.0/24 is directly connected, Ethernet0/3
L        100.0.101.1/32 is directly connected, Ethernet0/3
O        100.0.102.0/24 [110/20] via 100.0.101.2, 00:01:23, Ethernet0/3
C        100.0.254.1/32 is directly connected, Loopback0
O        100.0.254.2/32 [110/11] via 100.0.12.2, 00:01:33, Ethernet0/1
O        100.0.254.3/32 [110/11] via 100.0.13.3, 00:01:33, Ethernet0/2
O        100.0.254.4/32 [110/21] via 100.0.13.3, 00:01:33, Ethernet0/2
                        [110/21] via 100.0.12.2, 00:01:28, Ethernet0/1
O        100.0.254.5/32 [110/11] via 100.0.101.2, 00:01:23, Ethernet0/3
O        100.0.254.11/32 [110/11] via 100.0.11.11, 00:01:23, Ethernet1/0
O IA     100.0.254.12/32 [110/21] via 100.0.13.3, 00:01:23, Ethernet0/2
O IA     100.0.254.13/32 [110/21] via 100.0.12.2, 00:01:23, Ethernet0/1
P1#ping 100.0.254.13
Type escape sequence to abort.
Sending 5, 100-byte ICMP Echos to 100.0.254.13, timeout is 2 seconds:
!!!!!
Success rate is 100 percent (5/5), round-trip min/avg/max = 2/2/3 ms
P1#
Conclusion
In this part of the Nautobot Workshop, we brought together several powerful capabilities of Nautobot and Ansible to automate the full lifecycle of device configuration. By leveraging Config Contexts and Schemas stored in a Git repository, we created a structured and version-controlled approach to storing device-specific data. Using Nautobot’s GraphQL API and Ansible’s dynamic inventory plugin, we extracted the data needed to build platform-specific, modular configuration templates using Jinja2.
This setup not only reflects real-world practices for managing network infrastructure as code, but also lays a strong foundation for scaling and enforcing consistency across a multi-vendor environment. Whether you’re simulating a service provider core, validating designs, or testing automation playbooks, this kind of workflow empowers you to iterate faster and with confidence.