Nautobot Workshop Blog Series - Part 3 Managing Nautobot with Ansible
Nautobot Workshop Blog Series
Nautobot Workshop is a hands-on blog series for building a fully automated network lab using Nautobot, Containerlab, and Docker. Starting with a basic Ubuntu setup, each post walks through:
- Deploying Nautobot via
nautobot-docker-compose - Modeling topologies with Containerlab and vrnetlab routers
- Populating Nautobot with real device data using Ansible
- Generating configurations with Jinja2 templates
- Enforcing compliance with the Golden Config plugin
- Leveraging Nautobot’s GraphQL API for dynamic inventory
This series is perfect for network engineers aiming to combine source of truth, automation, and simulation in a streamlined workflow.
🚀 All project files are available in this GitHub repo
Part 3: Adding Devices to Nautobot via Ansible
Overview: 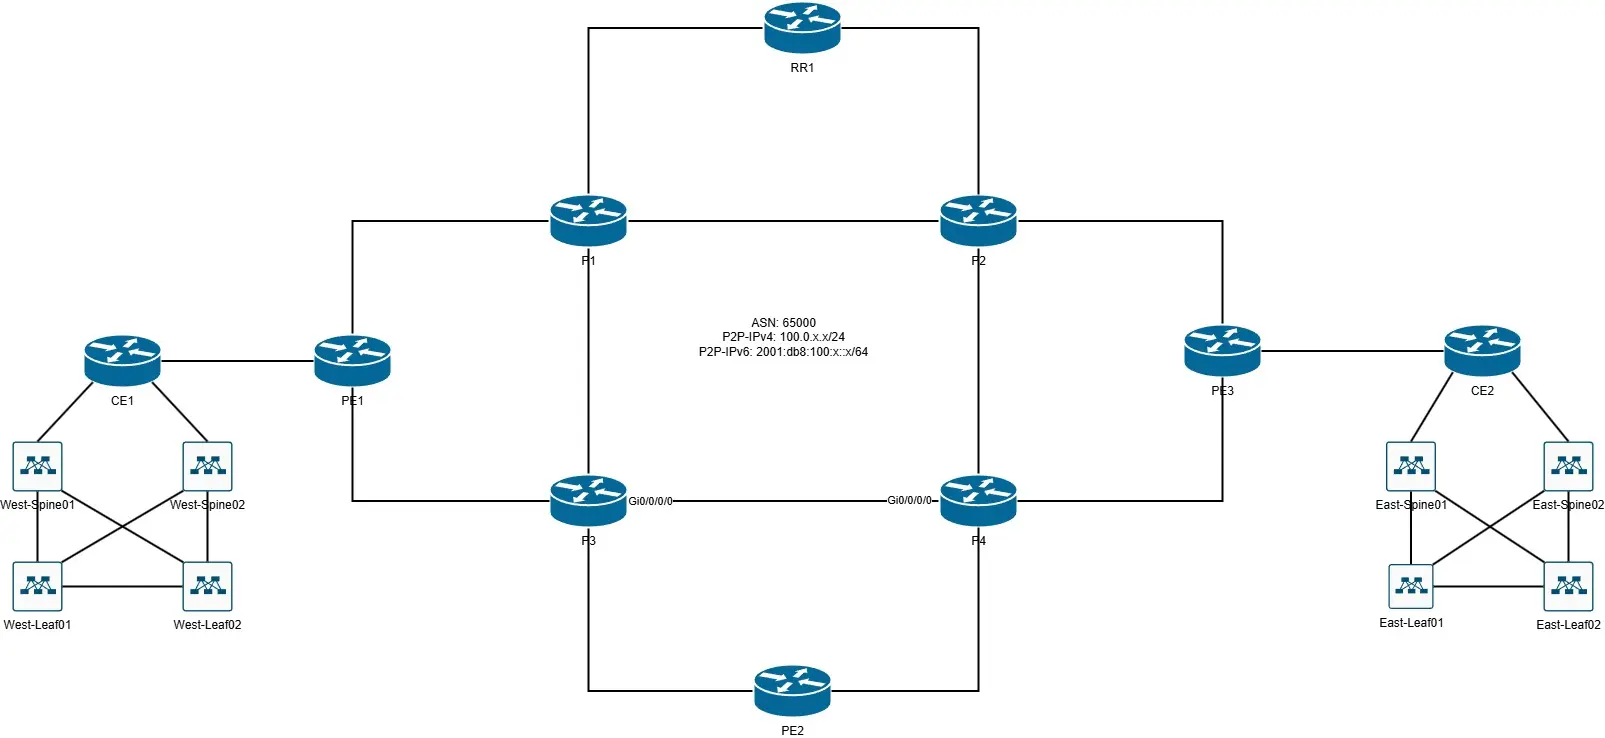
In this post, we will accomplish the following:
- Create a Python virtual environment to manage our Ansible playbooks.
- Create a file that contains all of the necessary elements for our Nautobot Source of Truth (NSoT).
- Create a playbook and tasks that will populate our NSoT.
🐍 Creating Python Environment
In your Nautobot-Workshop folder, create a new folder called ansible-lab.
1
2
3
4
5
6
7
cd Nautobot-Workshop
mkdir ansible-lab
cd ansible-lab
sudo apt update
sudo apt install -y python3-venv
python3 -m venv .ansible
source .ansible/bin/activate
Once in the virtual environment, install Ansible and Pynautobot:
1
2
pip install ansible pynautobot
touch ansible.cfg
Use this ansible.cfg as a reference.
Install the Nautobot Ansible collection:
1
ansible-galaxy collection install networktocode.nautobot
Having the Nautobot Ansible collection in your project folder helps with portability. When you need to look at an example for a module, they exist in:
ansible-lab/ansible_collections/networktocode/nautobot/plugins/modules{: .prompt-tip }
Start your Nautobot Docker instance from a separate terminal if it’s not running:
1
2
cd nautobot-docker-compose
invoke debug
Using a Python virtual environment isolates your project’s dependencies, ensuring compatibility and reproducibility across systems. {: .prompt-tip }
📜 Creating Ansible Playbook and Tasks
Create your base inventory and playbook files:
1
2
touch inventory/group_vars/all.yml
touch pb.build-lab.yml
all.yml:
1
2
nb_url: "<your-url-here>"
nb_token: "<your-token-here>"
To create an API key in Nautobot, navigate to the admin panel and click your profile. You’ll find a link for “API Tokens” where you can generate a token. {: .prompt-tip }
Now create the role folder and task structure:
1
2
mkdir -p roles/load_nautobot/tasks
touch roles/load_nautobot/tasks/main.yml
Expected structure:
1
2
3
4
5
6
7
8
9
.
├── pb.build-lab.yml
├── inventory
│   └── group_vars
│       └── all.yml
└── roles
    └── load_nautobot
        └── tasks
            └── main.yml
In your main.yml, include all task files:
1
2
3
4
5
6
7
8
9
10
11
12
13
14
15
16
17
18
19
20
---
- name: Build Nautobot Extensibility
  import_tasks: extensibility.yml
  tags: [extensibility]

- name: Build Nautobot organizational data
  import_tasks: organizational.yml
  tags: [organization]

- name: Build Nautobot IPAM data
  import_tasks: ipam.yml
  tags: [ipam]

- name: Build Nautobot device data
  import_tasks: devices.yml
  tags: [devices]

- name: Build Nautobot BGP routing instances
  import_tasks: bgp.yml
  tags: [bgp]
📂 Creating the Nautobot Data Files
In your root project directory, create the following data files:
nautobot-data/extensible_data.ymlnautobot-data/organization_data.ymlnautobot-data/ipam_data.ymlnautobot-data/nautobot_devices.yml
These files will contain everything needed to populate Nautobot and build the topology.
| Section | Nautobot Functionality Unlocked |
|---|---|
location_types, locations | Physical/logical hierarchy, mapping, grouping |
roles | Automation, compliance, filtering by function |
manufacturers, device_types, platforms | Inventory modeling, config templating, plugin filtering |
software_versions | OS version tracking, Nornir group matching |
prefixes, ip_addresses | IPAM, interface mapping, VRF/subnet usage |
devices, interfaces | Topology, inventory, config generation, connection validation |
routing_instances, bgp_peers | BGP configuration and peering logic |
View these sample files on GitHub:
🛠️ Managing Nautobot with Ansible
🔗 main.yml (Playbook Structure)
This top-level playbook includes tasks in logical order:
extensibility.yml: Define custom fields and allowed valuesorganizational.yml: Build hierarchy with locations and rolesipam.yml: Configure IP space, prefixes, addressesdevices.yml: Define devices, assign platforms, IPs, and interfacesbgp.yml: Create BGP autonomous systems, routing instances, AFI/SAFI, and peerings
📦 extensibility.yml – Custom Fields & Metadata
- Module:
networktocode.nautobot.custom_field - Module:
networktocode.nautobot.custom_field_choice
🏢 organizational.yml – Location and Role Modeling
- Location Types:
networktocode.nautobot.location_type - Locations:
networktocode.nautobot.location - Roles:
networktocode.nautobot.role
🌐 ipam.yml – IP Address Management
- Namespaces:
networktocode.nautobot.namespace - VRFs:
networktocode.nautobot.vrf - Prefixes:
networktocode.nautobot.prefix - IP Addresses:
networktocode.nautobot.ip_address - Loopback Tagging: Conditional tag
/32or/128withLoopback
💻 devices.yml – Device & Network Provisioning
- Manufacturers:
networktocode.nautobot.manufacturer - Device Types:
networktocode.nautobot.device_type - Platforms:
networktocode.nautobot.platform - Software Versions:
networktocode.nautobot.software_version - Devices:
networktocode.nautobot.device - Assign Software Versions: PATCH via
uri - Interfaces:
networktocode.nautobot.device_interface - IP Assignment:
networktocode.nautobot.ip_address_to_interface - Primary IPs:
networktocode.nautobot.device - Cabling:
networktocode.nautobot.cable - Interface Custom Fields: OSPF, MPLS via
custom_fields
🌍 bgp.yml – BGP Configuration
- Autonomous Systems:
networktocode.nautobot.plugin (bgp.autonomous-systems) - Routing Instances:
networktocode.nautobot.plugin (bgp.routing-instances) - Address Families:
networktocode.nautobot.plugin (bgp.address-families) - BGP Peers & Endpoints: dynamic logic using GraphQL, facts, and
urifor:- Peerings
- PeerEndpoints
- PeerEndpoint AFI/SAFI
Conclusion
In Part 3, you’ve built a reliable workflow to populate Nautobot with structured network data using Ansible. This includes everything from physical and logical device modeling to IPAM and BGP routing definitions—setting the stage for dynamic automation.
🔜 Next Up: Containerlab Topology Generation
In Part 4, we’ll use the data you’ve added to Nautobot to automatically build a complete Containerlab topology, including:
Defining nodes, links, and interfaces
Using device roles and platforms from Nautobot
Creating topology files dynamically with Jinja2
🎯 Action: Ensure your Nautobot instance is fully populated and accessible. Then, get ready to build and launch your virtual network lab using Containerlab in the next post.