Source of Truth - Part 1

The Source of Truth in Automation: A Critical Foundation
In the ever-evolving landscape of automation, the concept of a “Source of Truth” (SoT) has emerged as a vital element for ensuring efficiency, reliability, and consistency in the automation process. A SoT is a centralized repository where all relevant and accurate data about an organization’s infrastructure, processes, and policies are stored and managed.
The importance of a SoT in automation is manifold. It provides a single, authoritative source of information for all stakeholders involved in the automation process, eliminating the confusion and errors that can arise from relying on multiple, potentially conflicting sources. This not only streamlines the automation process but also makes it more efficient and robust.
Moreover, a SoT plays a crucial role in maintaining the integrity of the automation process. By ensuring that all data is accurate and up-to-date, a SoT helps to prevent the deployment of incorrect or outdated configurations, which can lead to system failures or security breaches.
In addition, a SoT facilitates the implementation of a data-first approach to automation. This approach involves defining the intended state of the network or system and using this information to drive the automation process. This ensures that the network or system is always configured according to the organization’s approved standards and designs, enhancing compliance and reducing the risk of human error.
In conclusion, a Source of Truth is a fundamental component of modern automation architectures. It provides a solid foundation for efficient, reliable, and secure automation, making it a critical tool for any organization looking to harness the power of automation.
Stepping of the soapbox for a minute, the developers source of truth tool might not be best for the network engineer, or even the site reliability engineers, so what are we to do with all of these different tool when building automation?
Aggregating Sources of Truth
There is an open source project out there run by NetworkToCode called Nautobot, no this is not a paid promotion, I wish, but no one read this blog, so no one is out there asking me to pump their products. One day maybe, but for now what is Nautobot?
Nautobot is a Network Source of Truth and Network Automation Platform that is designed to streamline data management and drive network automation. It serves as a central clearinghouse for data, acting as a Single Source of Truth for network infrastructure. Nautobot is built on top of the Django Python framework with a PostgreSQL or MySQL database, and it enables network engineers to define the intended state of network infrastructure, thus making it a reliable source of truth.
Nautobot attempts to be the Aggregate for sources of truth in the context of automation by unifying and aggregating disparate data sources. It achieves this through its plugin system, which is also used to integrate and aggregate data from various “source of truth” (SoT) systems. This approach ensures that Nautobot can provide a consolidated view of network data, making it easier to manage and automate network operations.
In essence, Nautobot acts as a central repository for network data, making it easier to manage and automate network operations by providing a single, authoritative source of truth. By unifying disparate data sources, Nautobot reduces complexity and increases the reliability of network automation efforts.
In a captivating previous post, I unveiled a diagram of a meticulously crafted network designed to explore the potential of NGINX as a live stream caching solution across network boundaries, utilizing a K3S cluster. To bring this innovative network to life, I meticulously developed a series of Ansible playbooks, harnessing the power of Nautobot as the Source of Truth for generating configurations for each router. This cutting-edge approach not only demonstrates my expertise in network automation but also showcases the potential of leveraging Nautobot as the backbone for managing complex network infrastructure.
Let me walk through how I used both GIT and Nautobot together to make this all work.
GIT and Nautobot Working together
I use the GIT repository to store all of my ansible playbooks and jinja templates, this is the best way for me to manage my code and share it or collaborate with other developers. This is great for me and maybe the other developer, but what about the engineers who need to deploy the network or server gear? Nautobot allow me to build out how the intended design from the floor rack, to the interface connectivity, down to the specific configurations that should be inside the box.
Because this is something I intended to tear down and re-build multiple times, I used a simple YAML file to layout everything I wanted inside of Nautobot, and built out a list of Ansible tasks to put that information into Nautobot. This could be one way to manage the data in Nautobot in the future, where the potential is specific elements are kept in GIT where you can make use of branches and approvals before anything was updated or added to Nautobot. You can find the code and examples of Ansible tasks here.
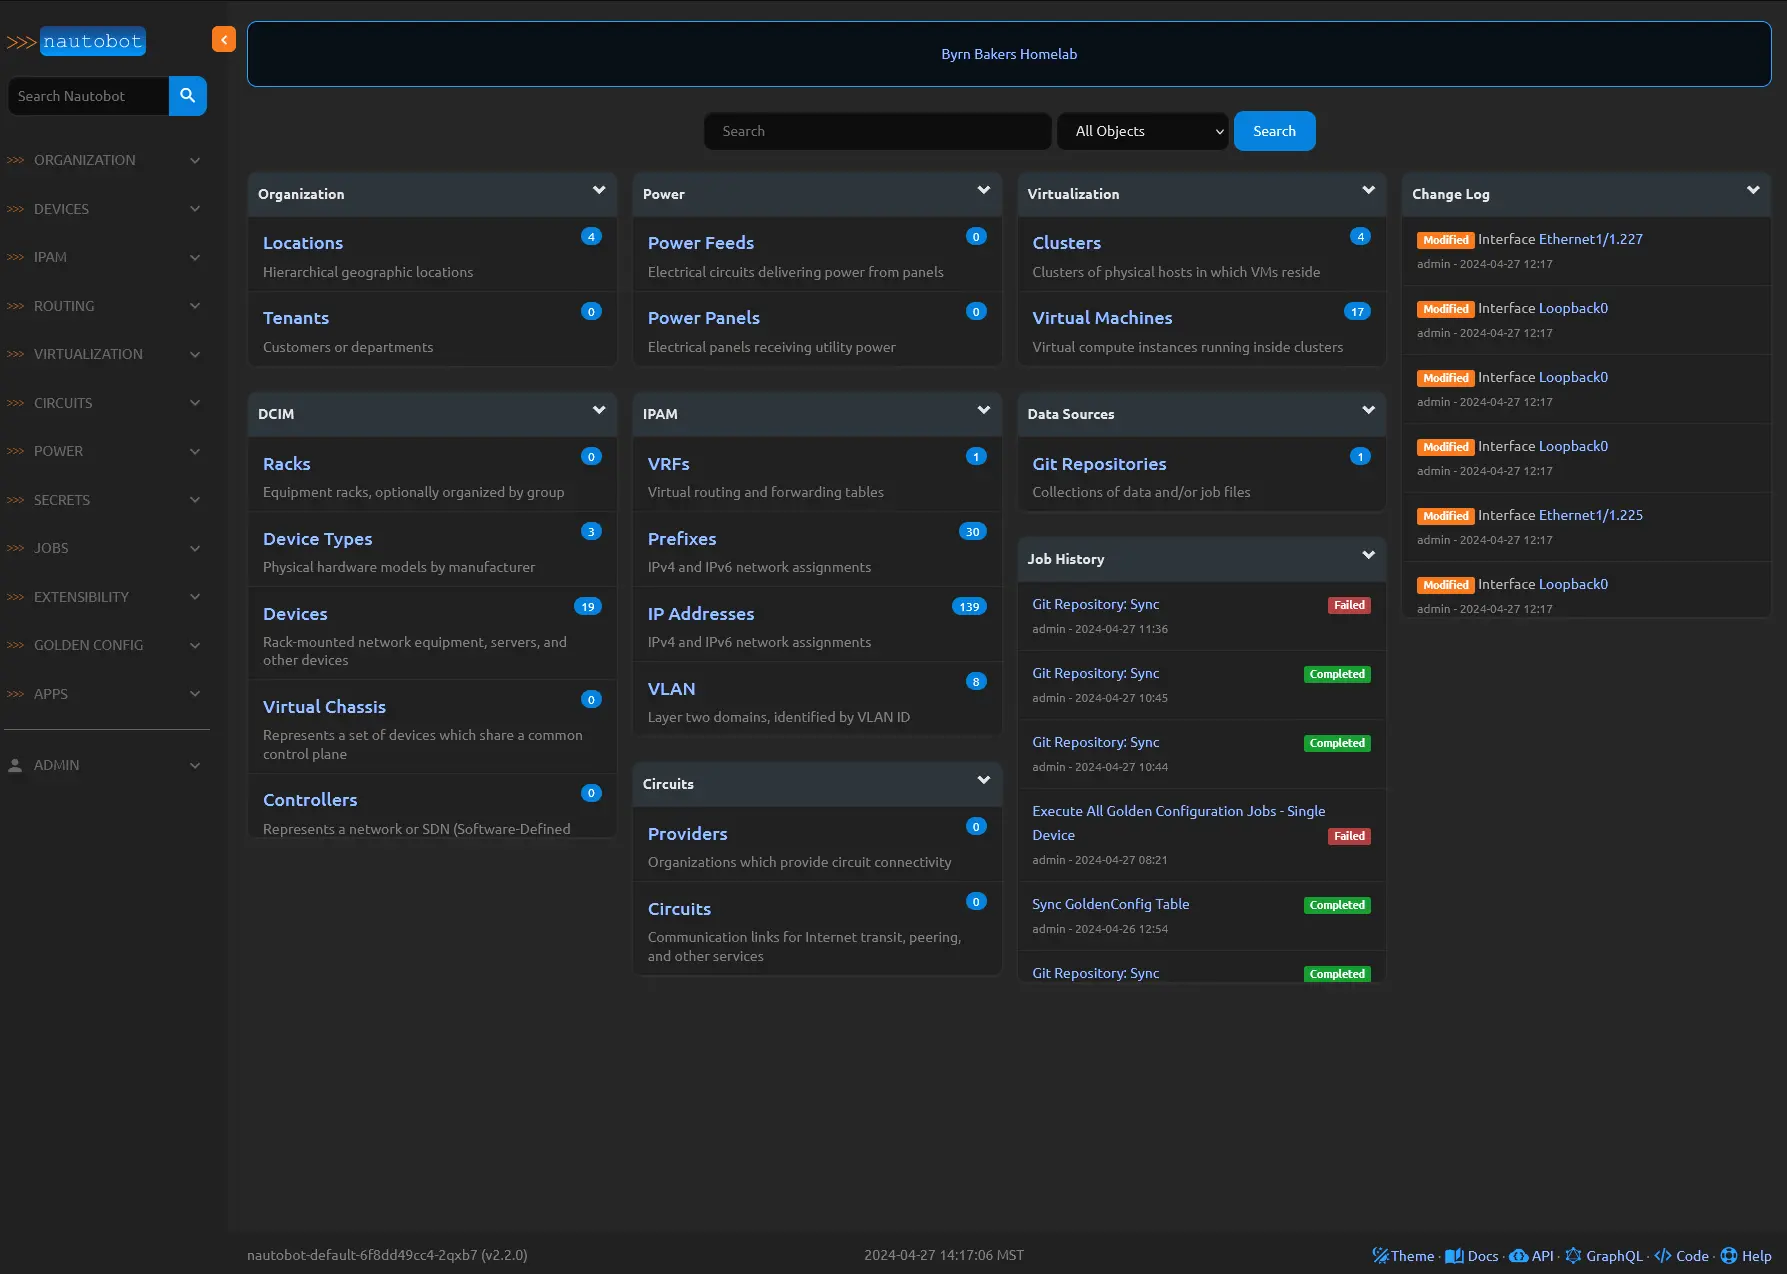 Here is the Nautobot Homepage you get an idea of how things are organized and it also provides a change log, so you can track the who, what, when of any changes.
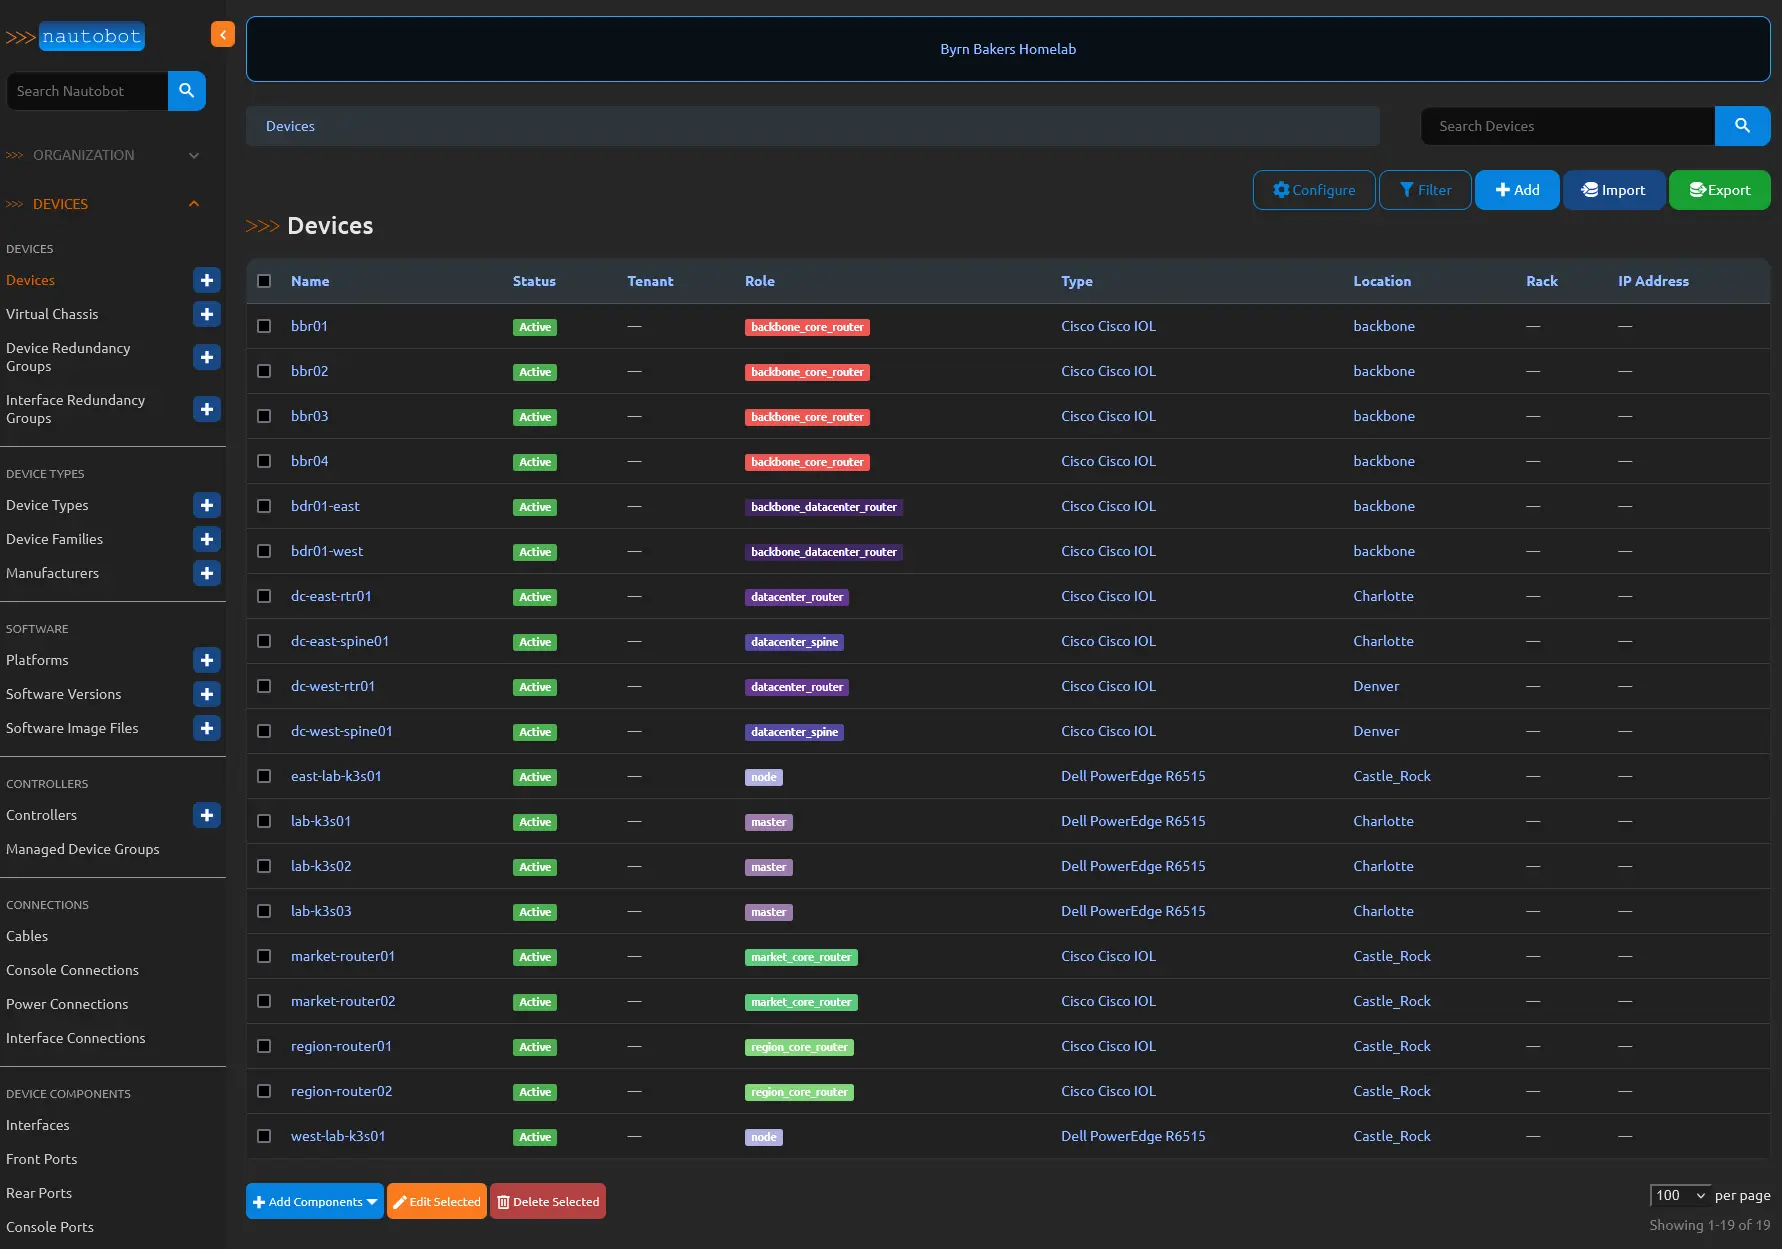 Drilling into devices you get a table that can be customized to show or not show any of the device attributes
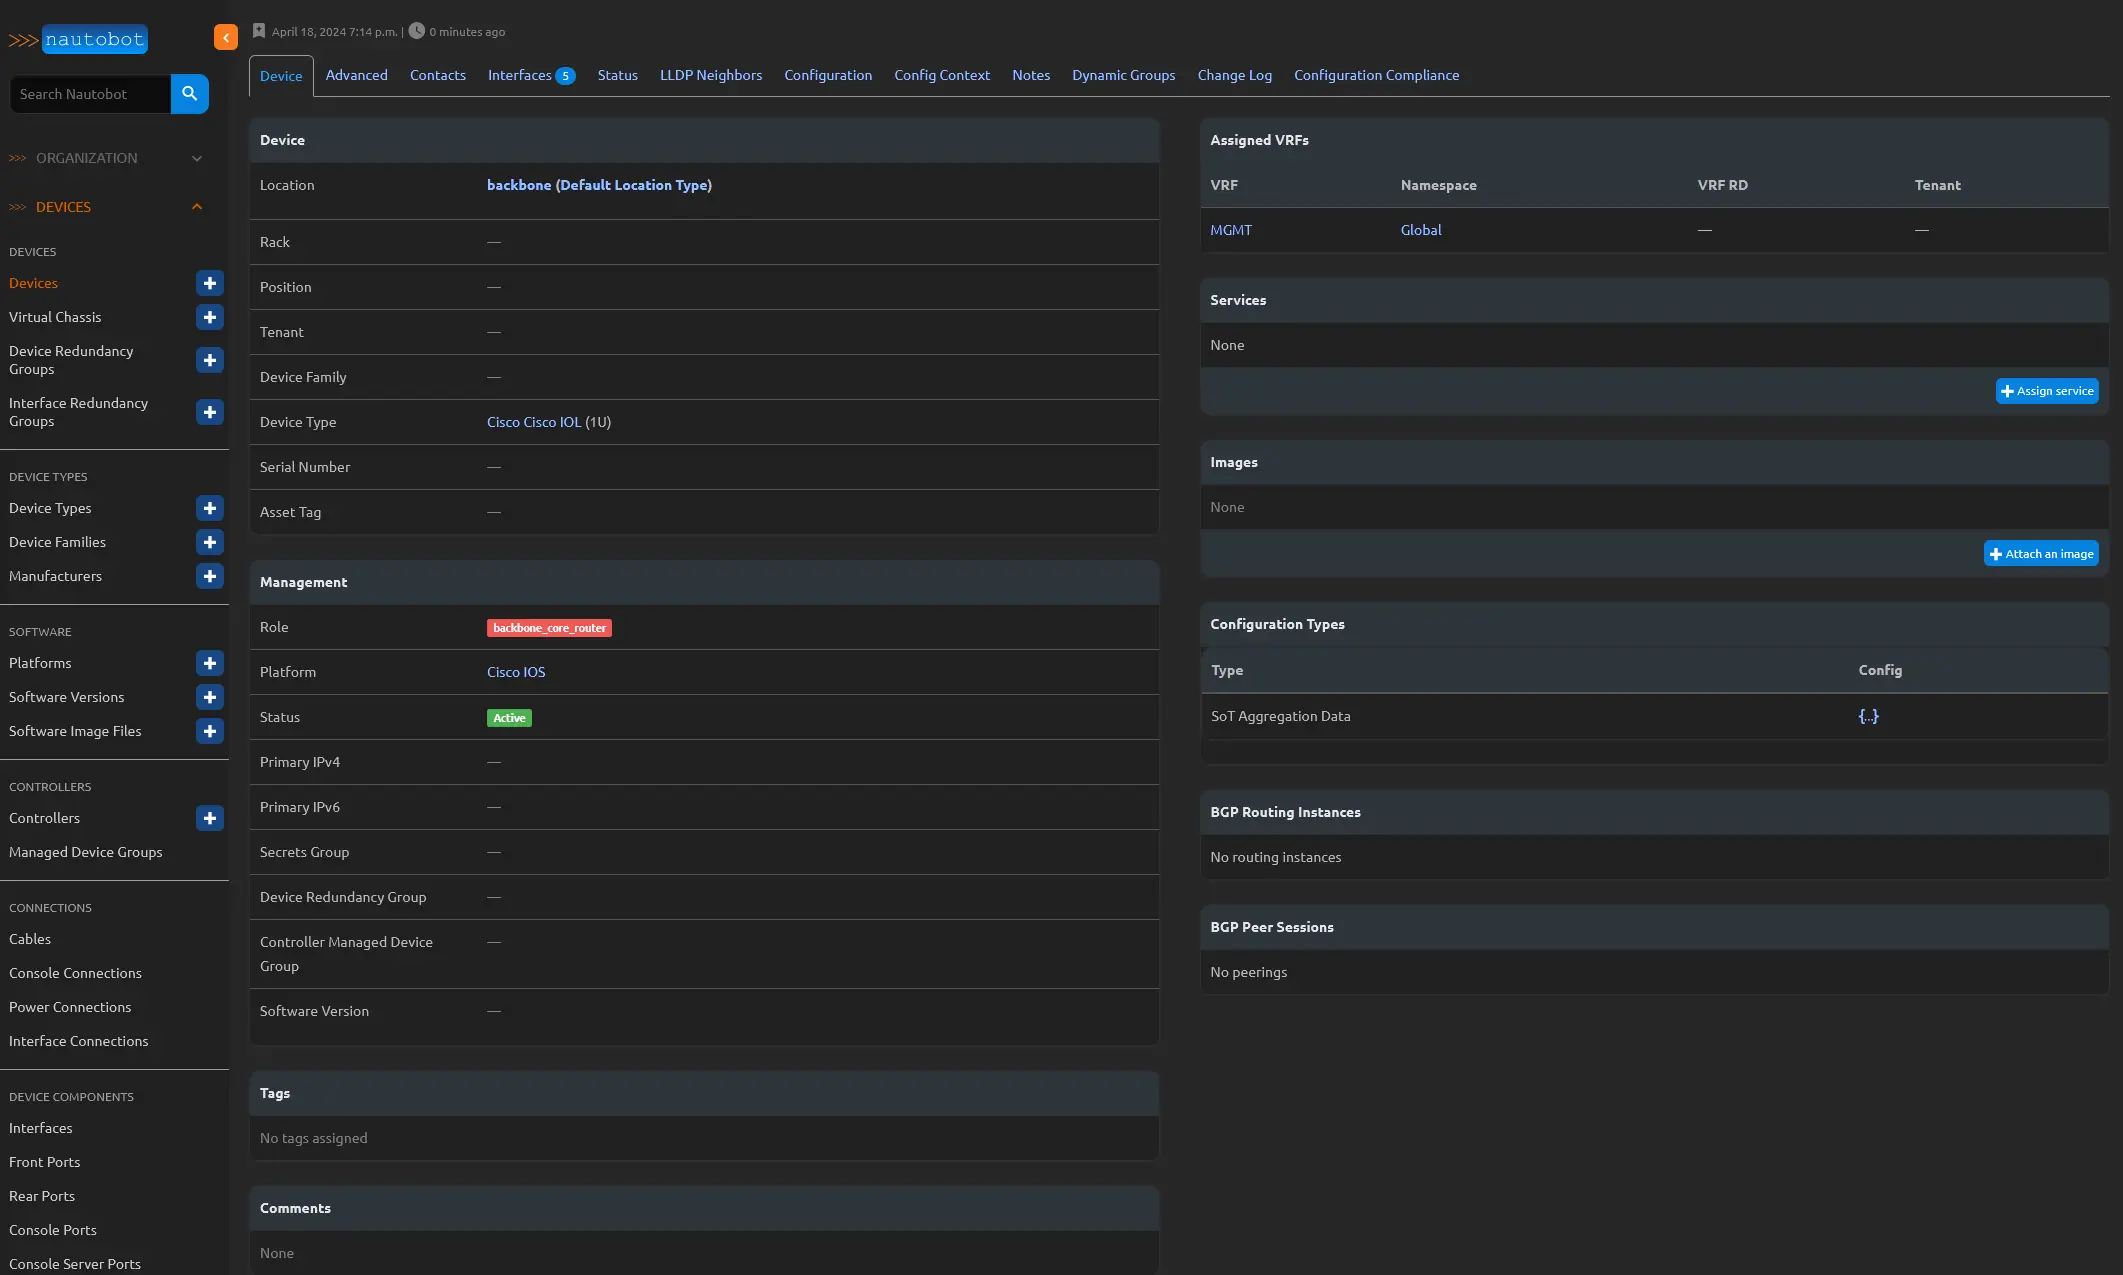 In the device details for BBR01, you can easily access crucial information such as the device type, role, status, and the assigned platform. The platform, in this context, serves as a repository for data that can be utilized by Ansible and Napalm.
If Napalm is configured, it can use the primary IP assignment to log into the device, retrieve the configuration, and display it under the configuration tab. This functionality becomes even more powerful when combined with the Nautobot Golden Configuration App, which allows you to track the intended configuration and compare it with the actual configuration. This ensures compliance between the two and provides a robust mechanism for maintaining a reliable and secure network.
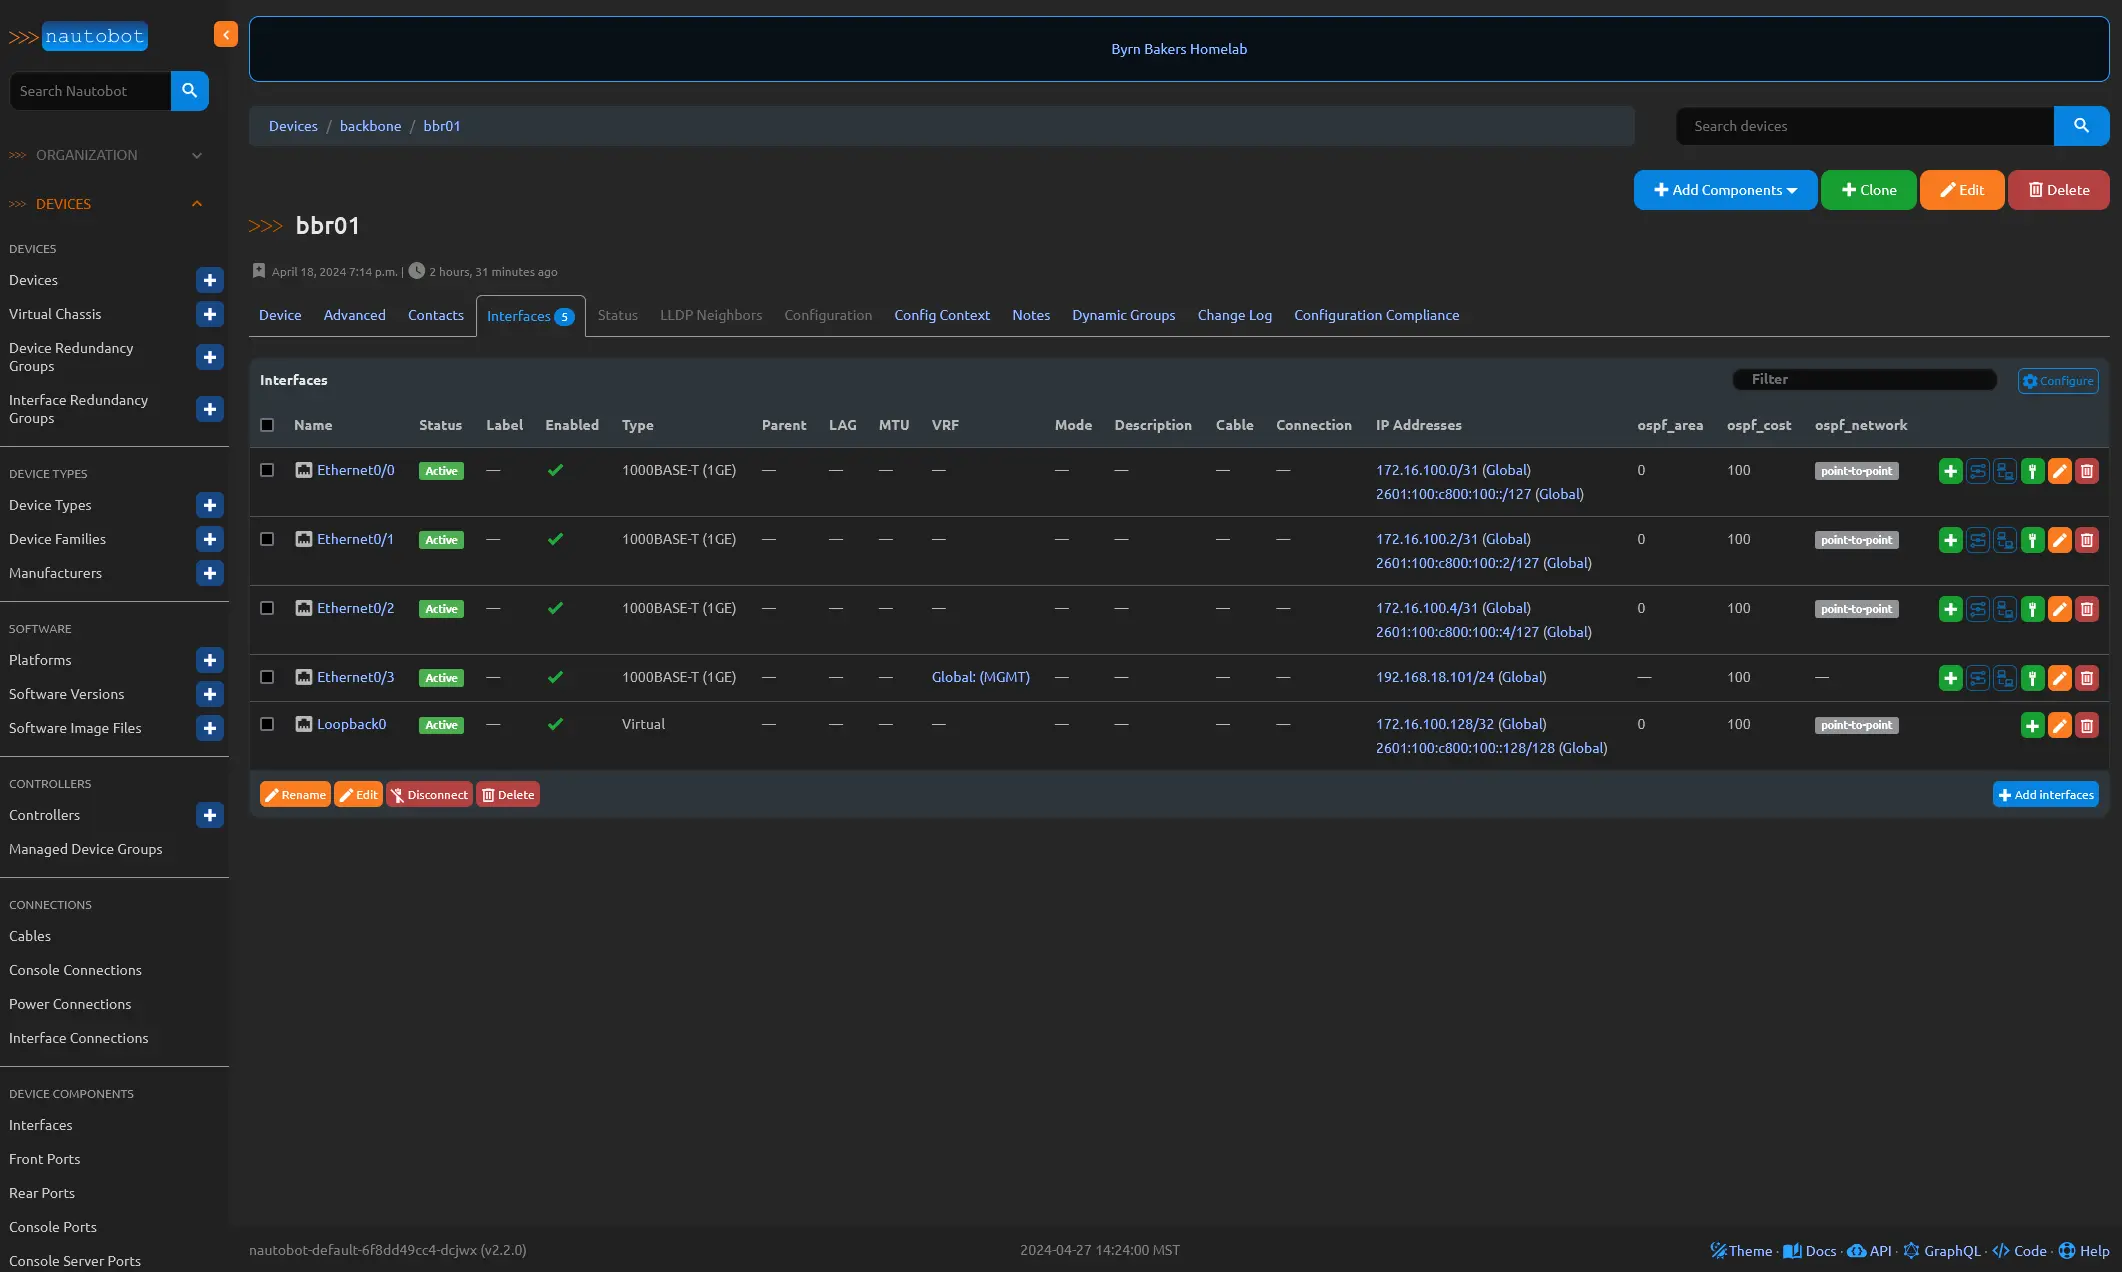 The Device Interfaces feature in Nautobot is, indeed, as straightforward as it sounds. However, what sets Nautobot apart is its ability to define custom fields that can be linked to any of the app’s database tables. In the example provided, you’ll notice that I’ve created a few custom fields specifically tailored for OSPF configuration. This allows me to maintain my intended configuration at the interface level for the Interior Gateway Protocol (IGP). By leveraging Nautobot’s custom fields, you can easily manage and customize your network configurations to suit your specific requirements.
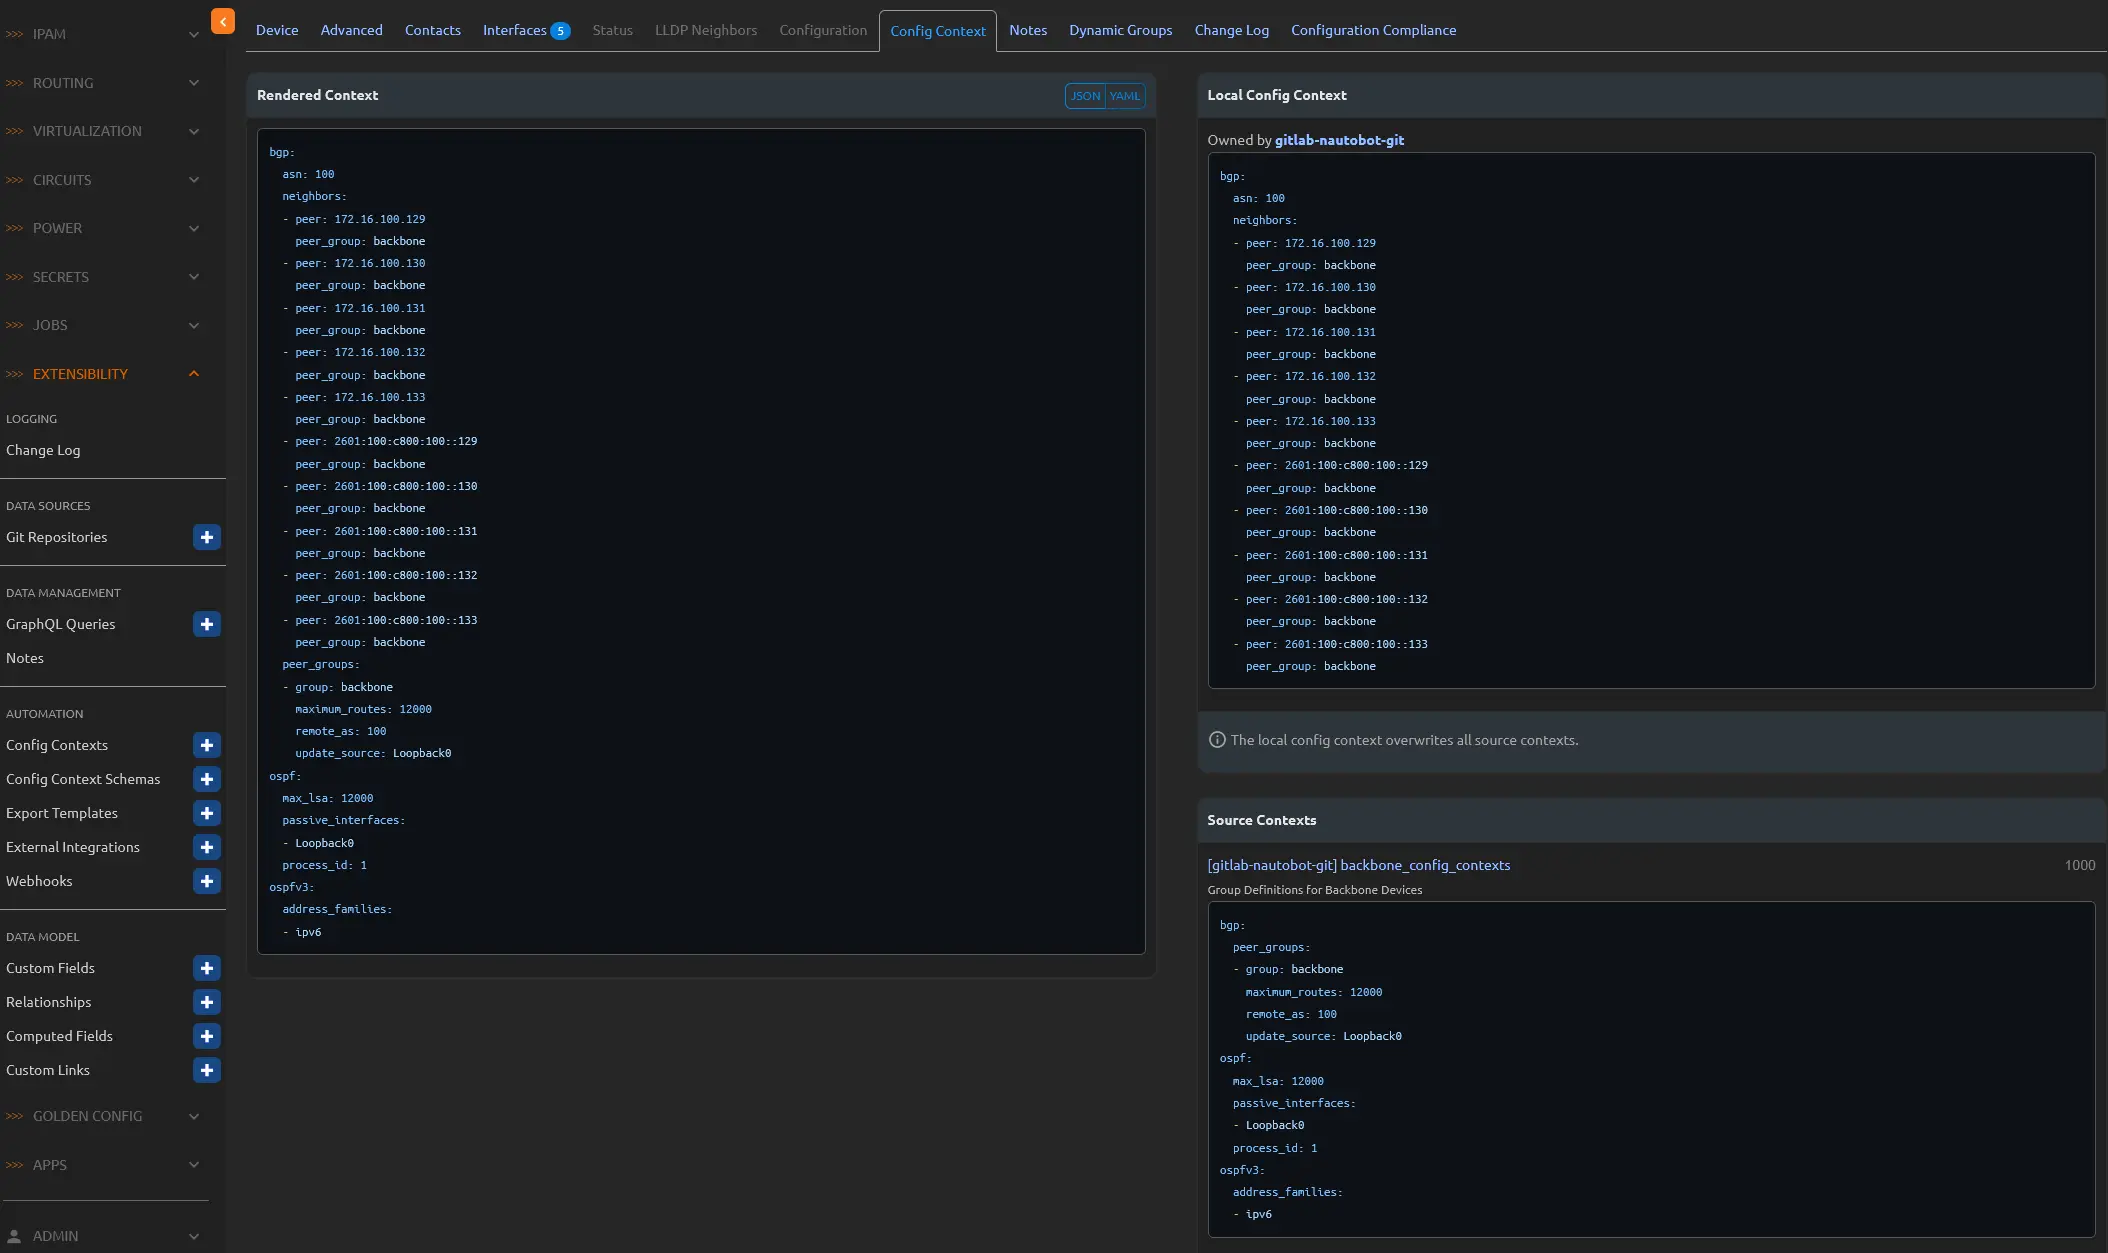 One of Nautobot’s most impressive features is the Device Config Context, which enables the assignment of specific configurations to individual devices or based on roles, among other criteria. With the ability to weight contexts, you can ensure that lower-weighted contexts do not overwrite higher-weighted ones. This means you can establish a default configuration that applies to all devices unless a specific context is assigned. In the example provided, I use this feature to assign device-specific BGP attributes, role-specific BGP Peer groups, and OSPF attributes.
On the right side of the interface, you’ll find two distinct contexts: “Local Config Context” and “Source Contexts.” The Local Config Context is unique to the specific device, while the Source Context can be assigned to groups of devices based on various criteria, such as roles.
On the left side, the contexts are rendered into a well-organized YAML output, which can be used, for example, to generate configurations using Jinja Templates.
The best part? These contexts can be managed in Git! As a tool that can aggregate multiple sources of truth, Nautobot can import from Git repositories where Configuration Contexts and other elements can be stored and synchronized with Nautobot.
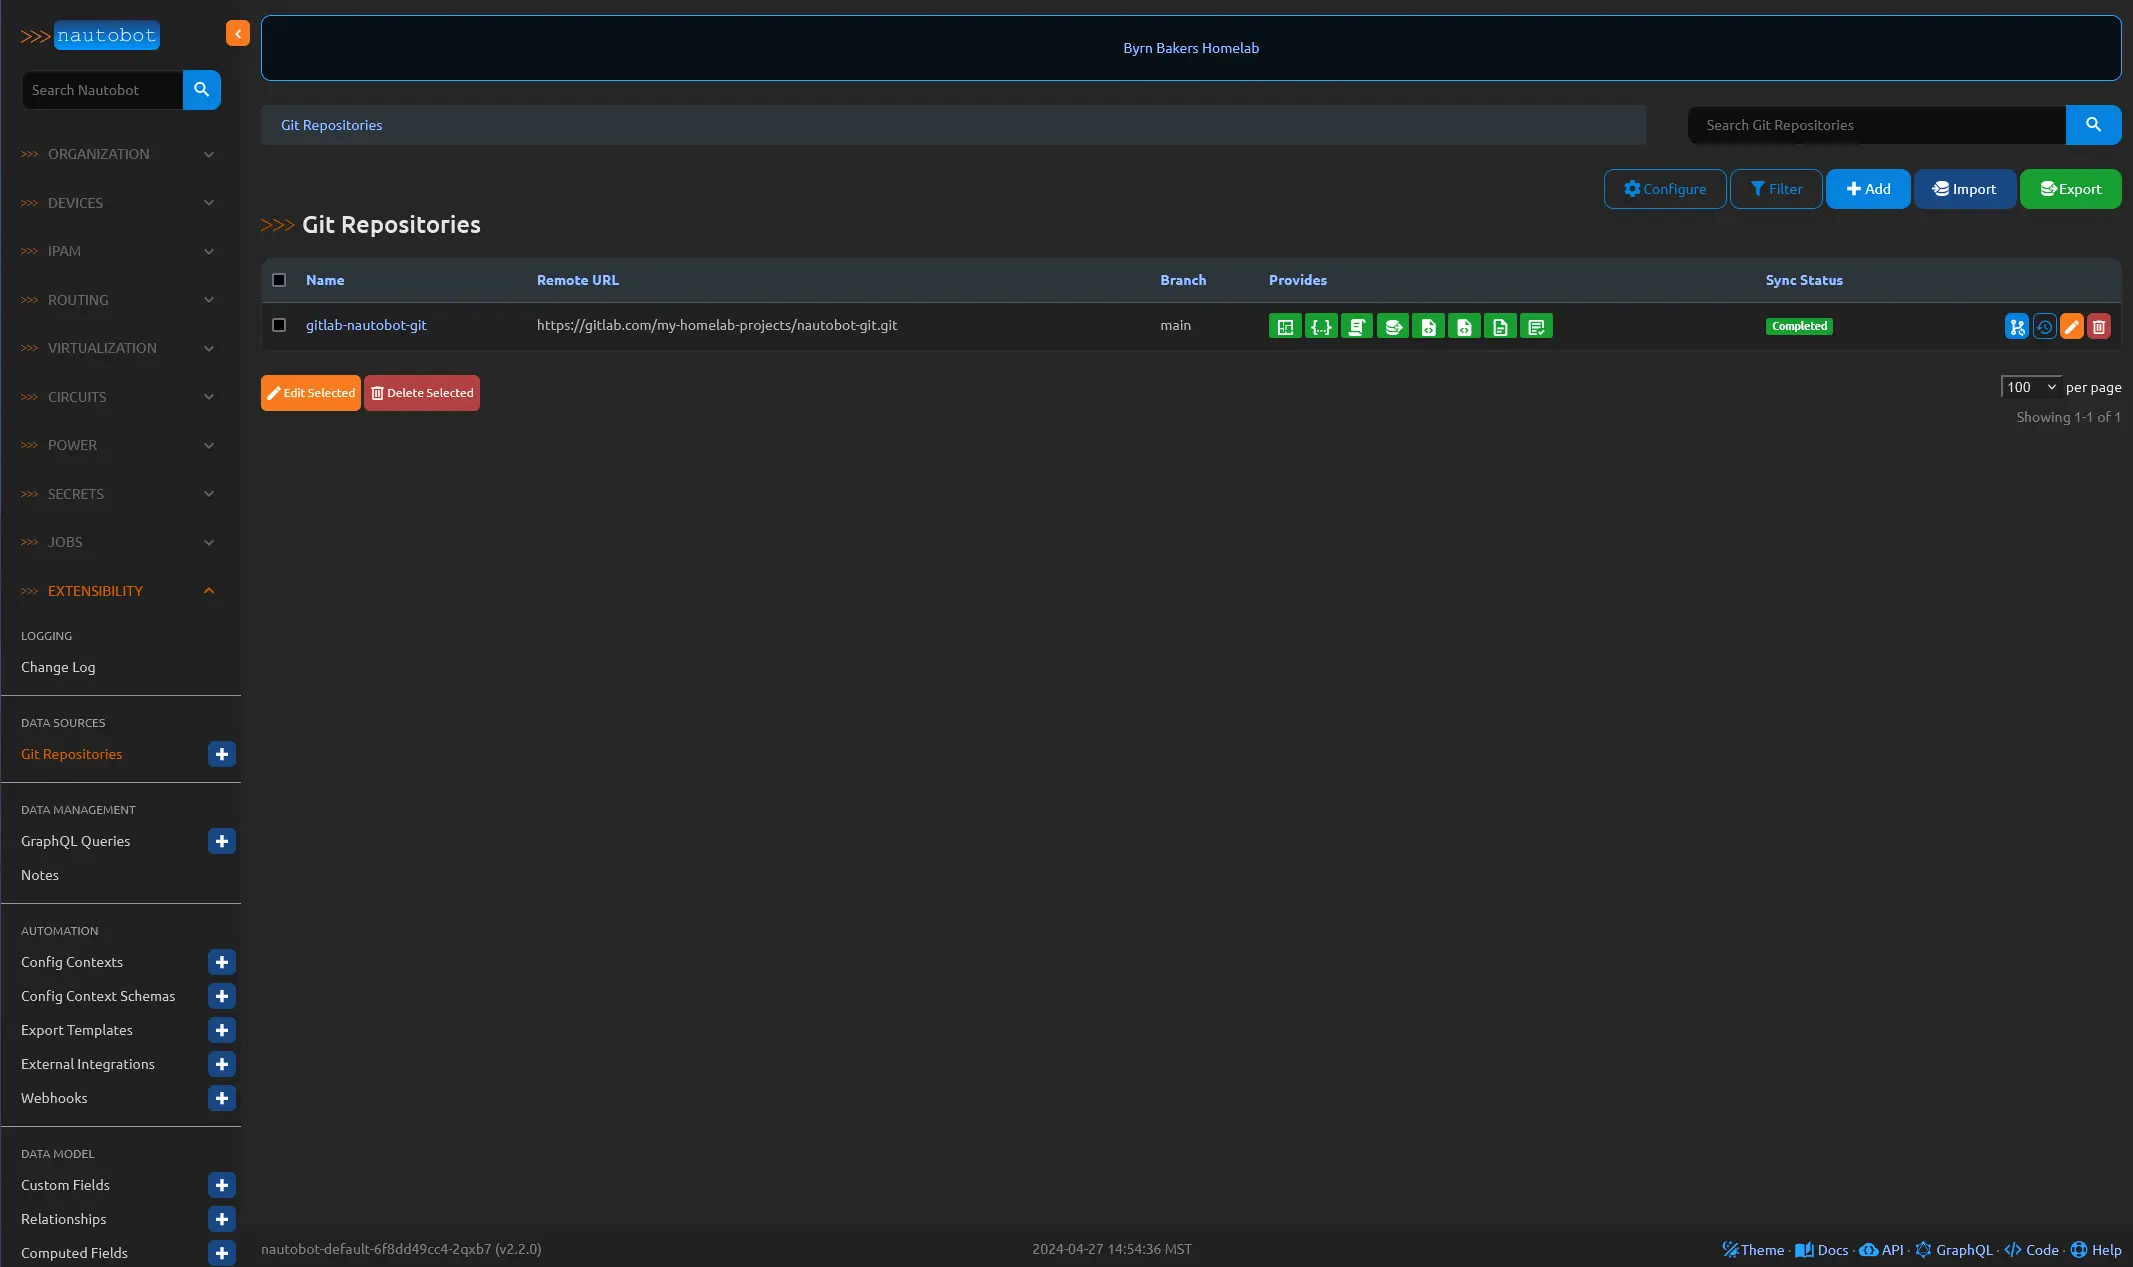 In Extensibility - Data Sources, Nautobot provides a feature that allows for the configuration of a Git repository to organize various elements, such as config contexts. This approach not only simplifies data management but also enables the creation of schemas to govern the content of these contexts.
Furthermore, Nautobot offers the power of “Jobs,” a versatile tool that can execute a wide range of tasks, from simple interface adjustments to more complex, real-time device modifications. Imagine the ease of disabling a live interface with just a click, without ever leaving the Nautobot interface. This seamless integration of Git repositories and Nautobot’s job capabilities not only streamlines network management but also unlocks a world of possibilities for network automation.
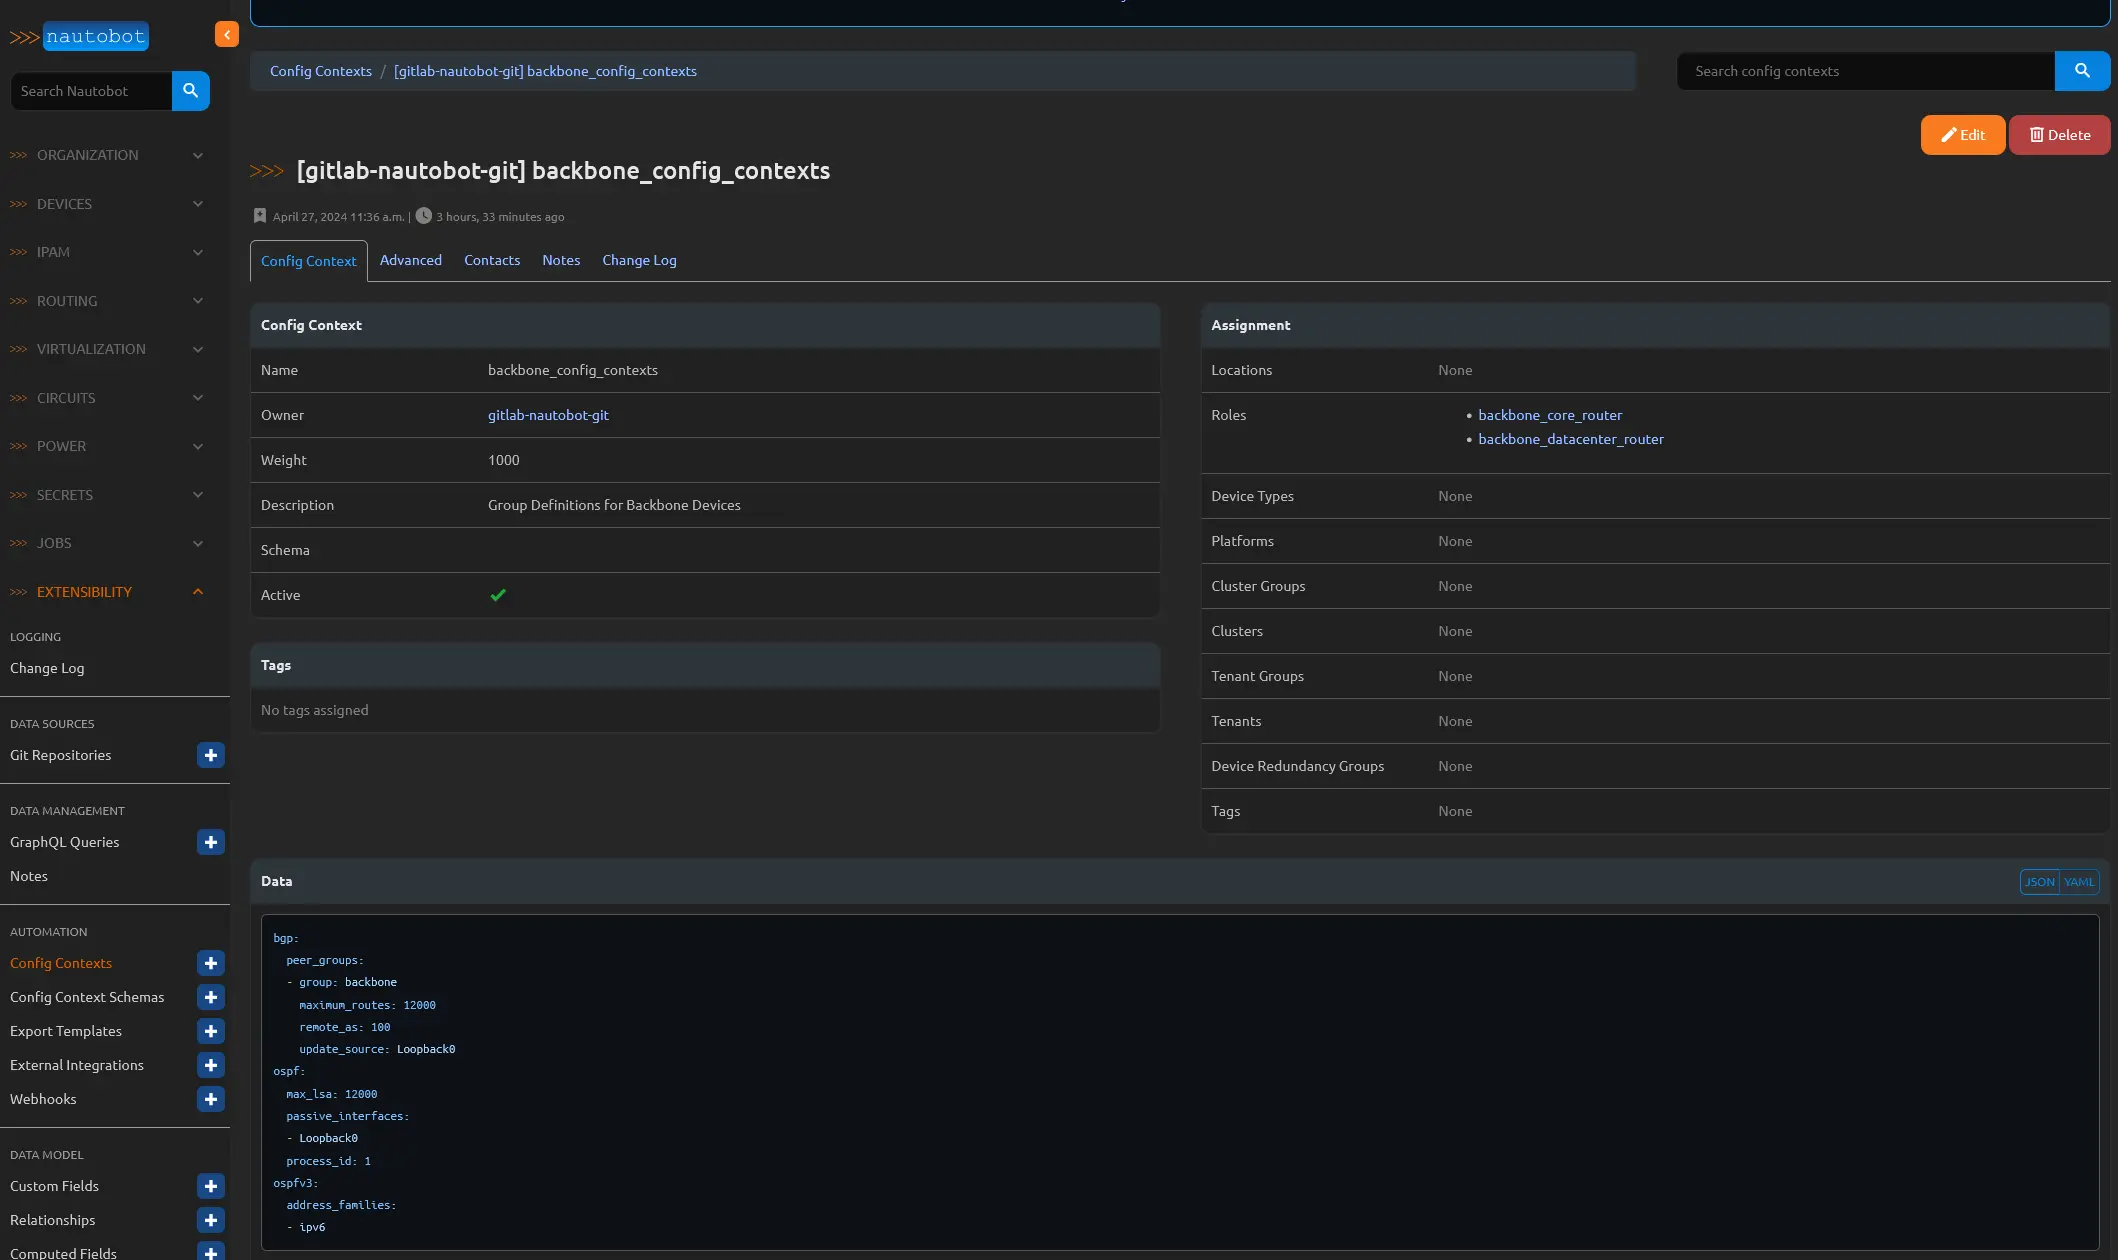 Here is an example of a config context that was synced from the git repo and would be assigned by a Role.
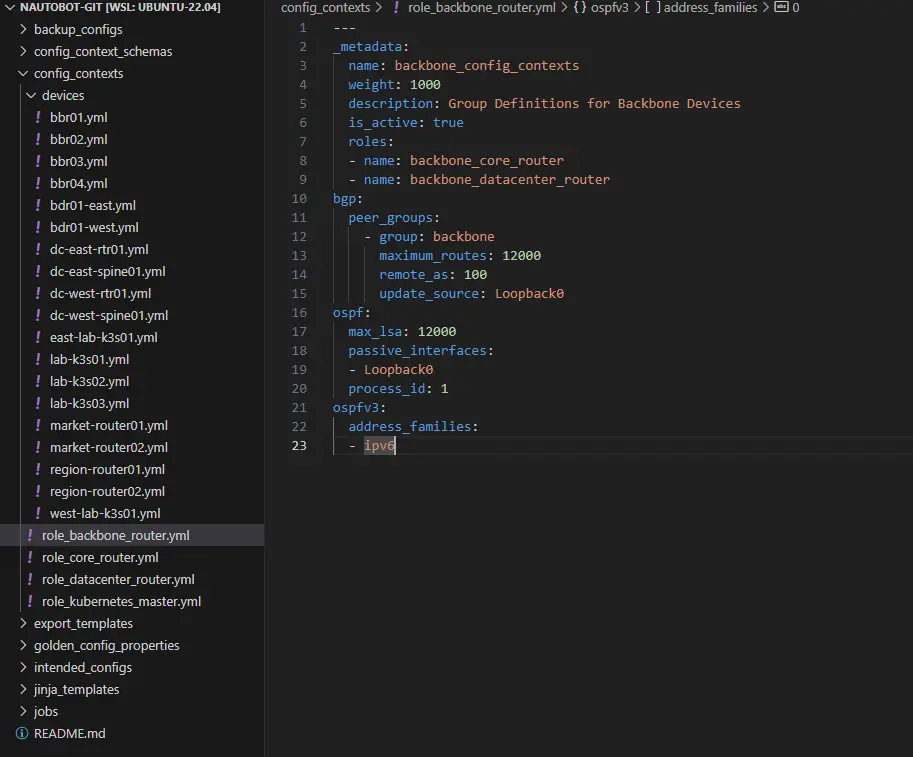 In the Git repository, you can organize your data using folders to easily sync various elements with Nautobot. Continuing with the config contexts example, you can create a folder named “config_contexts” that contains YAML files for each device role you wish to assign a context to. Additionally, you can create a nested folder called “devices” to apply specific contexts based on the device name.
In the “role_backbone_router.yml” file, you’ll notice that a “_metadata” tag is used at the top. When this file is synced to Nautobot, the metadata is utilized to configure the Config Contexts section in Nautobot’s Extensibility settings. This approach not only simplifies the management of your network configurations but also provides a seamless integration between your Git repository and Nautobot.
Under the bbr01.yml you just build the yaml with the configuration that you want to see rendered as part of the overal config context.
1
2
3
4
5
6
7
8
9
10
11
12
13
14
15
16
17
18
19
20
21
22
23
bgp:
  asn: 100
  neighbors:
  - peer: 172.16.100.129
    peer_group: backbone
  - peer: 172.16.100.130
    peer_group: backbone
  - peer: 172.16.100.131
    peer_group: backbone
  - peer: 172.16.100.132
    peer_group: backbone
  - peer: 172.16.100.133
    peer_group: backbone
  - peer: 2601:100:c800:100::129
    peer_group: backbone
  - peer: 2601:100:c800:100::130
    peer_group: backbone
  - peer: 2601:100:c800:100::131
    peer_group: backbone
  - peer: 2601:100:c800:100::132
    peer_group: backbone
  - peer: 2601:100:c800:100::133
    peer_group: backbone
How do I get this data out of Nautobot so I can use it?
Nautobot boasts a stellar API and comprehensive API documentation, complemented by GraphQL capabilities, which empower users to extract all the necessary information for crafting a tailored device configuration. Let’s delve into this remarkable feature and explore its potential.
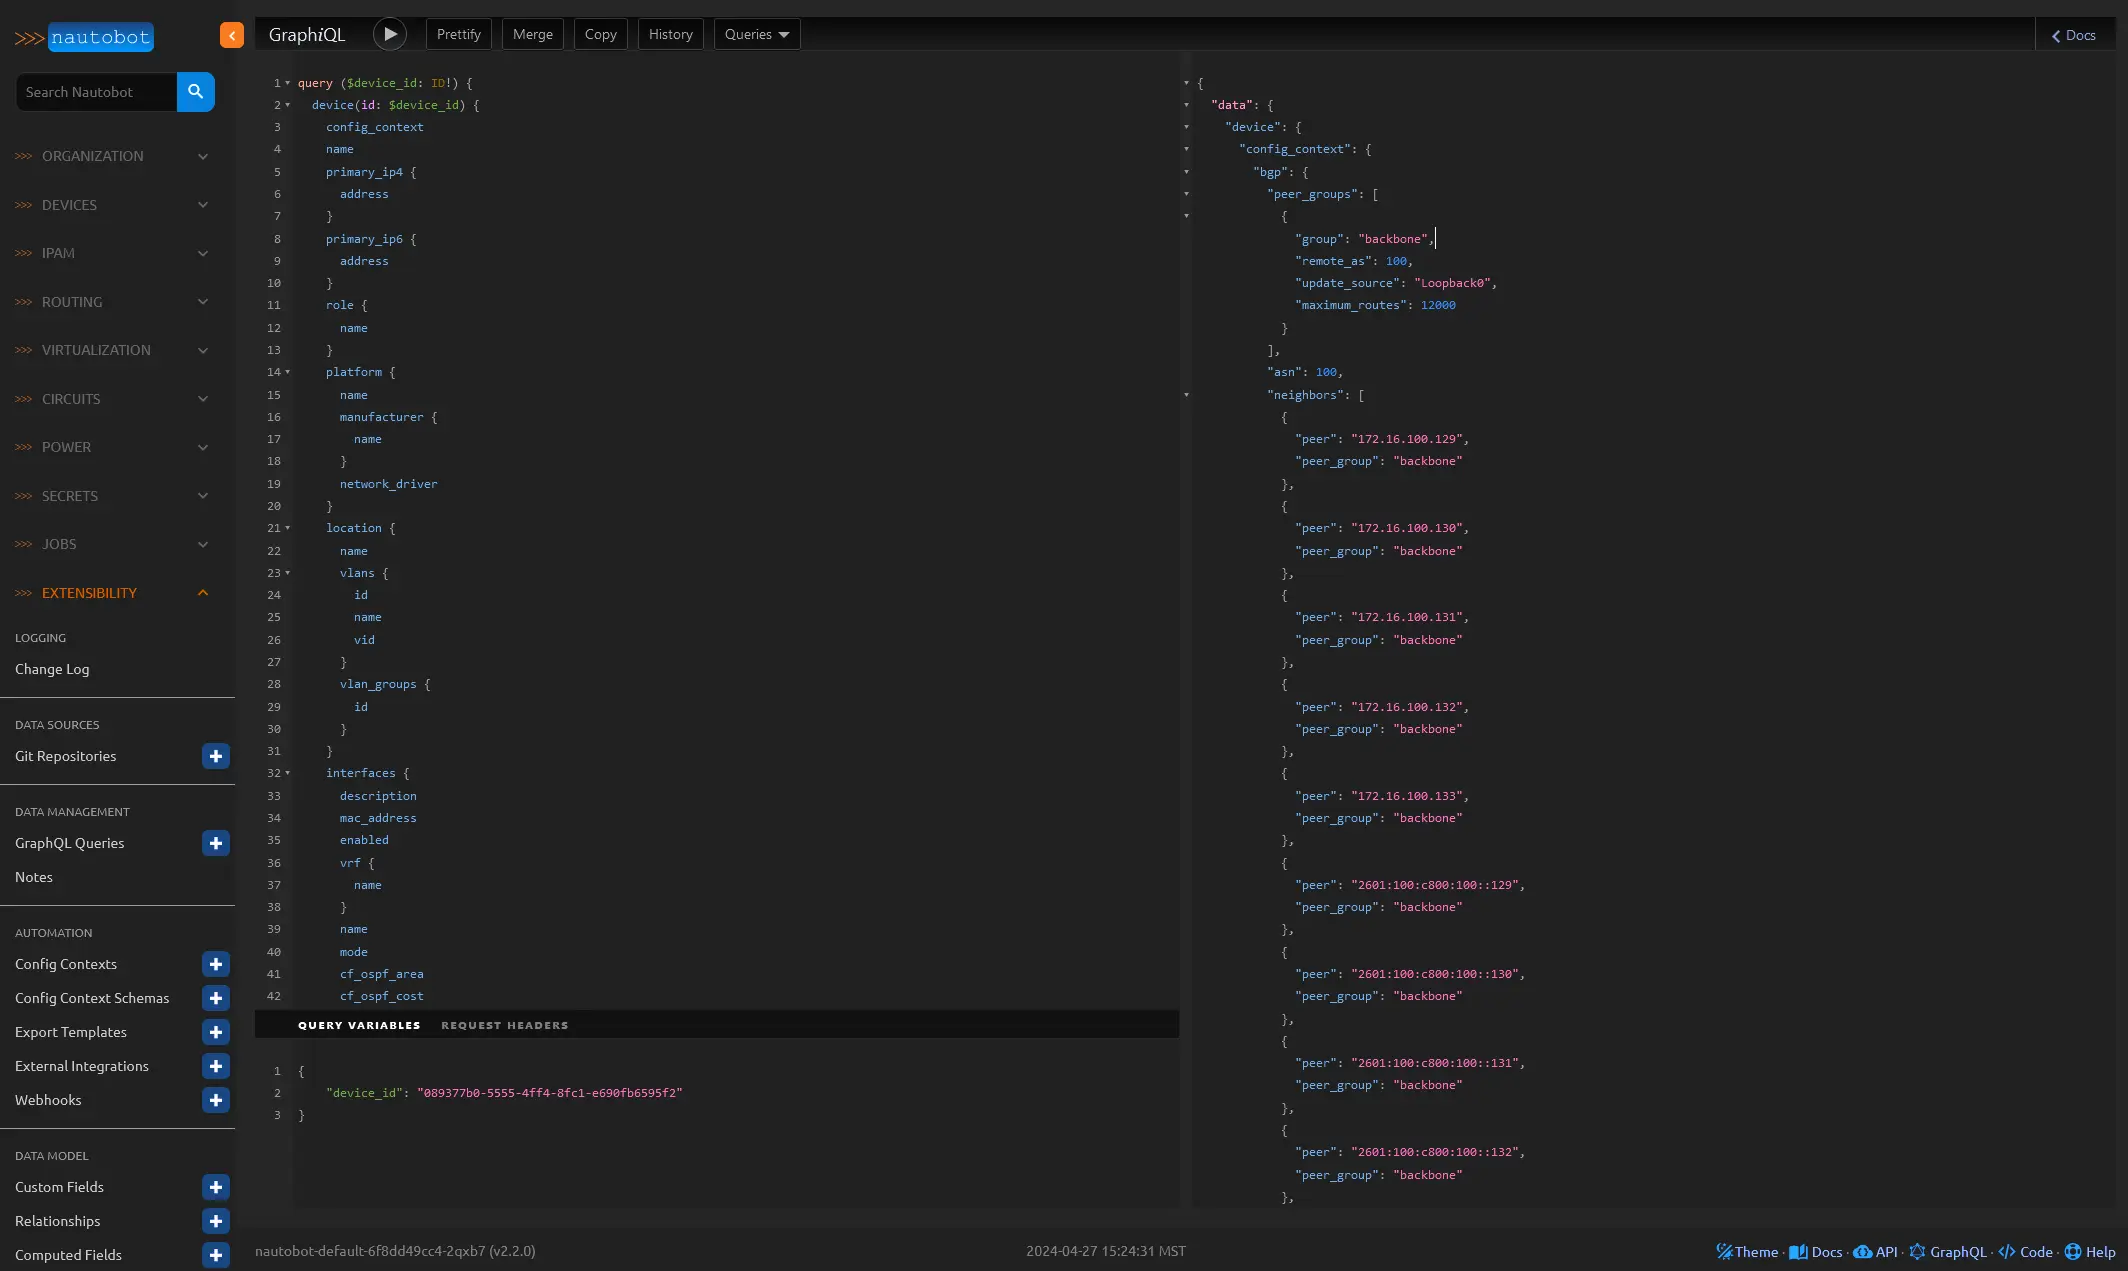 On the left, you’ll find an example GraphQL query that is based on the BBR01 device’s UUID. The query’s output, displayed on the right, showcases the wealth of data available for crafting a device configuration template.
The beauty of this approach lies in the standardization of the data format, which ensures consistent results across different device types, interface counts, and OSPF requirements. By leveraging Nautobot’s GraphQL capabilities, you can streamline the configuration template creation process and maintain a high level of reliability and efficiency in your network management.
Here is the full query
1
2
3
4
5
6
7
8
9
10
11
12
13
14
15
16
17
18
19
20
21
22
23
24
25
26
27
28
29
30
31
32
33
34
35
36
37
38
39
40
41
42
43
44
45
46
47
48
49
50
51
52
53
54
55
56
57
58
59
60
61
62
63
64
65
66
67
68
69
70
71
72
73
74
75
76
77
78
79
80
81
query ($device_id: ID!) {
  device(id: $device_id) {
    config_context
    name
    primary_ip4 {
      address
    }
    primary_ip6 {
      address
    }
    role {
      name
    }
    platform {
      name
      manufacturer {
        name
      }
      network_driver
    }
    location {
      name
      vlans {
        id
        name
        vid
      }
      vlan_groups {
        id
      }
    }
    interfaces {
      description
      mac_address
      enabled
      vrf {
        name
      }
      name
      mode
      cf_ospf_area
      cf_ospf_cost
      cf_ospf_network
      cf_ospf_priority
      ip_addresses {
        address
      }
      connected_circuit_termination {
        circuit {
          cid
          commit_rate
          provider {
            name
          }
        }
      }
      tagged_vlans {
        vid
      }
      untagged_vlan {
        vid
      }
      cable {
        termination_a_type
        status {
          name
        }
        color
      }
      tagged_vlans {
        locations {
          name
        }
        id
      }
      tags {
        id
      }
    }
  }
}
And here is the full result
1
2
3
4
5
6
7
8
9
10
11
12
13
14
15
16
17
18
19
20
21
22
23
24
25
26
27
28
29
30
31
32
33
34
35
36
37
38
39
40
41
42
43
44
45
46
47
48
49
50
51
52
53
54
55
56
57
58
59
60
61
62
63
64
65
66
67
68
69
70
71
72
73
74
75
76
77
78
79
80
81
82
83
84
85
86
87
88
89
90
91
92
93
94
95
96
97
98
99
100
101
102
103
104
105
106
107
108
109
110
111
112
113
114
115
116
117
118
119
120
121
122
123
124
125
126
127
128
129
130
131
132
133
134
135
136
137
138
139
140
141
142
143
144
145
146
147
148
149
150
151
152
153
154
155
156
157
158
159
160
161
162
163
164
165
166
167
168
169
170
171
172
173
174
175
176
177
178
179
180
181
182
183
184
185
186
187
188
189
190
191
192
193
194
195
196
197
198
199
200
201
202
203
204
205
206
207
208
209
210
211
212
213
214
215
216
217
{
  "data": {
    "device": {
      "config_context": {
        "bgp": {
          "peer_groups": [
            {
              "group": "backbone",
              "remote_as": 100,
              "update_source": "Loopback0",
              "maximum_routes": 12000
            }
          ],
          "asn": 100,
          "neighbors": [
            {
              "peer": "172.16.100.129",
              "peer_group": "backbone"
            },
            {
              "peer": "172.16.100.130",
              "peer_group": "backbone"
            },
            {
              "peer": "172.16.100.131",
              "peer_group": "backbone"
            },
            {
              "peer": "172.16.100.132",
              "peer_group": "backbone"
            },
            {
              "peer": "172.16.100.133",
              "peer_group": "backbone"
            },
            {
              "peer": "2601:100:c800:100::129",
              "peer_group": "backbone"
            },
            {
              "peer": "2601:100:c800:100::130",
              "peer_group": "backbone"
            },
            {
              "peer": "2601:100:c800:100::131",
              "peer_group": "backbone"
            },
            {
              "peer": "2601:100:c800:100::132",
              "peer_group": "backbone"
            },
            {
              "peer": "2601:100:c800:100::133",
              "peer_group": "backbone"
            }
          ]
        },
        "ospf": {
          "max_lsa": 12000,
          "process_id": 1,
          "passive_interfaces": [
            "Loopback0"
          ]
        },
        "ospfv3": {
          "address_families": [
            "ipv6"
          ]
        }
      },
      "name": "bbr01",
      "primary_ip4": null,
      "primary_ip6": null,
      "role": {
        "name": "backbone_core_router"
      },
      "platform": {
        "name": "Cisco IOS",
        "manufacturer": {
          "name": "Cisco"
        },
        "network_driver": "cisco.ios"
      },
      "location": {
        "name": "backbone",
        "vlans": [],
        "vlan_groups": []
      },
      "interfaces": [
        {
          "description": "",
          "mac_address": null,
          "enabled": true,
          "vrf": null,
          "name": "Ethernet0/0",
          "mode": null,
          "cf_ospf_area": 0,
          "cf_ospf_cost": 100,
          "cf_ospf_network": "point-to-point",
          "cf_ospf_priority": null,
          "ip_addresses": [
            {
              "address": "172.16.100.0/31"
            },
            {
              "address": "2601:100:c800:100::/127"
            }
          ],
          "connected_circuit_termination": null,
          "tagged_vlans": [],
          "untagged_vlan": null,
          "cable": null,
          "tags": []
        },
        {
          "description": "",
          "mac_address": null,
          "enabled": true,
          "vrf": null,
          "name": "Ethernet0/1",
          "mode": null,
          "cf_ospf_area": 0,
          "cf_ospf_cost": 100,
          "cf_ospf_network": "point-to-point",
          "cf_ospf_priority": null,
          "ip_addresses": [
            {
              "address": "172.16.100.2/31"
            },
            {
              "address": "2601:100:c800:100::2/127"
            }
          ],
          "connected_circuit_termination": null,
          "tagged_vlans": [],
          "untagged_vlan": null,
          "cable": null,
          "tags": []
        },
        {
          "description": "",
          "mac_address": null,
          "enabled": true,
          "vrf": null,
          "name": "Ethernet0/2",
          "mode": null,
          "cf_ospf_area": 0,
          "cf_ospf_cost": 100,
          "cf_ospf_network": "point-to-point",
          "cf_ospf_priority": null,
          "ip_addresses": [
            {
              "address": "172.16.100.4/31"
            },
            {
              "address": "2601:100:c800:100::4/127"
            }
          ],
          "connected_circuit_termination": null,
          "tagged_vlans": [],
          "untagged_vlan": null,
          "cable": null,
          "tags": []
        },
        {
          "description": "",
          "mac_address": null,
          "enabled": true,
          "vrf": {
            "name": "MGMT"
          },
          "name": "Ethernet0/3",
          "mode": null,
          "cf_ospf_area": null,
          "cf_ospf_cost": 100,
          "cf_ospf_network": null,
          "cf_ospf_priority": null,
          "ip_addresses": [
            {
              "address": "192.168.18.101/24"
            }
          ],
          "connected_circuit_termination": null,
          "tagged_vlans": [],
          "untagged_vlan": null,
          "cable": null,
          "tags": []
        },
        {
          "description": "",
          "mac_address": null,
          "enabled": true,
          "vrf": null,
          "name": "Loopback0",
          "mode": null,
          "cf_ospf_area": 0,
          "cf_ospf_cost": 100,
          "cf_ospf_network": "point-to-point",
          "cf_ospf_priority": null,
          "ip_addresses": [
            {
              "address": "172.16.100.128/32"
            },
            {
              "address": "2601:100:c800:100::128/128"
            }
          ],
          "connected_circuit_termination": null,
          "tagged_vlans": [],
          "untagged_vlan": null,
          "cable": null,
          "tags": []
        }
      ]
    }
  }
}
This exploration is becoming quite comprehensive! In the next post, we’ll dive into the fascinating world of using Ansible with Nautobot to generate device configurations and deploy them to your network devices. Stay tuned for practical examples and insights that will help you harness the power of this dynamic duo for your network management needs.